1. Introduction
The HIWONDER LX-824 is a high-performance 17KG torque bus servo designed for various robotic and control applications. It features three connectors for easy serial bus wiring, supports temperature, voltage, and position feedback, and offers both servo and gear motor operating modes. This manual provides detailed instructions for setting up, operating, and maintaining your LX-824 servo.
2. Product Features
- User-Friendly Ports: Utilizes serial bus servo connectors for daisy-chaining, simplifying wiring.
- Extended Lifespan: Engineered for reduced power consumption and increased service life.
- High Precision: Internal high-precision potentiometer enables accurate angle feedback.
- Versatile Control: Supports control via phone, dedicated handle, and computer software.
- Dual Operating Modes: Operates in Servo mode (0-240° rotation range) and Gear Motor mode (0-360° continuous rotation).
3. Package Contents
Please verify that all components are present in your package:
- HIWONDER LX-824 Bus Servo
- Connecting Cables
- Mounting Screws and Accessories
- Servo Horns/Brackets (may vary based on kit)

Image: HIWONDER LX-824 servo shown with various compatible mounting brackets and accessories.
4. Setup and Installation
The LX-824 servo is designed for easy integration into your projects. Follow these steps for proper setup:
4.1 Physical Installation
- Attach the appropriate servo horn or bracket to the servo output shaft using the provided screws.
- Mount the servo securely to your robot or structure using the mounting holes on the servo body and compatible brackets.

Image: Multiple HIWONDER LX-824 servos connected in a series using their three-port wiring system.
4.2 Wiring Connections
The LX-824 features three connectors for serial bus communication, allowing for daisy-chaining multiple servos. Connect the servos in series to your control board. Ensure correct polarity when connecting power.

Image: HIWONDER LX-824 servo with its serial bus connecting wires properly attached.
4.3 Bracket Assembly Demonstration
This video demonstrates the assembly of brackets with the LX-224 serial bus servo, which uses a similar three-connector design. This can be used as a general guide for LX-824 bracket assembly.
Video: Demonstration of bracket assembly for a similar serial bus servo, illustrating the process of attaching brackets and connecting wires.
5. Operating Instructions
The LX-824 servo offers flexible control options, including PC software debugging and offline control.
5.1 PC Software Debugging
Use the dedicated PC software to configure and test the servo. The software allows you to switch between Servo Mode and Motor Mode, adjust angles, speed, and monitor real-time feedback such as voltage, position, and temperature.

Image: Screenshot of the HIWONDER servo control software, showing options for servo and motor modes, and real-time feedback.
This video demonstrates how to use the PC software for debugging, including changing servo angles, direction, speed, and viewing real-time feedback.
Video: Tutorial on using the PC software to debug and control the serial bus servo, demonstrating mode switching, angle adjustment, and feedback monitoring.
5.2 Offline Control
The LX-824 supports offline control using compatible controllers, such as a PS2 controller, when connected to an appropriate control board. This allows for direct manipulation of the servo without a computer connection.
This video illustrates the offline control capabilities of the serial bus servo using a PS2 controller.
Video: Demonstration of offline control for the serial bus servo, showing how to operate multiple servos with a PS2 controller.
5.3 Operating Modes
- Servo Mode: Provides precise angular positioning within a 0-240° range. Ideal for applications requiring specific joint movements.
- Gear Motor Mode: Allows for continuous rotation over a 0-360° range, suitable for driving wheels or continuous rotation tasks.

Image: Visual representation of the two operating modes: Servo mode with a 240-degree range and Gear motor mode with 360-degree continuous rotation.
6. Maintenance
To ensure the longevity and optimal performance of your LX-824 servo, follow these maintenance guidelines:
- Keep Clean: Regularly clean the servo body to prevent dust and debris from entering the internal mechanisms.
- Avoid Overload: Do not exceed the specified torque limits (17KG·cm) to prevent damage to the gears and motor.
- Check Connections: Periodically inspect all wiring connections for looseness or damage.
- Temperature Monitoring: Utilize the temperature feedback feature to ensure the servo operates within safe temperature ranges, especially during prolonged use.

Image: Internal view of a servo, highlighting the durable copper and alloy gears designed for long service life.
7. Troubleshooting
If you encounter issues with your LX-824 servo, consider the following common problems and solutions:
- Servo Not Responding:
- Check all power and signal connections.
- Ensure the power supply voltage is within the specified range (6-8.4V).
- Verify the servo ID in the software matches the physical servo ID.
- Inaccurate Positioning:
- Recalibrate the servo using the PC software.
- Check for any mechanical obstructions or excessive load.
- Overheating:
- Reduce the load on the servo.
- Ensure adequate ventilation around the servo.
- Monitor temperature feedback via software.
8. Specifications
| Specification | Value |
|---|---|
| Product Dimensions | 1.57 x 0.79 x 2.01 inches (40 x 20.14 x 51.1 mm) |
| Item Weight | 2.24 ounces (57g) |
| Stalled Rotor Torque | 17kg·cm @ 7.4V |
| Rotation Speed | 0.20sec/60° @ 7.4V |
| Operating Voltage | 6-8.4V |
| Rotation Range (Servo Mode) | 0-240° |
| Rotation Range (Gear Motor Mode) | 0-360° |
| Gear Type | Brass Gear |
| Wire Length | 200mm |
| Servo Accuracy | 0.3° |
| No-load Current | 100mA |
| Stall Current | 2.4-3A |
| Communication Baud Rate | 115200 |
| Feedback Data | Temperature, Voltage, Position |
| Manufacturer Recommended Age | 14 years and up |
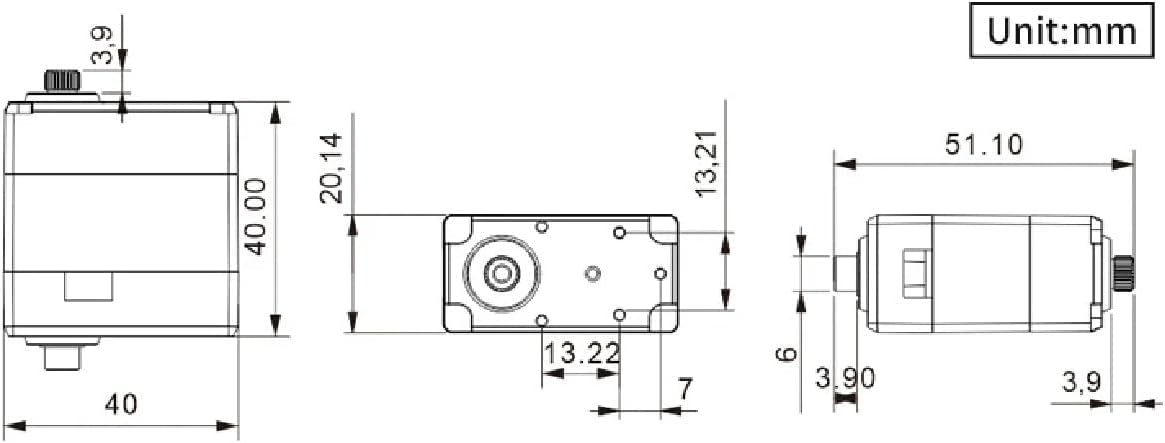
Image: Technical drawing showing the precise dimensions of the HIWONDER LX-824 servo in millimeters.
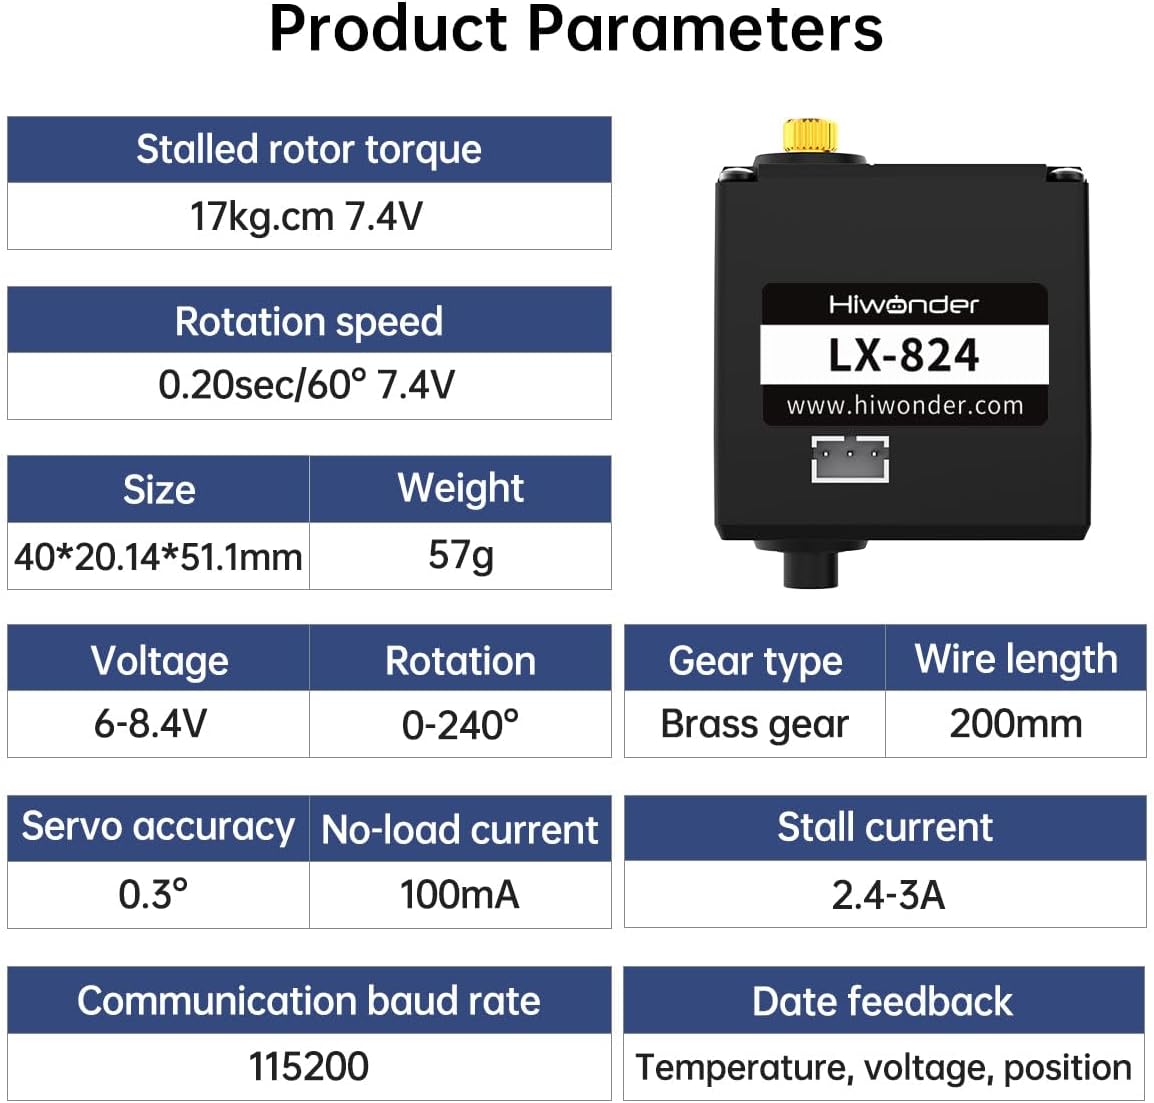
Image: A table summarizing the key product parameters and specifications of the HIWONDER LX-824 servo.
9. Warranty and Support
HIWONDER products are designed for reliability and performance. For specific warranty information and technical support, please refer to the official HIWONDER website or contact their customer service directly. Keep your purchase receipt for warranty claims.


