
1. Introduction
This manual provides detailed instructions for the safe and effective use of the QUECOO T12-959 Soldering Iron Station Kit. Please read this manual thoroughly before operating the device to ensure proper function and to prevent damage or injury. This soldering station is designed for electronic repair and general soldering tasks, offering rapid heating, precise temperature control, and automatic standby features.
2. Safety Instructions
- Always wear appropriate personal protective equipment, including safety glasses, when operating the soldering station.
- Ensure the work area is well-ventilated to avoid inhaling solder fumes. Use a fume extractor if available.
- Do not touch the soldering iron tip or heating element when the unit is powered on or hot. Temperatures can reach up to 500°C.
- Place the soldering iron in its designated stand when not in use. Never leave a hot iron unattended.
- Keep flammable materials away from the soldering station.
- Ensure the power cord is in good condition and properly connected to a grounded outlet.
- Do not operate the soldering station in wet or damp conditions.
- Unplug the unit from the power source before cleaning or performing any maintenance.
- Keep out of reach of children.
3. Product Overview and Components
The QUECOO T12-959 Soldering Iron Station Kit includes the following components:
- Soldering Station (Main Unit)
- Soldering Handle (M8 metal handle)
- Soldering Tips (K tip included, supports additional tips)
- Soldering Stand
- Power Cord
- Tin Gun (if included in specific kit)
- Tweezers (if included in specific kit)

Figure 3.1: QUECOO T12-959 Soldering Station with the connected soldering iron. The station features an LCD screen and a control knob.

Figure 3.2: All components included in the QUECOO T12-959 SET1 kit, showing the soldering station, soldering iron handle, power cord, and soldering tip.
Station Features:
- LCD Screen: Displays temperature, power, and settings.
- Control Knob: Used for adjusting temperature and navigating settings.
- Handle Interface: Connector for the soldering iron handle.
- Power Switch: On/Off control for the station.
- AC Power Interface: For connecting the power cord.
- DC 24V Interface: Alternative power input.

Figure 3.3: Detailed view of the QUECOO T12-959 soldering station, highlighting the OLED display, thermostat knob, handle interface, power switch, fuse, and AC/DC power interfaces.
4. Setup
- Unpack Components: Carefully remove all items from the packaging.
- Place the Station: Position the soldering station on a stable, heat-resistant surface in a well-ventilated area.
- Connect Soldering Handle: Insert the connector of the soldering handle into the handle interface on the front of the soldering station. Ensure it is securely fastened.
- Insert Soldering Tip: Gently insert the desired T12 soldering tip into the soldering handle. The design allows for easy tip changes without screwing.
- Connect Power Cord: Plug the power cord into the AC power interface on the rear of the station, then plug the other end into a grounded electrical outlet.
- Place Soldering Stand: Position the soldering stand conveniently near the station for safe placement of the hot iron.
5. Operating Instructions
5.1 Power On/Off
To turn the soldering station on or off, press the power switch located on the back of the unit.
5.2 Temperature Adjustment
Turn the control knob on the front panel to adjust the desired temperature. The LCD screen will display the current and set temperatures. The temperature range is 100°C to 500°C. The station heats up to 300°C within approximately 7 seconds.
5.3 Accessing Settings
Press and hold the control knob for approximately 2 seconds to enter the settings menu. From here, you can configure various parameters such as temperature locking, auto standby, auto sleep, and temperature stabilization.
5.4 Auto Sleep Function
The station features an automatic sleep function to conserve energy and prolong the life of the heating element. The sleep time can be set from 0 to 60 minutes, and the sleep temperature range is 60°C to 250°C. If set to 1 minute, the soldering iron will automatically enter sleep mode after 1 minute of non-use. To wake up the iron, simply lift the handle or rotate the encoder.

Figure 5.1: The Auto Sleep feature display on the QUECOO T12-959, showing the remaining sleep time and current temperature.
5.5 Auto Standby Function
The auto standby function can be set from 0 to 120 minutes. If set for 1 minute, the station will automatically enter a shutdown state after sleeping for 1 minute. The screen will turn off, and the temperature will gradually decrease to room temperature. Lifting the handle or rotating the encoder will wake the unit. For example, if sleep is set to 2 minutes and shutdown to 5 minutes, the handle left for 2 minutes without movement will initiate sleep, and after 5 minutes of sleep, the unit will enter shutdown.
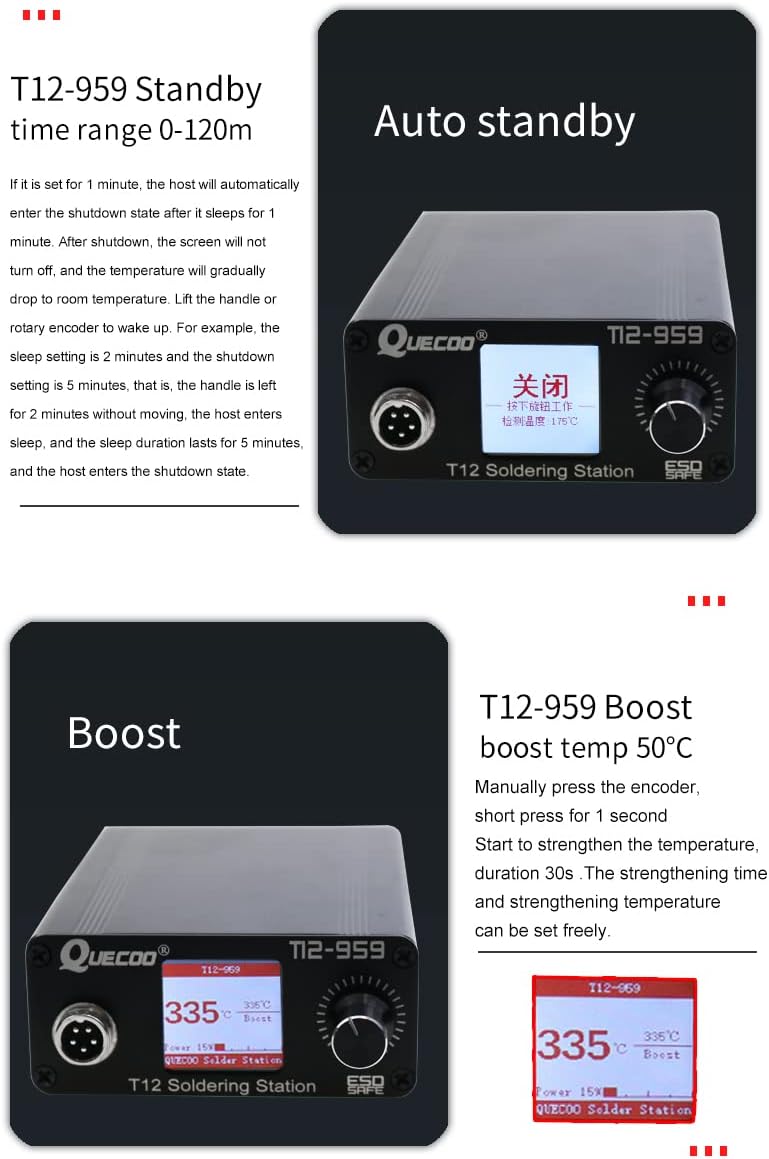
Figure 5.2: Display showing the Auto Standby feature (left) and the Boost function (right) on the QUECOO T12-959.
5.6 Boost Function
To temporarily increase the tip temperature, manually press the encoder (control knob) for 1 second. This will activate the boost function, increasing the temperature by 50°C for a duration of 30 seconds. Both the strengthening time and temperature can be adjusted in the settings.
6. Maintenance
- Tip Cleaning: Regularly clean the soldering tip using a damp sponge or brass wool to remove excess solder and oxidation. This helps maintain optimal heat transfer and tip longevity.
- Tip Tinning: Always tin the tip with a small amount of solder before storing and after cleaning to prevent oxidation.
- Station Cleaning: Keep the soldering station clean and free of dust and debris. Use a soft, dry cloth for cleaning. Do not use abrasive cleaners or solvents.
- Cord Inspection: Periodically inspect the power cord and soldering handle cable for any signs of damage. Replace if necessary.
- Tip Replacement: Replace soldering tips when they become excessively worn or corroded, as this can affect performance.
7. Troubleshooting
- No Power: Check if the power cord is securely plugged into both the station and the electrical outlet. Ensure the power switch is in the 'ON' position. Verify the outlet is functional.
- Iron Not Heating: Ensure the soldering handle is properly connected to the station. Check if the soldering tip is correctly inserted. If the issue persists, the tip or heating element may need replacement.
- Temperature Fluctuations: Ensure the tip is clean and tinned. Check for stable power supply. If the issue continues, refer to the settings menu for temperature stabilization options.
- Error Messages: If an error message appears on the LCD screen, power off the unit, wait a few seconds, and power it back on. If the error persists, contact customer support.
- Auto Sleep/Standby Not Working: Verify the sleep and standby settings in the menu. Ensure the handle is placed in the stand or remains stationary for the set duration.
8. Specifications
| Feature | Specification |
|---|---|
| Brand | QUECOO |
| Model Number | T12-959 (SET1) |
| Max Power | 108W |
| Output Power | 75W |
| Output Voltage | 24V |
| Input Voltage | 110-240V AC/DC |
| Temperature Range | 100°C - 500°C |
| Temperature Stability | 450°C (Upper rating) |
| Heating Time (to 300°C) | Approx. 7 seconds |
| Display Type | OLED |
| Host Dimensions (L x W x H) | 120mm x 88mm x 38mm |
| Item Weight | 590 g |
| Material | Metal |
| Default Tip | K tip |
| UPC | 748521130812 |
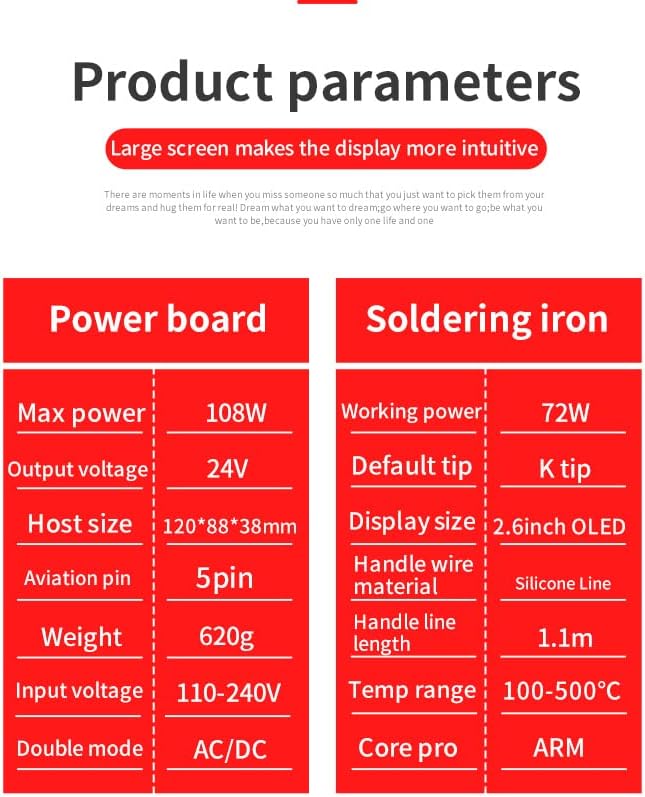
Figure 8.1: Table of product parameters for the QUECOO T12-959 soldering station, detailing power, voltage, dimensions, and temperature range.

Figure 8.2: Diagram illustrating the dimensions of the QUECOO T12-959 soldering station: 120mm length, 88mm width, and 38mm height.
9. Warranty and Support
QUECOO provides a 1-year warranty for this product and offers life-long after-sales service. If you have any questions, encounter issues, or require technical assistance, please contact the seller or QUECOO customer support directly. Please have your purchase information and model number (SET1) ready when contacting support.


