
Important Safety Information
Please read these instructions carefully before installation and retain them for future reference. All electrical connections must be in accordance with local and national electrical codes. If you are unsure about any part of the installation, consult a qualified electrician.
- WARNING: To avoid the risk of electric shock, always disconnect power at the main circuit breaker or fuse box before beginning installation or maintenance.
- WARNING: This fixture is intended for indoor use only. Do not expose to water or moisture.
- Ensure all connections are secure and properly insulated.
- Do not exceed the maximum wattage specified for the bulbs.
- Handle glass components with care to prevent breakage.
Package Contents
Carefully unpack your new lighting fixture and lay out all parts on a clean, soft surface. Ensure all components listed below are present before discarding packaging materials.
- Mounting Canopy (Black, Round)
- Pendant Light Assemblies (3 units, with gold sockets and adjustable cords)
- Glass Shades (3 units, clear cylindrical)
- Mounting Hardware Kit (screws, wire nuts, mounting bracket)
- Instruction Manual

Figure 1: Included Components
Specifications
| Brand | ZEVNI |
| Model | Kitchen Island Lighting |
| Material | Metal, Glass |
| Fixture Color | Gold (Pendants), Black (Canopy) |
| Shade Color | Clear |
| Number of Lights | 3 |
| Bulb Base | E12 (Candelabra) |
| Max Wattage per Bulb | 40W |
| Voltage | 120 Volts |
| Dimmable | Yes (with compatible dimmer switch, not included) |
| Adjustable Height Range | 12.5 inches to 69.5 inches |
| Canopy Diameter | 10 inches |
| Pendant Shade Dimensions | Approximately 3 inches (width) x 9 inches (height) |
| Fixture Weight | 4 Pounds |
| Mounting Type | Ceiling Mount, Semi Flush Mount |
| Recommended Room Use | Dining Room, Kitchen, Living Room, Lobby |
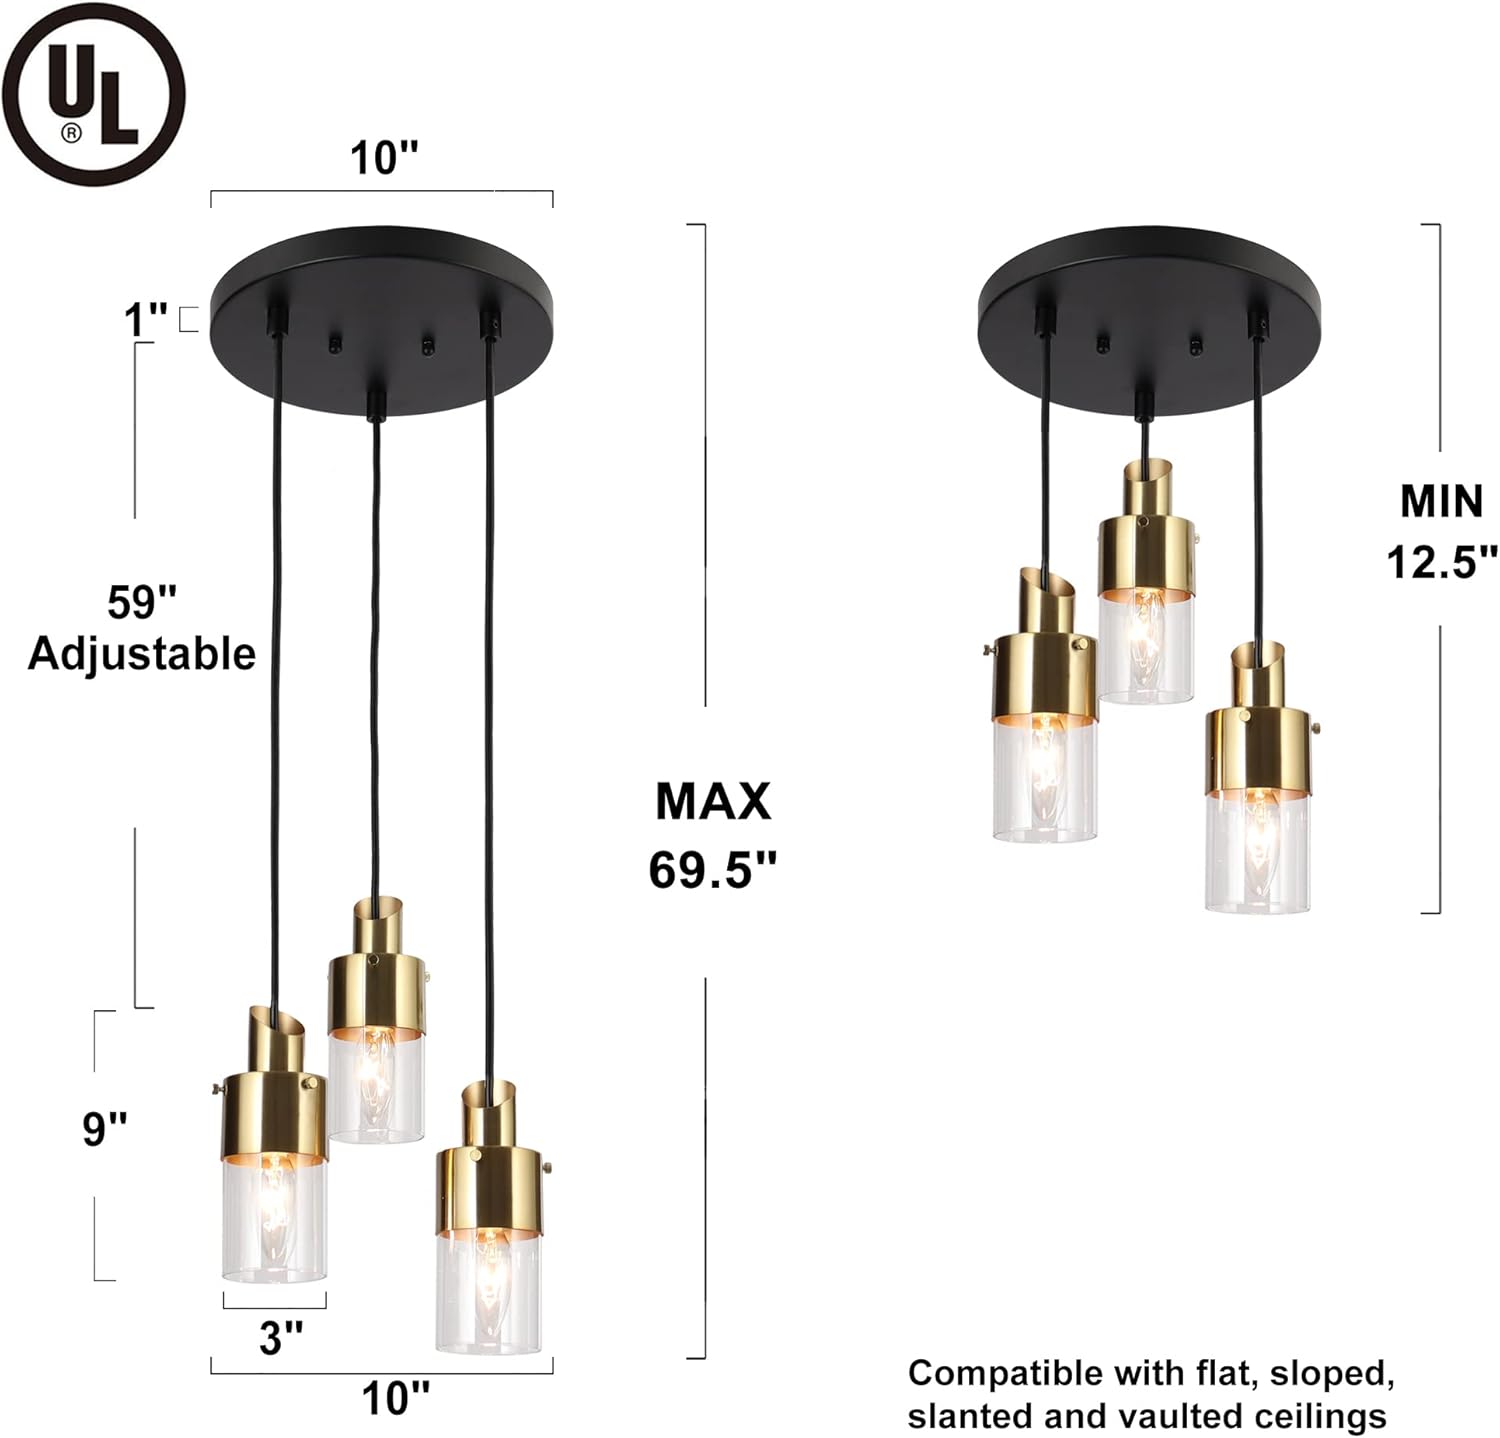
Figure 2: Product Dimensions
Setup and Installation
Before installation, ensure the power is turned off at the circuit breaker. It is recommended to have two people for installation.
- Prepare for Installation: Turn off the main power supply at the circuit breaker. Remove the old fixture if applicable.
- Attach Mounting Bracket: Secure the mounting bracket to the junction box in your ceiling using the provided screws. Ensure it is firmly attached.
- Adjust Cord Length: Determine the desired hanging height for each pendant. Loosen the set screws on the canopy to adjust the length of each cord. Once the desired length is achieved, tighten the set screws to secure the cords. The fixture is adjustable from 12.5 inches (minimum) to 69.5 inches (maximum) from the ceiling.
- Wire Connections: Connect the fixture's wires to your household electrical wires. Connect the black wire (Live/Hot) from the fixture to the black wire from the junction box. Connect the white wire (Neutral) from the fixture to the white wire from the junction box. Connect the ground wire (bare copper or green) from the fixture to the ground wire from the junction box. Secure all connections with wire nuts and wrap with electrical tape for added safety.
- Mount Canopy: Carefully push the canopy up to the ceiling, aligning the holes in the canopy with the screws on the mounting bracket. Secure the canopy in place with the decorative nuts or screws provided.
- Assemble Pendants:
- Attach the gold socket component to the end of each pendant cord.
- Carefully slide each clear glass shade over the gold socket component.
- Secure the glass shade in place, typically by screwing a retaining ring onto the socket.
- Install Bulbs: Screw E12 base bulbs (not included, max 40W each) into each socket. Do not overtighten.
- Restore Power: Once installation is complete and all connections are secure, restore power at the circuit breaker.
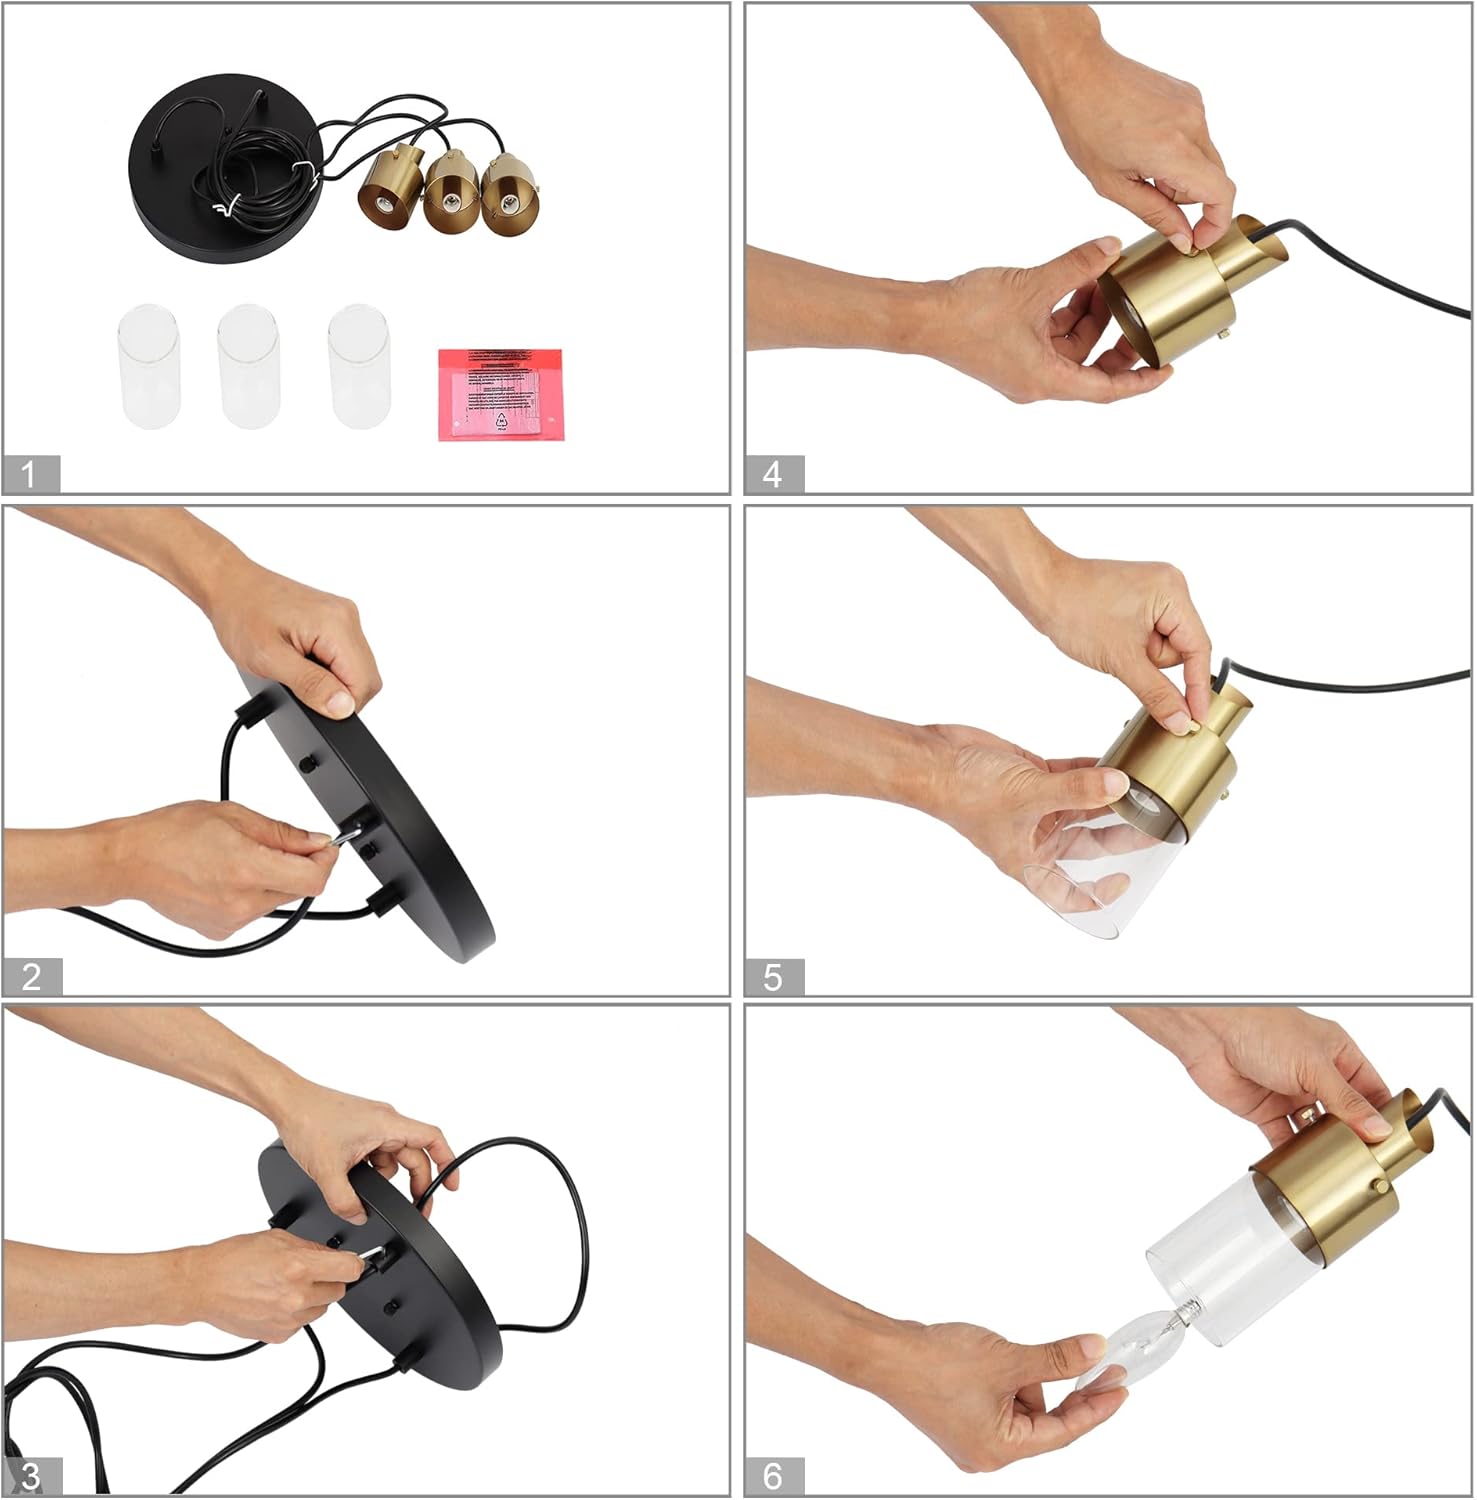
Figure 3: Assembly Steps
Operating Instructions
This ZEVNI lighting fixture is designed for simple operation.
- Power On/Off: Control the light fixture using a standard wall switch connected to the circuit.
- Dimmable Functionality: This fixture is fully dimmable. To utilize the dimming feature, you must install compatible E12 dimmable bulbs and connect the fixture to a compatible dimmer switch (both sold separately).
- Bulb Requirements: Uses 3 E12 base bulbs, maximum 40 watts per bulb. LED bulbs are recommended for energy efficiency and longer lifespan.

Figure 4: Light On/Off States
Maintenance
Regular maintenance will help preserve the appearance and functionality of your lighting fixture.
- Cleaning: Always turn off the power before cleaning. Use a soft, dry cloth to wipe down the metal parts. For glass shades, a slightly damp cloth can be used, followed by a dry cloth to prevent water spots. Avoid using abrasive cleaners, solvents, or polishes as they may damage the finish.
- Bulb Replacement: Ensure the power is off and the bulbs have cooled before attempting to replace them. Unscrew the old bulb and screw in a new E12 base bulb (max 40W).
- Inspection: Periodically check all connections and mounting hardware to ensure they remain secure.
Troubleshooting
If you encounter issues with your ZEVNI lighting fixture, refer to the following common problems and solutions:
| Problem | Possible Cause | Solution |
|---|---|---|
| Light does not turn on. | No power to the fixture. Loose wire connection. Faulty bulb. | Check circuit breaker. Ensure wall switch is on. Verify all wire connections are secure. Replace bulb. |
| Light flickers. | Loose bulb. Incompatible dimmer switch/bulb. Loose wire connection. | Tighten bulb. Ensure dimmer and bulbs are compatible. Check wire connections. |
| Fixture hums. | Incompatible dimmer switch. | Replace with a high-quality, compatible LED dimmer switch. |
If these steps do not resolve the issue, please contact customer support.
Warranty and Support
This ZEVNI lighting fixture comes with a manufacturer's warranty. For specific warranty details, please refer to the documentation included with your purchase or contact the retailer.
For technical assistance, replacement parts, or any questions regarding your product, please contact ZEVNI customer support through their official website or the retailer where the product was purchased.


