Introduction
This manual provides detailed instructions for the safe installation and operation of your Pipishell Full Motion TV Wall Mount. Please read all instructions carefully before beginning installation. If you have any questions, contact customer support.

Image: Overview of Pipishell Full Motion TV Wall Mounts, models PIMFK3 and PILFK4, showing their articulating arm designs and TV mounting plates.
Important Safety Information
WARNING: Failure to read and follow these instructions may result in serious personal injury, property damage, or voiding of your warranty.
- Do not install this product on drywall alone. It must be mounted to a solid wood stud, concrete wall, or brick wall.
- Ensure the wall structure can safely support the combined weight of the mount and your television.
- Do not exceed the maximum weight capacity specified for each model: 99 lbs (45 kg) for PIMFK3 and 132 lbs (60 kg) for PILFK4.
- Always use an assistant for lifting and positioning the television.
- Tighten all screws firmly but do not overtighten. Overtightening can damage screws and components.
- Check all connections periodically to ensure they remain secure.
Package Contents
Verify that all components are present and undamaged before installation. If any parts are missing or defective, contact Pipishell customer service.
Mount Components:
- Wall Plate Assembly
- TV Brackets (2x)
- Mounting Hardware Kit (various screws, washers, spacers)
- Bubble Level
- Cable Ties

Image: Detailed view of the PIMFK3 mount, highlighting the security lock, compression hinges, and strong dual arms. Also shows the maximum weight capacity of 99 lbs and TV size range of 26-55 inches.

Image: Detailed view of the PILFK4 mount, showcasing its six-arm structure, safety lock, extra-wide TV plate, and ultra-strong wall plate for heavy-duty support.
Tools Required (Not Included)
- Pencil
- Stud Finder (for wood stud installation)
- Electric Drill
- Drill Bits (appropriate size for wall type and lag bolts)
- Socket Wrench or Adjustable Wrench
- Phillips Head Screwdriver
- Measuring Tape
Installation Requirements
TV Compatibility:
- PIMFK3: Fits most 26-55 inch flat or curved LED, LCD, OLED TVs. Maximum weight capacity: 99 lbs (45 kg).
- PILFK4: Fits most 37-75 inch flat or curved LED, LCD, OLED TVs. Maximum weight capacity: 132 lbs (60 kg).
VESA Compatibility:
This mount supports VESA patterns from 100x100mm up to 600x400mm. Measure the horizontal and vertical distance between the mounting holes on the back of your TV to determine its VESA pattern.
Wall Type Compatibility:
The mount is designed for installation on:
- Single Wood Studs (PIMFK3) or 16-inch Wood Studs (PILFK4)
- Solid Concrete Walls
- Brick Walls
DO NOT mount on drywall alone.

Image: Diagram illustrating VESA compatibility (Min 100mm, Max 400mm for PIMFK3) and suitable wall types: single wood stud, concrete wall, and brick wall.

Image: Diagram illustrating VESA compatibility (Max 600x400mm) and suitable wall types for PILFK4: 16-inch wood studs, concrete wall, and brick wall. A warning states: Do not mount on drywall alone.
Setup and Installation
Step 1: Determine Mounting Location and Wall Type
- Use a stud finder to locate the center of a wood stud if installing on wood. Mark the stud edges.
- For concrete or brick walls, ensure the wall is solid and free of obstructions.
- Hold the wall plate against the wall at your desired height and use a pencil to mark the pilot hole locations. Use the included bubble level to ensure it is level.
Step 2: Drill Pilot Holes
- For wood studs: Drill pilot holes using a 7/32 inch (5.5mm) drill bit to a depth of 2.2 inches (55mm).
- For concrete/brick walls: Drill pilot holes using a 3/8 inch (10mm) masonry drill bit to a depth of 2.4 inches (60mm). Insert concrete anchors into the holes, ensuring they are flush with the wall surface.
Step 3: Attach Wall Plate to Wall
- Align the wall plate with the drilled holes.
- Secure the wall plate to the wall using the provided lag bolts and washers. Tighten firmly with a socket wrench.
Step 4: Attach TV Brackets to TV
- Lay your TV face down on a soft, clean surface.
- Identify the correct diameter and length of screws for your TV's VESA mounting holes. Use the provided spacers if the TV back is uneven or if screws are too long.
- Attach the two TV brackets to the back of your TV using the chosen screws and washers. Ensure the brackets are centered and level.
Step 5: Mount TV to Wall Plate
- With an assistant, carefully lift the TV and hook the TV brackets onto the wall plate.
- Ensure the TV is securely seated on the wall plate.
- Engage the safety locks on the bottom of the TV brackets to prevent accidental dislodging.
Operating and Adjustments
Your Pipishell Full Motion TV Wall Mount allows for various adjustments to optimize your viewing experience.
Tilt Adjustment:
The mount allows for a tilt range of -15° to +5° (PIMFK3) or -15° to +5° (PILFK4). Loosen the tilt adjustment knobs on the TV brackets, adjust the TV to the desired angle, and then re-tighten the knobs to secure the position.
Swivel Adjustment:
The articulating arm allows the TV to swivel up to 90° left or right (PIMFK3) or 120° (PILFK4), depending on TV size and wall distance. Gently push or pull the TV to the desired viewing angle.
Level Adjustment:
After installation, you can adjust the TV's level by ±3°. Loosen the leveling screws on the TV brackets, adjust the TV to be perfectly level, and then re-tighten the screws.
Extension and Retraction:
The mount can extend the TV away from the wall up to 19.5 inches (PIMFK3) or 16 inches (PILFK4) and retract it to a minimum distance of 3.2 inches (PIMFK3) or 3.1 inches (PILFK4) from the wall. Gently pull or push the TV to adjust the distance.

Image: Demonstrates the PIMFK3 mount's ability to pull out to 19.5 inches, tilt ±5° for anti-glaring, swivel ±90°, and level ±3° for an optimal viewing experience.
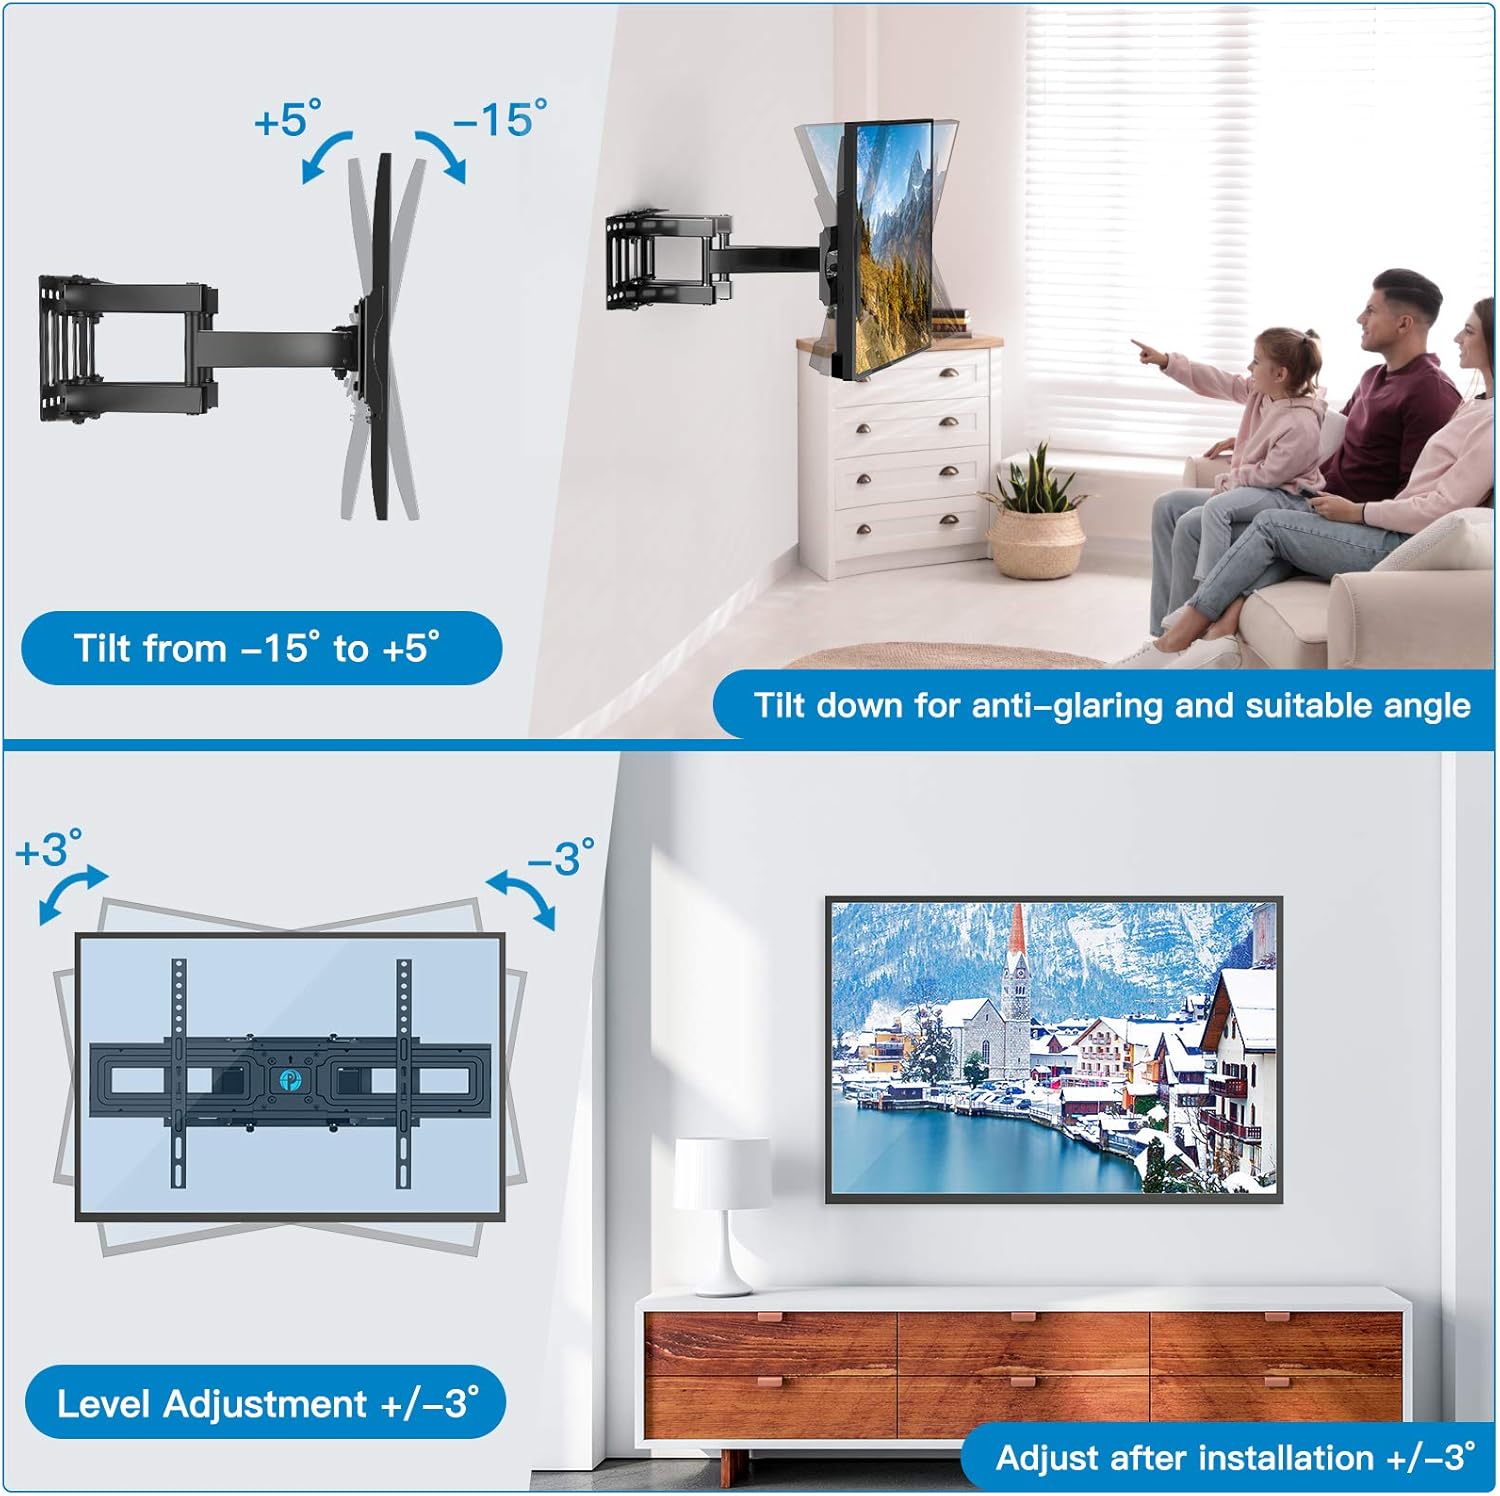
Image: Illustrates the PILFK4 mount's tilt range from -15° to +5° and level adjustment of ±3° for fine-tuning the TV's position after installation.

Image: Shows the PILFK4 mount's swivel capability of 120° and its ability to retract to 3.1 inches and extend up to 16 inches from the wall, allowing for flexible viewing positions and space saving.
Maintenance
- Periodically check that all screws and connections are secure. Re-tighten if necessary.
- Clean the mount with a soft, dry cloth. Avoid abrasive cleaners or solvents.
- Ensure cables are properly managed and not pinched by moving parts of the mount. Use the provided cable ties to keep cables tidy.
Troubleshooting
TV is not level after installation:
Loosen the level adjustment screws on the TV brackets, adjust the TV to the desired level using a bubble level, and then re-tighten the screws.
Mount feels loose on the wall:
Immediately remove the TV from the mount. Check that all lag bolts securing the wall plate to the wall are fully tightened. If the wall material is damaged, consult a professional for repair before re-mounting.
Difficulty adjusting tilt or swivel:
Ensure that the tilt adjustment knobs are sufficiently loosened before attempting to adjust the tilt. For swivel, ensure no cables are snagged or preventing movement. Do not force adjustments.
Missing parts:
Refer to the 'Package Contents' section. If any parts are missing, contact Pipishell customer support for assistance.
Specifications
| Feature | PIMFK3 | PILFK4 |
|---|---|---|
| TV Size Range | 26 - 55 inches | 37 - 75 inches |
| Max Weight Capacity | 99 lbs (45 kg) | 132 lbs (60 kg) |
| VESA Compatibility | 100x100mm to 400x400mm | 200x100mm to 600x400mm |
| Tilt Angle | -15° to +5° | -15° to +5° |
| Swivel Angle | Up to ±90° | Up to ±120° |
| Level Adjustment | ±3° | ±3° |
| Wall Distance (Retracted) | 3.2 inches | 3.1 inches |
| Wall Distance (Extended) | 19.5 inches | 16 inches |
| Material | Alloy Steel | |
| Color | Black | |
Warranty and Customer Support
Pipishell products are manufactured with quality and care. For warranty information or technical assistance, please contact Pipishell customer support through the retailer's platform or the official Pipishell website.
Please have your product model number (PIMFK3 or PILFK4) and purchase date available when contacting support.


