1. Introduction
This manual provides detailed instructions for the assembly, operation, and maintenance of your IKEA KALLAX Insert with Door. This insert is designed to fit seamlessly into KALLAX shelving units, offering concealed storage within one of the unit's compartments. Please read these instructions carefully before beginning assembly and retain them for future reference.

Image 1: The IKEA KALLAX Insert with Door, featuring a white stained oak effect finish. This image displays the complete insert unit with its single door and small knob handle, ready for installation into a KALLAX shelving cube.
2. Safety Information
- Always follow the assembly instructions precisely to ensure the stability and safety of the product.
- Keep small parts and packaging materials away from children to prevent choking hazards.
- Ensure all screws and fittings are tightened securely. Periodically check and re-tighten if necessary.
- Do not overload the insert or the KALLAX unit it is placed in.
3. Package Contents
Before assembly, verify that all components are present. The package should contain:
- Door panel (1x)
- Hinges (2x)
- Handle/Knob (1x)
- Screws and fasteners for assembly
- Assembly instruction sheet (visual guide)
4. Setup and Assembly Instructions
Follow these steps to assemble and install your KALLAX Insert with Door:
- Prepare the KALLAX Unit: Ensure the KALLAX shelving unit is fully assembled and placed in its desired location.
- Attach Hinges to Door: Place the door panel on a soft, clean surface to prevent scratches. Attach the two hinges to the pre-drilled holes on one side of the door panel using the provided screws. Ensure the hinges are oriented correctly.
- Install Door into KALLAX Cube: Carefully position the door panel with attached hinges into the KALLAX cube opening. Align the hinges with the pre-drilled holes on the inside edge of the KALLAX unit. Secure the hinges to the KALLAX unit using the remaining screws.
- Attach Handle/Knob: From the front of the door panel, insert the handle's screw through the pre-drilled hole. Secure the handle/knob from the front by twisting it onto the screw until firm.
- Adjust Door (if necessary): If the door does not close properly or is misaligned, use a screwdriver to make minor adjustments to the hinge screws. Loosen slightly, adjust the door position, and re-tighten.
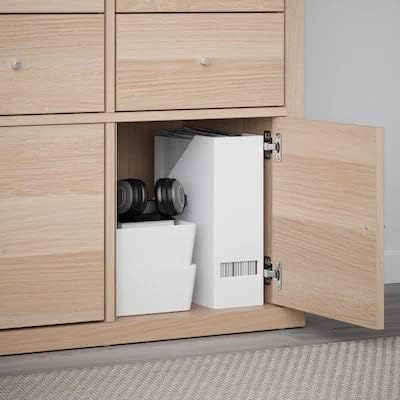
Image 2: An IKEA KALLAX Insert with Door shown installed within a KALLAX shelving unit. The door is partially open, revealing items stored inside the cube, demonstrating its function as a concealed storage solution.
5. Operating Instructions
To open the door, gently pull the knob or handle. To close, push the door until it sits flush with the KALLAX unit frame. The hinges are designed for smooth operation.
6. Maintenance
- Cleaning: Wipe clean with a cloth dampened in a mild cleaner. Wipe dry with a clean cloth. Avoid abrasive cleaners or harsh chemicals.
- Inspection: Periodically check all screws and fittings to ensure they remain tight. Re-tighten as needed to maintain stability.
7. Troubleshooting
- Door does not close properly: Check if the KALLAX unit itself is level. Adjust the hinge screws slightly to realign the door. Ensure no items inside the cube are obstructing the door's path.
- Loose handle/knob: Re-tighten the screw connecting the handle/knob to the door panel.
- Squeaking hinges: Apply a small amount of silicone-based lubricant to the hinge joints.
8. Specifications
| Feature | Detail |
|---|---|
| Model Number | 303.245.07 |
| Dimensions (H x W x D) | 33 cm x 33 cm x 33 cm (approx. 13 x 13 x 13 inches) |
| Material (Basematerial) | Fibreboard, Plastic foil |
| Material (Door) | Particleboard, Plastic foil, Paper foil, Plastic edging |
| Color/Effect | White Stained Oak Effect |
| Item Weight | 2.24 Kilograms |
9. Warranty and Support
IKEA products typically come with a limited warranty. For specific warranty details, terms, and conditions, please refer to the warranty information provided at the time of purchase or visit your local IKEA store or the official IKEA website. For customer support, assembly assistance, or to order spare parts, please contact IKEA customer service directly.


