
1. Product Overview
This manual provides detailed instructions for the installation, operation, and maintenance of your SMANOW Running Boards. These running boards are designed to provide a convenient and secure step for entering and exiting your vehicle, while also offering a protective barrier against road debris.

Figure 1: SMANOW Running Boards with textured black finish.
The running boards feature a durable carbon steel construction with a matte textured black powder coating for enhanced rust and corrosion resistance. The wide drop steps incorporate a non-slip tread for superior traction, ensuring safe use in various conditions.

Figure 2: SMANOW Running Boards installed on a vehicle.
2. Vehicle Compatibility
These running boards are specifically designed for the following vehicle models:
- 2009-2018 Dodge RAM 1500 Quad Cab
- 2019-2024 RAM 1500 Classic Quad Cab
- 2010-2024 RAM 2500 & 3500 Quad Cab
Important: Please verify your vehicle's cab size to ensure proper fitment. This product is not compatible with Mega Cab, Crew Cab, or Regular Cab models.

Figure 3: Cab size compatibility diagram. Ensure your vehicle matches the Quad Cab configuration shown.
3. Key Features
- Durable Construction: Made from heavy-duty carbon steel with a matte textured black powder coating for excellent rust and corrosion resistance.
- Non-Slip Step Pads: Special non-slip tread on step pads provides superior traction for safe entry and exit.
- Wide Drop Step Design: Features a drop-down style, making it easier to step into and out of the vehicle. The 4.7-inch drop-off height is designed for optimal accessibility.
- High Load Capacity: Engineered to support a maximum load of over 350 pounds.
- Enhanced Stability: Triangular welding process and fixed mounting holes contribute to greater stability and prevent breakage.

Figure 4: Illustration of the 4.7-inch drop step design for easier vehicle access.

Figure 5: Detail of the non-slipping step surface with reinforced grip.

Figure 6: Illustration of the triangular welding process designed to prevent breakage and enhance stability.
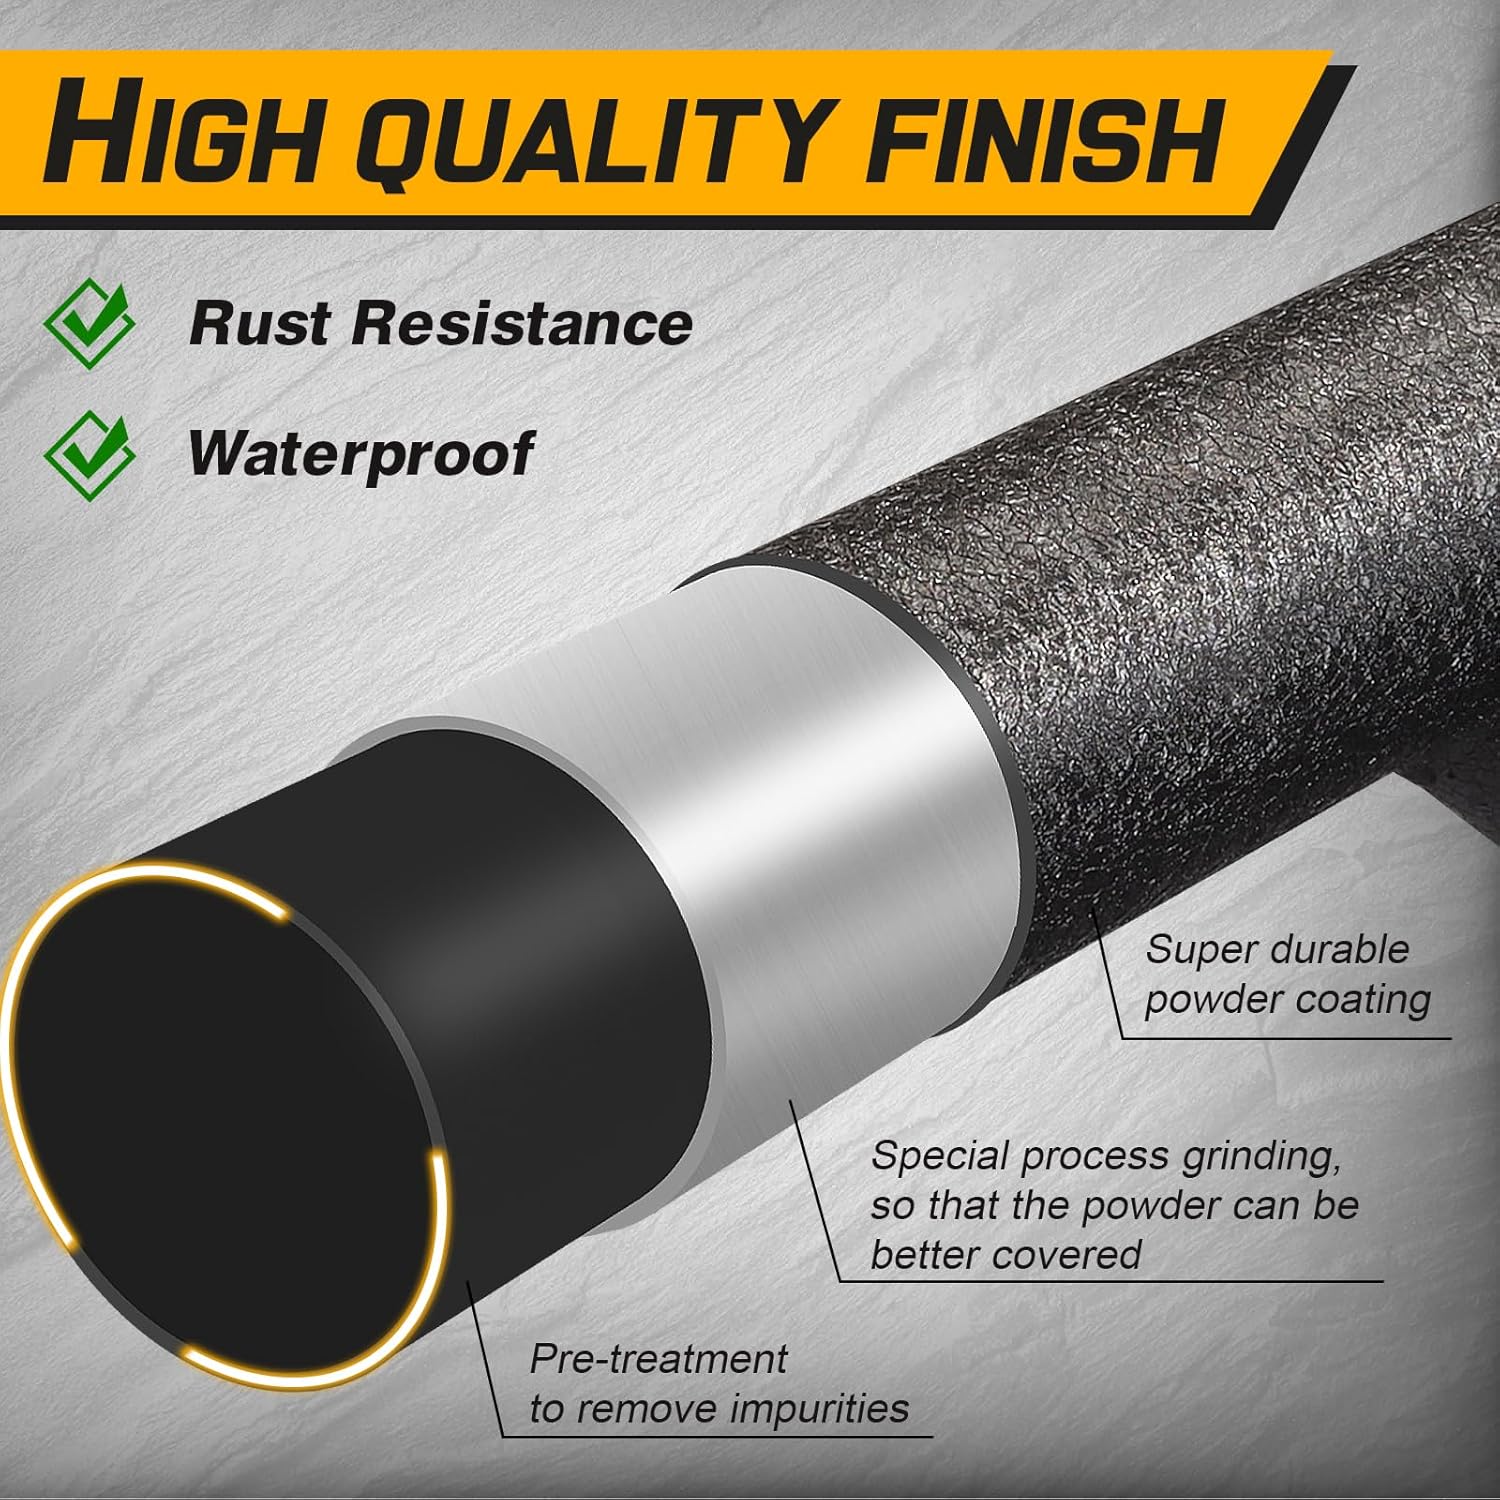
Figure 7: High-quality finish layers for rust resistance and waterproofing.
4. Package Contents
Before beginning installation, please ensure all components are present and undamaged:
- Two (2) Running Boards (one for the left side, one for the right side)
- Mounting Brackets (specific to your vehicle's side)
- Hardware Kit (nuts, bolts, washers, clips)
- Installation Instructions (this manual)
Note: If any parts are missing or damaged, please contact customer support before proceeding with installation.
5. Installation Instructions
Safety First: Always wear appropriate personal protective equipment, including eye protection, during installation. Ensure the vehicle is parked on a level surface and the parking brake is engaged.
5.1. Tools Required (Not Included)
- Socket Wrench Set
- Open-End Wrench Set
- Torque Wrench
- Drill (for specific models, see step 5.3)
- 1/4" Drill Bit (for specific models)
- Tap (optional, for cleaning threaded holes)
- Knee Pads or Creeper (for comfort)
5.2. Pre-Installation Steps
- Identify Components: Separate the left and right running boards, and organize all mounting brackets and hardware. It is recommended to group nuts, bolts, and washers for easier access during installation.
- Clean Mounting Points: Locate the factory mounting points on your vehicle's frame or pinch weld. Clean any dirt, rust, or debris from these areas. If your vehicle has existing threaded holes, it is advisable to clean them with a tap to ensure smooth bolt insertion.
5.3. Mounting Bracket Installation
The running boards utilize fixed mounting holes for precise installation and stability.

Figure 8: Fixed mounting holes for secure bracket attachment.
- Attach Brackets to Vehicle:
- Position the mounting brackets onto the vehicle's frame. Ensure the brackets are oriented correctly; the offset side of the bracket pieces should generally point towards the center of the vehicle.
- Secure the brackets using the provided hardware. Do not fully tighten bolts at this stage to allow for adjustment.
- For 2009-2011 and some 2012 models: A small 1/4" hole may need to be punched in the pinch weld of the support bracket area. Refer to your vehicle's specific undercarriage for exact locations.
5.4. Running Board Attachment
- Position Running Board: Carefully lift one running board and align it with the installed mounting brackets.
- Secure Running Board: Attach the running board to the brackets using the remaining hardware. Again, do not fully tighten the bolts yet.
- Adjust and Align: Adjust the running board for optimal position and alignment with the vehicle's body. Ensure there is adequate clearance and that the board is level.
- Final Tightening: Once satisfied with the position, progressively tighten all bolts, starting from the center and working outwards. Ensure all connections are secure and torqued to the manufacturer's specifications (if available, otherwise tighten firmly).
- Repeat for Other Side: Follow the same steps for installing the running board on the opposite side of the vehicle.
Post-Installation Check: After driving a short distance, re-check all mounting hardware to ensure it remains tight. Re-tighten if necessary.
6. Maintenance
Regular maintenance will help prolong the life and appearance of your SMANOW Running Boards:
- Cleaning: Wash the running boards regularly with mild soap and water to remove dirt, salt, and road grime. Avoid abrasive cleaners or harsh chemicals that could damage the powder coating.
- Inspection: Periodically inspect all mounting hardware for tightness. Re-tighten any loose bolts to prevent rattling or detachment.
- Damage Check: Check for any signs of damage, such as cracks, bends, or significant rust. Address any issues promptly to maintain structural integrity and safety.
7. Troubleshooting
| Problem | Possible Cause | Solution |
|---|---|---|
| Running board does not fit or align properly. | Incorrect cab size; brackets oriented incorrectly; bolts not loosened enough for adjustment. | Verify vehicle compatibility (Quad Cab only). Ensure brackets are oriented correctly (offset towards vehicle center). Loosen all bolts, adjust alignment, then re-tighten. |
| Running board feels loose or rattles. | Mounting hardware is loose. | Inspect and re-tighten all mounting bolts and nuts. Check for any missing hardware. |
| Difficulty inserting bolts into threaded holes. | Threads are dirty or corroded. | Clean threaded holes with a tap before attempting to insert bolts. |
| Premature wear or rust. | Lack of regular cleaning; exposure to harsh elements without proper care. | Follow recommended cleaning and maintenance procedures. Avoid harsh chemicals. |
8. Product Specifications
| Feature | Detail |
|---|---|
| Brand | SMANOW |
| Model Number | GDX-BC20165 |
| Material | Carbon Steel |
| Exterior Finish | Matte Textured Black Powder Coating |
| Dimensions (L x W x H) | 78 x 3 x 4.5 inches (approximate) |
| Weight Limit | 350 Pounds |
| Vehicle Service Type | 2009-2018 Ram 1500 Quad Cab, 2010-2024 Ram 2500 3500 Quad Cab, Including Ram Classic Model |
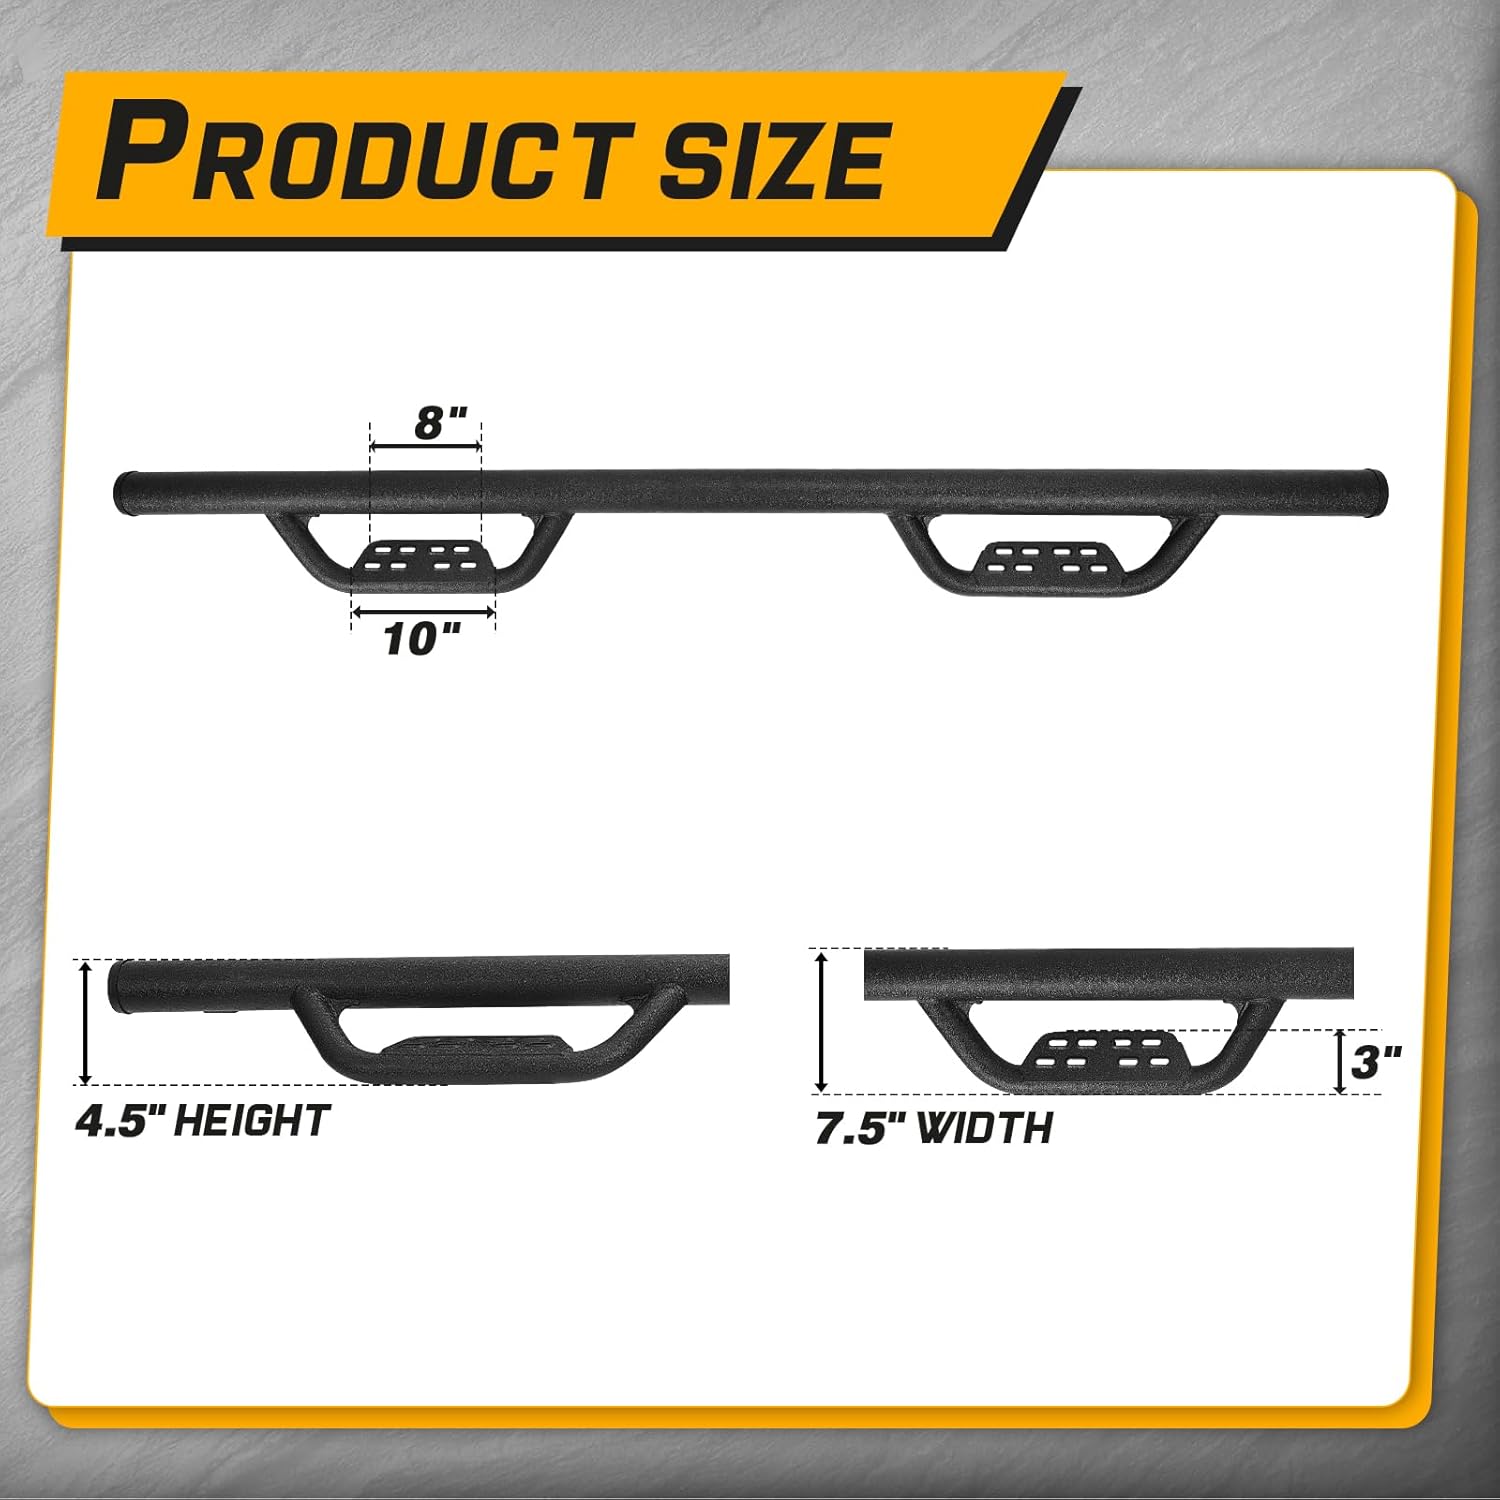
Figure 9: Product dimensions overview.
9. Warranty & Customer Support
SMANOW products are manufactured to high-quality standards. For specific warranty information, please refer to the product packaging or contact your retailer. If you encounter any issues during installation or use, or if you have questions about your product, please contact SMANOW customer support through the retailer's platform or the official SMANOW website.