1. Introduction and Overview
This manual provides comprehensive instructions for the installation, operation, and maintenance of the ASUS Prime B660M-A WiFi D4 motherboard. Designed to support 12th Gen Intel Core processors, this mATX motherboard features robust power delivery, efficient cooling solutions, and advanced connectivity options. Please read this manual thoroughly before proceeding with installation to ensure proper setup and optimal performance.
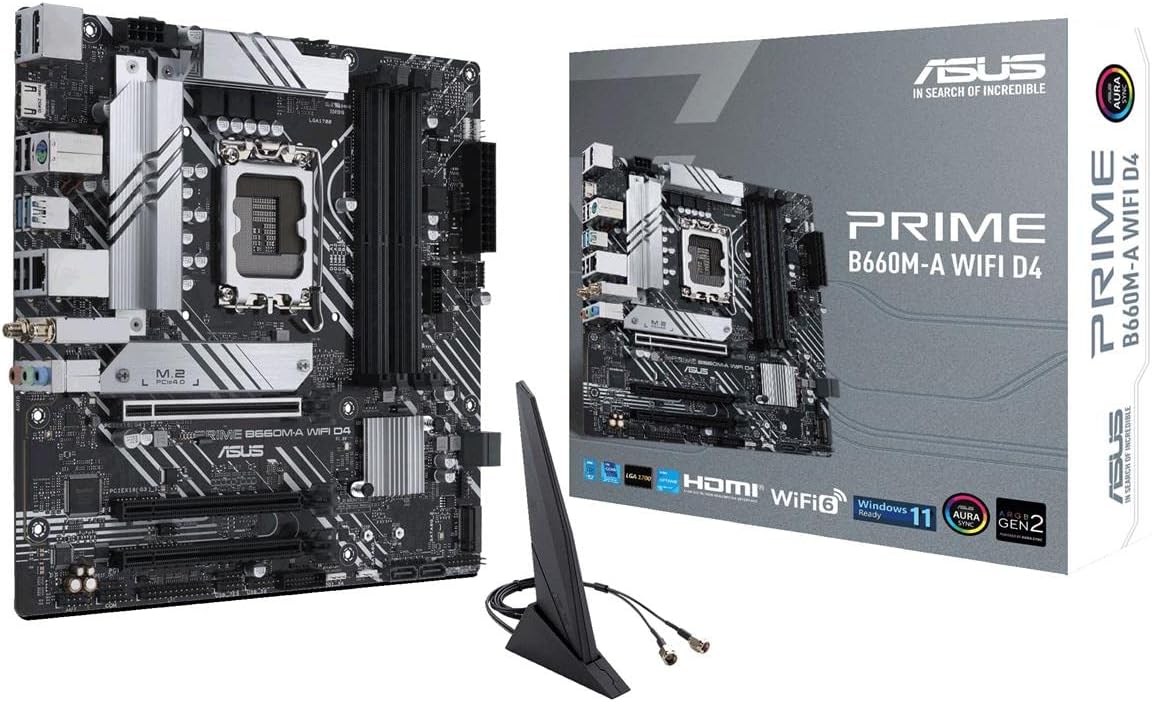
Figure 1.1: ASUS Prime B660M-A WiFi D4 Motherboard with retail packaging and Wi-Fi antenna.
2. Key Features
- Intel LGA 1700 Socket: Compatible with 12th Gen Intel Core, Pentium Gold, and Celeron Processors.
- Ultrafast Connectivity: Features PCIe 4.0, Intel Wi-Fi 6, Intel 1 Gb Ethernet, rear USB 3.2 Gen 2, and front USB 3.2 Gen 1 Type-C ports.
- ASUS OptiMem II: Optimized trace routing and ground layer enhancements for improved memory overclocking and signal integrity.
- Comprehensive Cooling: Equipped with VRM heatsink, M.2 heatsink, PCH heatsink, hybrid fan headers, and Fan Xpert 2+ for efficient thermal management.
- Dual M.2 Slots: Supports two M.2 NVMe SSDs for high-speed storage solutions.
- Aura Sync: Integrated RGB headers for customizable lighting effects.
3. Package Contents
Verify that all items listed below are present in your motherboard package:

Figure 3.1: Included accessories with the ASUS Prime B660M-A WiFi D4 motherboard.
- ASUS Prime B660M-A WiFi D4 Motherboard
- Rear I/O Panel Shield
- User Guide / Instruction Manual
- Driver Support CD/DVD
- SATA Data Cables (x2)
- M.2 Screw Packages
- M.2 Rubber Standoffs
- Wi-Fi Antenna
Note: Contents may vary slightly depending on region or revision.
4. Setup and Installation
Before beginning installation, ensure your system is powered off and disconnected from the power source. Wear an anti-static wrist strap to prevent electrostatic discharge (ESD) damage to components.
4.1. CPU Installation (LGA 1700)
- Locate the LGA 1700 socket on the motherboard.
- Open the CPU socket lever and lift the load plate.
- Carefully align the notches on your 12th Gen Intel CPU with the socket and gently place the CPU into the socket. Do not force it.
- Close the load plate and secure it with the lever.
4.2. Memory (RAM) Installation

Figure 4.1: Location of DDR4 DIMM slots, M.2 slots, and PCIe slot.
- Open the clips at both ends of the DDR4 DIMM slots.
- Align the notch on the memory module with the key in the DIMM slot.
- Insert the memory module firmly into the slot until the clips snap into place.
- For dual-channel configuration, refer to the motherboard's specific manual for recommended slot pairing.
4.3. Storage Device Installation (M.2 SSDs and SATA Drives)
- M.2 SSD: Locate the M.2 slots. Remove the M.2 heatsink if present. Insert the M.2 SSD into the slot at a 30-degree angle, then push it down and secure it with the provided M.2 screw or rubber standoff. Reattach the heatsink.
- SATA Drives: Connect one end of a SATA data cable to a SATA 6Gb/s port on the motherboard and the other end to your SATA hard drive or SSD. Connect a SATA power cable from your power supply to the drive.
4.4. Expansion Card Installation (PCIe)
- Align your PCIe expansion card (e.g., graphics card) with the PCIe 4.0 x16 slot.
- Press the card firmly into the slot until it is fully seated and the retention clip locks.
- Secure the card to your chassis with a screw.
4.5. Power Connections
- Connect the 24-pin ATX power connector from your power supply to the motherboard's main power socket.
- Connect the 8-pin (or 4+4 pin) CPU power connector to the motherboard's CPU power socket.
- Ensure all power cables are securely seated.
4.6. Front Panel and Peripheral Connections
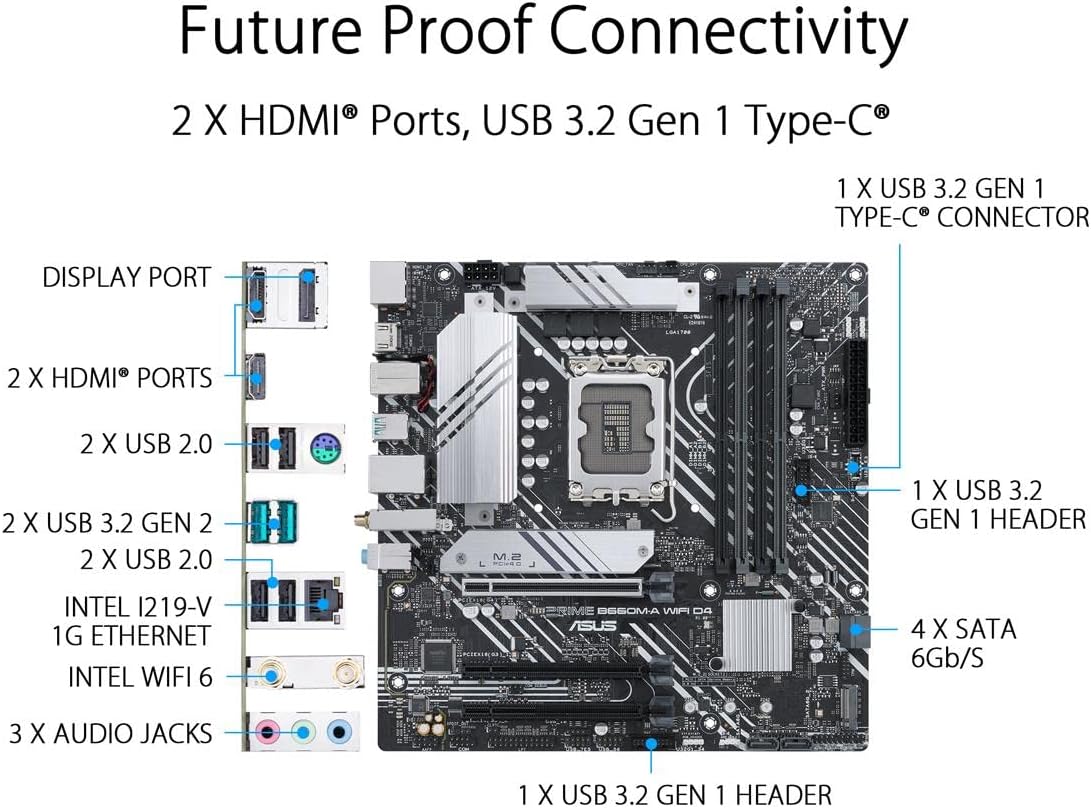
Figure 4.2: Overview of rear I/O ports and internal headers.
- Connect your chassis' front panel connectors (power switch, reset switch, HDD LED, power LED) to the corresponding pins on the motherboard. Refer to the motherboard manual for pin assignments.
- Connect USB 2.0, USB 3.2 Gen 1, and audio headers from your chassis to the motherboard.
- Attach the Wi-Fi antenna to the rear I/O panel connectors for wireless connectivity.
- Connect display cables (HDMI, DisplayPort) to your monitor.
5. Operating Instructions
5.1. First Boot and BIOS Setup
- After assembling your system, connect a monitor, keyboard, and mouse.
- Power on your system. Press the DEL key or F2 key during startup to enter the BIOS/UEFI setup utility.
- In the BIOS, you can configure boot order, system time, and various hardware settings. Save changes and exit to boot into your operating system installer.
5.2. Driver Installation
After installing your operating system, install the necessary drivers for optimal performance. Drivers can be found on the included support CD or downloaded from the official ASUS support website for your specific motherboard model.
- Chipset Drivers
- LAN Drivers
- Wi-Fi Drivers
- Audio Drivers
- Graphics Drivers (if using integrated graphics or a dedicated GPU)
5.3. Software Utilities
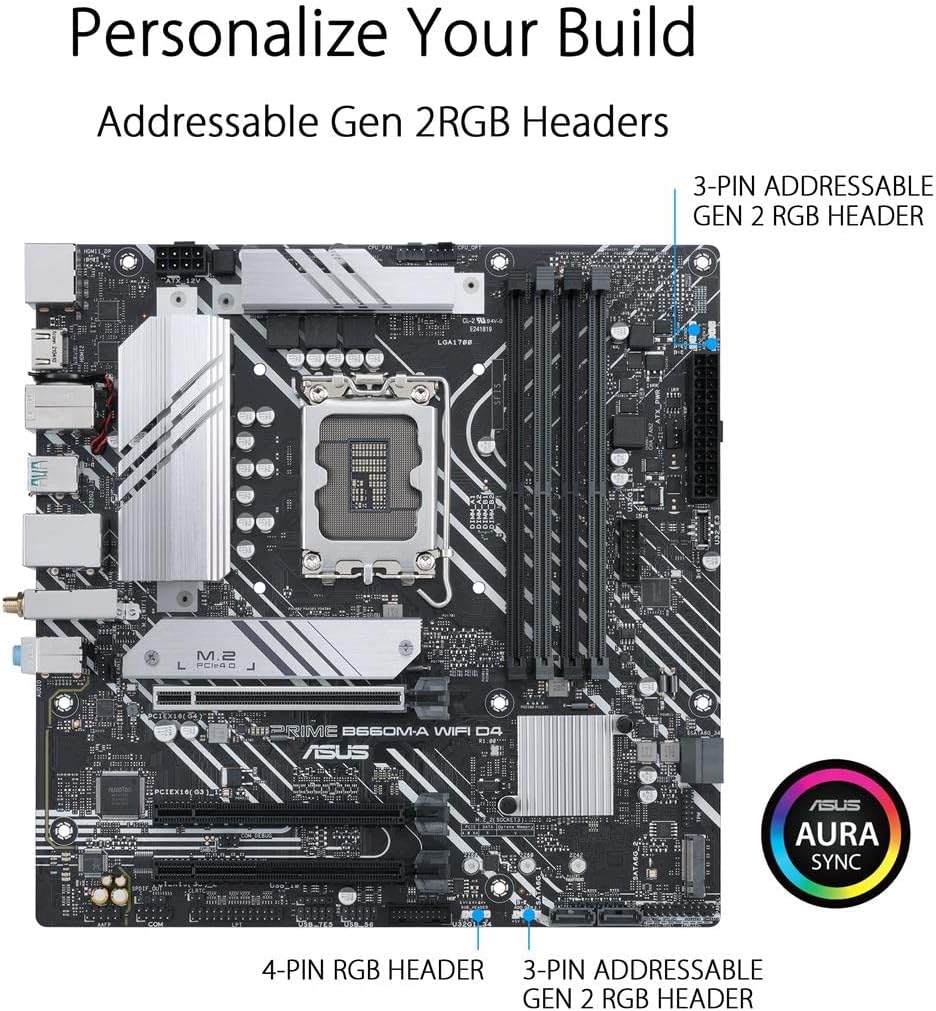
Figure 5.1: RGB and Addressable Gen 2 RGB headers for Aura Sync.
ASUS provides various software utilities to enhance your user experience, such as:
- ASUS Armoury Crate: A software suite for system monitoring, driver updates, and Aura Sync control.
- ASUS Aura Sync: For synchronizing RGB lighting effects across compatible components.
- Fan Xpert 2+: For advanced fan control and system cooling optimization.
6. Maintenance
6.1. BIOS Updates
Regularly check the ASUS support website for BIOS updates. BIOS updates can improve system stability, add support for new hardware, and fix bugs. Follow the instructions provided by ASUS carefully when updating the BIOS to avoid system damage.
6.2. Driver Updates
Keep your drivers updated to ensure optimal performance and compatibility with new software and hardware. Drivers can be updated via ASUS Armoury Crate or by downloading the latest versions from the ASUS support website.
6.3. Physical Cleaning
Periodically clean your computer's interior to prevent dust buildup, which can lead to overheating and reduced performance. Use compressed air to remove dust from heatsinks, fans, and other components. Ensure the system is powered off and unplugged before cleaning.

Figure 6.1: VRM and M.2 heatsinks for thermal management.
7. Troubleshooting
This section provides solutions to common issues you might encounter.
- No Power:
- Ensure all power cables (24-pin ATX, 8-pin CPU) are securely connected to the motherboard and power supply.
- Verify the power supply switch is in the ON position.
- Check if the front panel power switch connector is correctly installed on the motherboard.
- No Display:
- Confirm the monitor is connected to the correct display output (motherboard or dedicated graphics card).
- Reseat the graphics card and memory modules.
- Try booting with only one memory stick installed.
- System Instability/Crashes:
- Check CPU and GPU temperatures. Ensure cooling solutions are properly installed.
- Verify memory modules are correctly seated and compatible. Run a memory diagnostic tool.
- Update BIOS and all drivers to the latest versions.
- Wi-Fi/LAN Connectivity Issues:
- Ensure Wi-Fi antenna is securely attached.
- Install or update Wi-Fi/LAN drivers.
- Check network cable connections for LAN.
For more detailed troubleshooting, refer to the full user manual available on the ASUS support website or contact ASUS technical support.
8. Specifications
| Feature | Detail |
|---|---|
| Brand | ASUS |
| Model Name | PRIME B660M-A WIFI D4 |
| CPU Socket | LGA 1700 |
| Compatible Processors | 12th Gen Intel Core, Pentium Gold, Celeron Processors |
| Chipset Type | Intel B660 |
| RAM Memory Technology | DDR4 |
| Memory Slots | 4 x DIMM, Max. 128GB, DDR4 (O.C.) |
| Memory Clock Speed | Up to 5333MHz (O.C.) |
| Graphics Output | 2 x HDMI, 1 x DisplayPort |
| Expansion Slots | 1 x PCIe 4.0 x16, 2 x PCIe 3.0 x1 |
| Storage | 2 x M.2 slots (PCIe 4.0 x4), 4 x SATA 6Gb/s ports |
| USB Ports (Rear) | 2 x USB 3.2 Gen 2, 4 x USB 2.0 |
| USB Ports (Front Headers) | 1 x USB 3.2 Gen 1 Type-C, 1 x USB 3.2 Gen 1, 2 x USB 2.0 |
| Ethernet | Intel 1Gb Ethernet |
| Wireless Connectivity | Intel Wi-Fi 6 (802.11ax), Bluetooth v5.2 |
| Audio | Realtek 7.1 Surround Sound High Definition Audio CODEC |
| Form Factor | mATX (9.6 inch x 9.6 inch) |
| Dimensions (LxWxH) | 11.1 x 10.6 x 2.8 inches |
| Item Weight | 2.86 pounds |
Note: Specifications are subject to change without notice. Please refer to the official ASUS product page for the most up-to-date information.
9. Support and Warranty Information
For technical support, driver downloads, BIOS updates, and further product information, please visit the official ASUS support website:
Information regarding your product's warranty coverage can be found on the ASUS website or within the warranty card included in your product packaging. Please retain your proof of purchase for warranty claims.


