
1. Introduction
This manual provides essential instructions for the safe and correct installation, operation, and maintenance of your WEIJIA DC92-01729M Main Control Board. This component is a direct replacement for Samsung dryer control boards with part numbers DC94-07311A and DC41-00248B.
Product Name: WEIJIA DC92-01729M Main Control Board for Samsung Dryer
Replacement Part Numbers: DC94-07311A, DC41-00248B
Compatibility: This main PCB assembly is valid for models including DVE52M8650V/A3, DVE52M8650W/A3, DVE54M8750V/A3, DVE54M8750W/A3, DVG52M8650V/A3, DVG52M8650W/A3, DVG54M8750V/A3, DVG54M8750W/A3, and other compatible Samsung dryer models. Please verify compatibility with your specific dryer model before installation.
2. Safety Information
WARNING: Disconnect power to the dryer before servicing. Failure to do so may result in electrical shock, serious injury, or death.
- Always wear appropriate personal protective equipment (PPE) such as gloves and safety glasses.
- Ensure the work area is well-lit and clear of obstructions.
- If you are unsure about any step, consult a qualified appliance technician.
- Keep children and pets away from the work area during installation.
- Handle the control board by its edges to avoid damaging electronic components.
3. Setup and Installation
This section outlines the general steps for replacing the main control board. Specific dryer models may vary in panel removal and access. Refer to your specific dryer's service manual for detailed instructions if needed.
- Disconnect Power: Unplug the dryer from the electrical outlet or turn off the circuit breaker supplying power to the dryer. Verify power is off.
- Access Control Board: Depending on your dryer model, you may need to remove the top panel, back panel, or front console to access the main control board. Use appropriate tools and follow manufacturer guidelines for panel removal.
- Document Connections: Before disconnecting any wires, take clear photos or make a detailed diagram of all wire connections to the existing control board. Pay attention to wire colors, positions, and any unique connectors. This documentation is crucial for correct reassembly.
- Disconnect Wires: Carefully disconnect all wire harnesses and individual connectors from the old control board. Note any clips or locking mechanisms that need to be released.
- Remove Old Board: Unscrew or unclip the old control board from its mounting brackets. Store any removed screws safely.
- Install New Board: Position the new WEIJIA DC92-01729M control board in place. Ensure it aligns correctly with the mounting points and secure it with the screws or clips removed earlier. Do not overtighten.
- Reconnect Wires: Using your photos or diagrams, carefully reconnect all wire harnesses and connectors to the new control board. Ensure all connections are secure, fully seated, and match the original configuration.
- Reassemble Dryer: Reattach any panels or consoles that were removed. Ensure all screws are tightened and panels are securely in place.
- Restore Power: Plug the dryer back into the electrical outlet or turn on the circuit breaker.
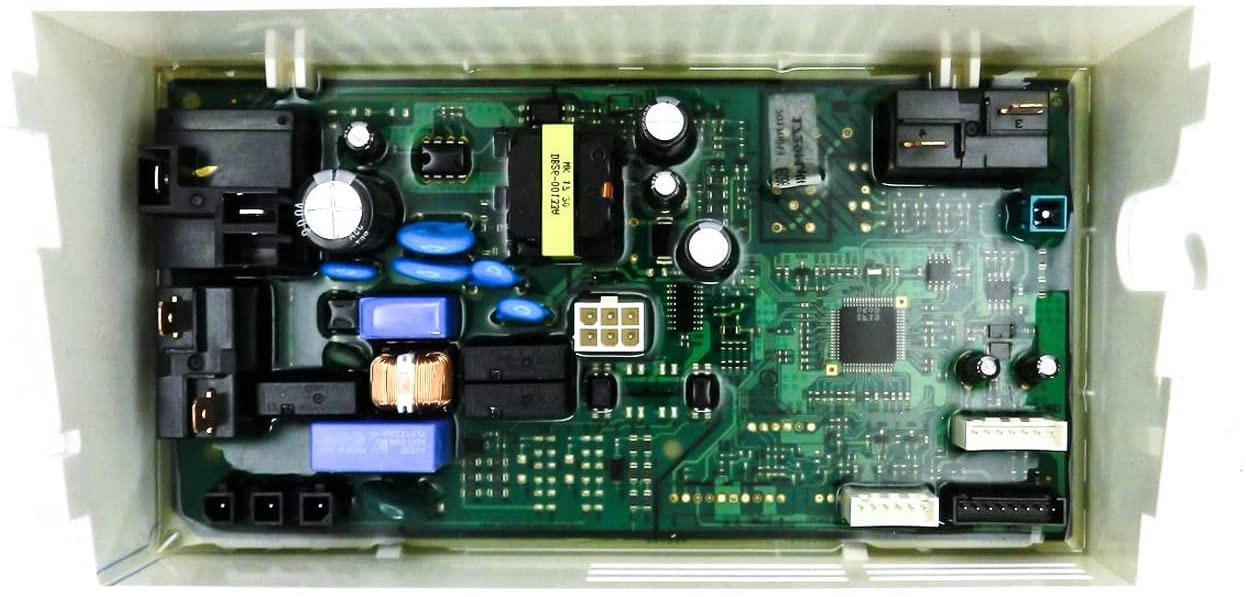
Image 1: The WEIJIA DC92-01729M Main Control Board. This image displays the overall layout and various connectors of the replacement part.
4. Operating Instructions
After successful installation of the main control board, the dryer's operation should return to its normal functionality. This control board manages the various electronic functions of your Samsung dryer.
- Ensure all connections are secure and panels are reassembled before operating the dryer.
- Refer to your Samsung dryer's original user manual for specific operating modes, cycle selections, and feature usage.
- The control board facilitates functions such as cycle selection, temperature control, drying time, and display operation.
- Perform a test cycle to confirm proper operation after installation.
5. Maintenance
The main control board itself requires no routine maintenance. However, proper general dryer maintenance can extend the life of all components, including the control board.
- Regularly clean the lint filter before or after every load to ensure efficient drying and prevent overheating.
- Inspect and clean the dryer vent system annually to prevent lint buildup, ensure proper airflow, and reduce fire hazards.
- Keep the area around the dryer clear of obstructions to allow for adequate ventilation.
- If the dryer is exposed to high humidity, ensure adequate room ventilation to prevent moisture-related issues that could affect electronic components.
6. Troubleshooting
If your dryer is not functioning correctly after replacing the control board, consider the following troubleshooting steps:
- No Power:
Check if the dryer is properly plugged into a working electrical outlet. Verify that the circuit breaker for the dryer is in the 'ON' position. Re-check all wire connections to the control board to ensure they are secure and correctly seated. - Incorrect Operation / Specific Functions Not Working:
Double-check all wire connections against your installation diagrams or photos. Ensure no wires are loose, pinched, or connected to the wrong terminal. A single misconnected wire can prevent proper function. - Error Codes Displayed:
If the dryer displays an error code, consult your Samsung dryer's original user manual or a specific service manual for your dryer model. These manuals typically provide the meaning of error codes and recommended solutions. - Still Malfunctioning:
If all connections are correct and the dryer still malfunctions, other components of the dryer may need inspection. This control board is a replacement part; if the original issue was not solely due to the control board, other parts might also require attention. Consider consulting a qualified technician.
7. Specifications
| Attribute | Value |
|---|---|
| Part Number | DC92-01729M |
| Replaces Part Numbers | DC94-07311A, DC41-00248B |
| Manufacturer | WEIJIA |
| Compatible Appliance Type | Samsung Dryer |
| Compatible Models (Partial List) | DVE52M8650V/A3, DVE52M8650W/A3, DVE54M8750V/A3, DVE54M8750W/A3, DVG52M8650V/A3, DVG52M8650W/A3, DVG54M8750V/A3, DVG54M8750W/A3 |
| Date First Available | December 29, 2021 |
8. Warranty Information
Specific warranty details for this replacement part are typically provided by the seller or manufacturer at the time of purchase. Please refer to your purchase documentation, such as an invoice or product listing, or contact the seller directly for information regarding warranty coverage, terms, and conditions.
General warranty information often covers manufacturing defects for a limited period from the date of purchase. Damage resulting from improper installation, misuse, accidental damage, or external factors may not be covered under warranty.
9. Support
For technical assistance, installation guidance, or troubleshooting beyond the scope of this manual, please contact the seller from whom you purchased this part or a qualified appliance repair technician.
When seeking support, always provide the part number (DC92-01729M) and your dryer's full model number to ensure accurate assistance.