1. Product Overview
The OLIGHT Warrior X 3 is a high-performance rechargeable tactical flashlight designed for various outdoor and tactical applications, offering exceptional brightness and beam distance. This section details the components included with your flashlight.

Package Contents:
- Warrior X 3 (Battery Included)
- Warrior Ring
- Silicone Tactical Grip Ring
- MCC3 USB Magnetic Charging Cable
- Holster
- User Manual

2. Setup
Before first use, ensure the battery is fully charged. The Warrior X 3 comes with a pre-installed battery.
2.1 Charging the Battery
The Warrior X 3 utilizes a convenient magnetic charging system. Use the provided MCC3 USB Magnetic Charging Cable.
- Connect the USB end of the MCC3 cable to a powered USB port (e.g., computer, USB wall adapter).
- Attach the magnetic end of the cable to the tail cap of the flashlight. The magnetic connection will snap into place automatically.
- The indicator light on the MCC3 cable will glow red during charging and turn green when charging is complete.

2.2 Attaching the Warrior Ring / Silicone Tactical Grip Ring
The Warrior X 3 includes both a Warrior Ring and a Silicone Tactical Grip Ring for enhanced grip and control. Choose the one that best suits your preference and attach it to the flashlight body as shown in the product overview images.
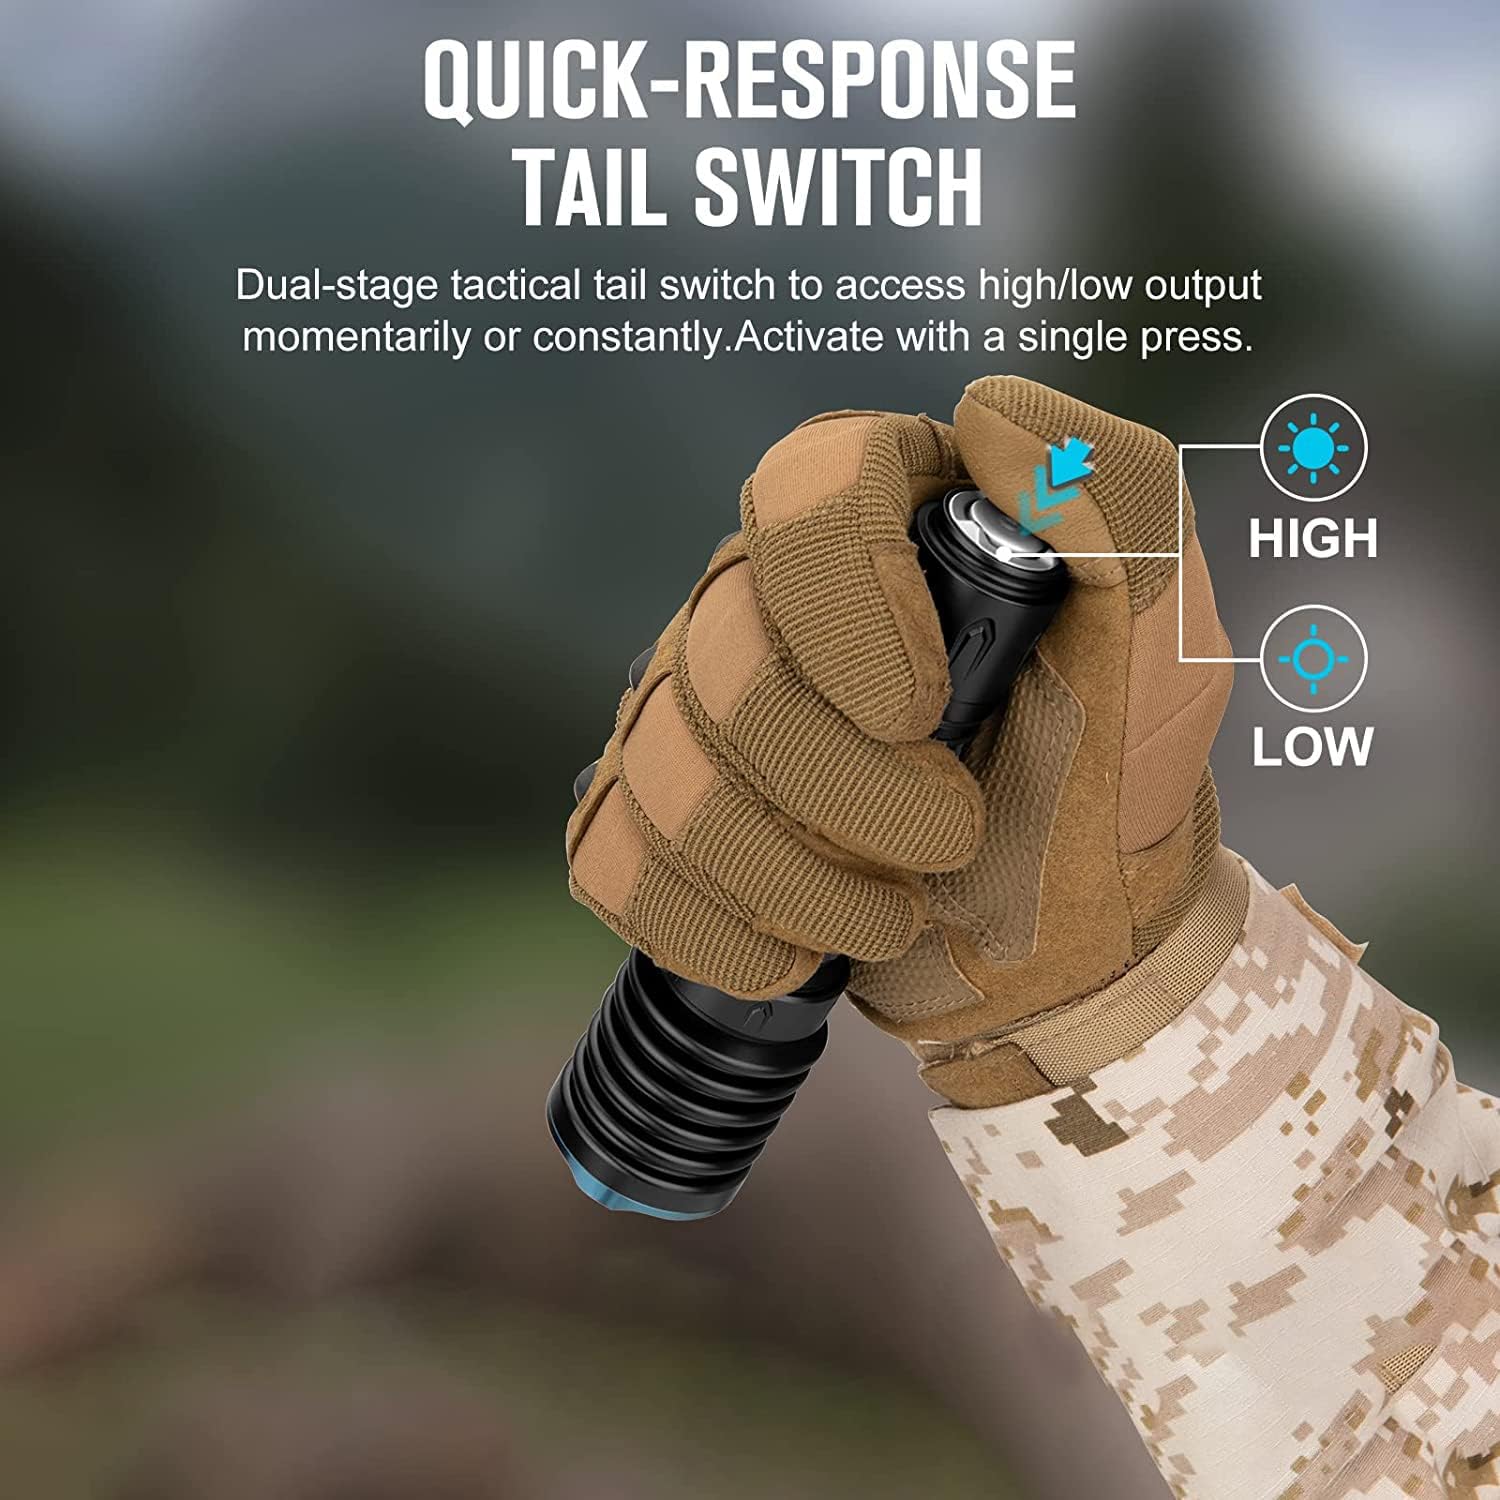
3. Operating Instructions
The Warrior X 3 features a dual-stage tactical tail switch for intuitive control of its output modes.
3.1 Basic Operation
- Momentary Low: Lightly press the tail switch. Release to turn off.
- Constant Low: Fully press and quickly release the tail switch. Press again to turn off.
- Momentary High: Fully press and hold the tail switch. Release to turn off.
- Constant High: Fully press the tail switch twice quickly. Press again to turn off.
3.2 Vibration Battery Indicator
The Warrior X 3 is equipped with an internal motor that silently vibrates to alert you when the battery level is low, eliminating the need to visually check the battery status.
- Short vibration every 5 minutes: Battery power is below 30%.
- Short vibration every 1 minute: Battery power is below 10%.
- Long vibration every 10 seconds: Battery power is below 5%.

3.3 Optional Dual-Button Remote Switch
The re-engineered tail cap of the Warrior X 3 supports an optional dual-button magnetic remote switch (sold separately). This accessory allows for convenient high/low output access when the flashlight is mounted to a setup, such as a weapon.

4. Maintenance
Proper maintenance ensures the longevity and optimal performance of your OLIGHT Warrior X 3 flashlight.
- Cleaning: Regularly clean the threads and O-rings with a clean cloth. Apply a thin layer of silicone grease to the O-rings periodically to maintain water resistance.
- Battery Care: Recharge the battery when the vibration indicator signals low power. If storing the flashlight for an extended period, remove the battery to prevent drainage and potential damage.
- Lens Care: Keep the lens clean. Use a soft, lint-free cloth to wipe away dust or smudges. Avoid abrasive materials that could scratch the lens.
- Storage: Store the flashlight in a cool, dry place away from direct sunlight and extreme temperatures.
5. Troubleshooting
If you encounter issues with your Warrior X 3, refer to the following common problems and solutions:
- Flashlight not turning on:
- Ensure the battery is fully charged.
- Check if the tail cap is fully tightened. A loose tail cap can prevent electrical contact.
- Verify the battery is inserted with the correct polarity.
- Light output is dim or inconsistent:
- Recharge the battery.
- Clean the battery contacts and the tail cap contacts with an alcohol swab.
- Vibration indicator not working:
- Ensure the battery is not completely depleted.
- If the issue persists, contact customer support.
For issues not covered here, please refer to the Warranty and Support section for assistance.
6. Specifications
Detailed technical specifications for the OLIGHT Warrior X 3 Tactical Flashlight:
| Feature | Specification |
|---|---|
| Brand | OLIGHT |
| Model | Warrior X 3 |
| Light Source Type | High Performance Cool White LED (6500K) |
| White Brightness | 2500 Lumens (Max) |
| Light Path Distance | 560 Meters (Max) |
| Power Source | Battery Powered |
| Battery Type | 1 Lithium Ion battery (included) |
| Runtime | Up to 8 hours |
| Material | Aerospace-grade Aluminum Alloy |
| Finish Type | Black |
| Water Resistance Level | Waterproof |
| Product Dimensions | 5.8"D x 1.54"W x 5.03"H |
| Item Weight | 1.15 pounds |
| Special Features | Adjustable Light Modes, High Power, Long Range, Rechargeable, Tactical Uses |
7. Warranty and Support
OLIGHT is committed to providing high-quality products and excellent customer service.
7.1 Warranty Information
OLIGHT offers a Lifetime Warranty on the Warrior X 3 flashlight, reflecting their confidence in the product's durability and performance. This warranty covers defects in materials and workmanship under normal use.

7.2 Customer Support
If you have any questions, concerns, or require assistance with your OLIGHT Warrior X 3, please do not hesitate to contact OLIGHT customer service. You can typically find contact information on the official OLIGHT website or through the retailer where you purchased the product.
For more information, visit the OLIGHT Store on Amazon.


