
1. Introduction
Thank you for choosing the Hamilton Beach FlexBrew Trio Coffee Maker. This appliance offers versatile brewing options, allowing you to brew a single cup using a K-Cup pod or ground coffee, or a full 12-cup carafe with ground coffee. This manual provides essential information for safe operation, setup, use, maintenance, and troubleshooting to ensure optimal performance and longevity of your coffee maker.
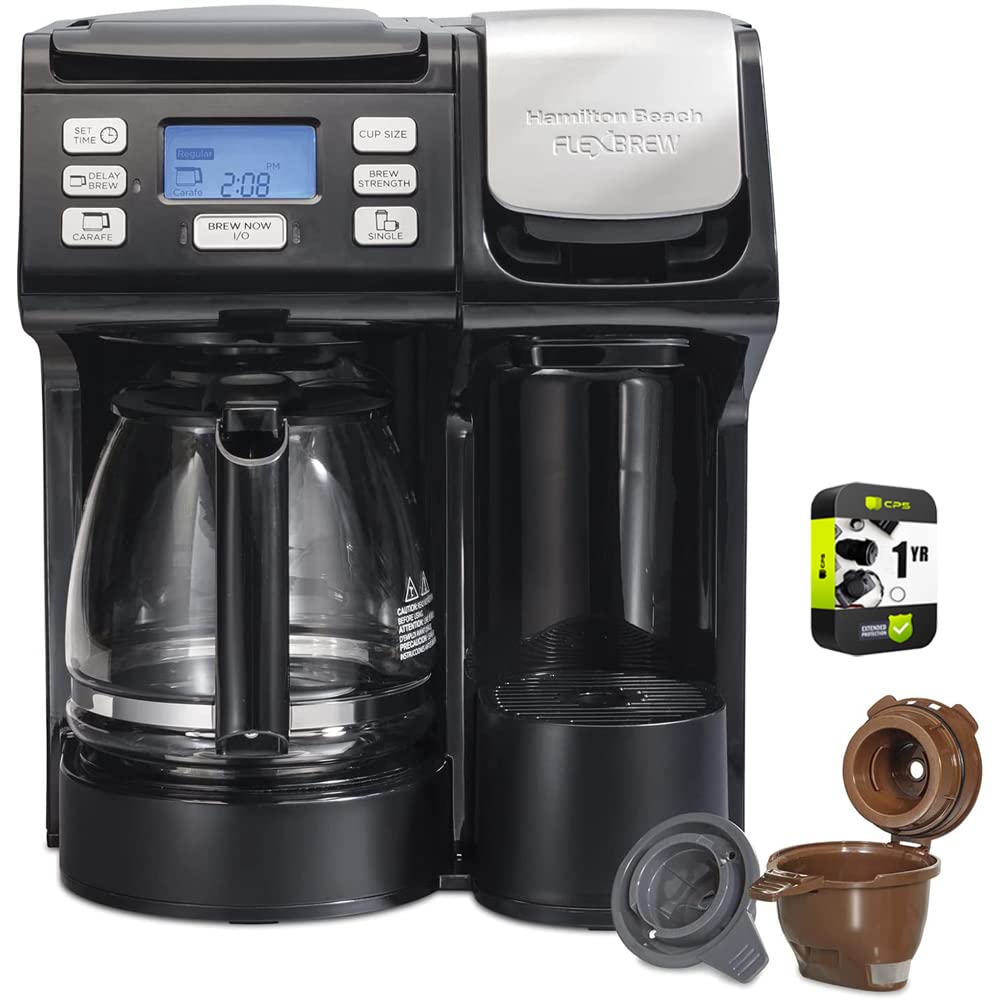
Image 1.1: The Hamilton Beach FlexBrew Trio Coffee Maker, featuring its dual brewing capabilities for single-serve and carafe coffee.

Image 1.2: Visual representation of the three brewing methods: K-Cup pod, ground coffee for a single cup, and a full 12-cup carafe.
2. Important Safety Information
Please read all instructions carefully before using this appliance. Failure to follow these safety guidelines may result in fire, electric shock, or personal injury.
- Do not touch hot surfaces. Use handles or knobs.
- To protect against electrical hazards, do not immerse cord, plugs, or coffee maker in water or other liquid.
- Close supervision is necessary when any appliance is used by or near children.
- Unplug from outlet when not in use and before cleaning. Allow to cool before putting on or taking off parts, and before cleaning the appliance.
- Do not operate any appliance with a damaged cord or plug, or after the appliance malfunctions or has been damaged in any manner. Contact customer service for examination, repair, or adjustment.
- The use of accessory attachments not recommended by the appliance manufacturer may result in fire, electric shock, or personal injury.
- Do not use outdoors.
- Do not let cord hang over edge of table or counter, or touch hot surfaces.
- Do not place on or near a hot gas or electric burner, or in a heated oven.
- To disconnect, turn any control to "off," then remove plug from wall outlet.
- Do not use appliance for other than intended use.
- The carafe is designed for use with this appliance. It must never be used on a range top.
- Do not place a hot carafe on a wet or cold surface.
- Do not use a cracked carafe or a carafe having a loose or weakened handle.
- Do not clean carafe with cleansers, steel wool pads, or other abrasive material.
- Scalding may occur if the lid is removed during the brewing cycle.
3. Setup and First Use
3.1 Unpacking and Placement
Carefully remove all packaging materials and place the coffee maker on a flat, stable, heat-resistant surface. Ensure there is adequate clearance around the unit for proper ventilation.
3.2 Initial Cleaning
Before first use, wash the removable parts (carafe, carafe lid, brew basket, single-serve pod holder, and reusable ground coffee filter) in hot, soapy water. Rinse thoroughly and dry. Wipe the exterior of the coffee maker with a damp cloth.
3.3 Priming the Coffee Maker
To prime the unit, fill the removable water reservoir with fresh water up to the MAX fill line. Place the carafe on the warming plate. Run a full carafe brew cycle without coffee grounds. Discard the water. Repeat this process for the single-serve side, running a large cup size brew cycle without a K-Cup pod or ground coffee. This cleans the internal components and prepares the machine for brewing.

Image 3.1: The removable water reservoir being lifted from the coffee maker, illustrating how to access it for filling.
4. Operating Instructions
4.1 Brewing a Single Cup with a K-Cup Pod
- Ensure the water reservoir is filled with fresh water.
- Lift the single-serve lid.
- Insert a K-Cup pod into the pod holder.
- Close the single-serve lid firmly.
- Place your mug on the drip tray.
- Press the 'CUP SIZE' button to select your desired brew size (6, 8, or 10 oz).
- Press the 'SINGLE' brew button to start brewing. The coffee maker will automatically shut off after brewing.

Image 4.1: A single cup of coffee being brewed and dispensed into a mug from the single-serve side.
4.2 Brewing a Single Cup with Ground Coffee
- Ensure the water reservoir is filled with fresh water.
- Lift the single-serve lid.
- Place the reusable ground coffee filter into the pod holder. Add your desired amount of ground coffee (typically 1-2 tablespoons per cup) into the reusable filter. Do not overfill.
- Close the single-serve lid firmly.
- Place your mug on the drip tray.
- Press the 'CUP SIZE' button to select your desired brew size (6, 8, 10, 12, or 14 oz).
- Press the 'SINGLE' brew button to start brewing. The coffee maker will automatically shut off after brewing.
4.3 Brewing a Full Carafe with Ground Coffee
- Ensure the water reservoir is filled with fresh water up to the 12-cup line.
- Open the carafe-side lid.
- Insert a standard basket-style paper filter into the brew basket, or use the permanent filter if provided.
- Add your desired amount of ground coffee into the filter (e.g., 1 scoop per cup).
- Close the carafe-side lid.
- Place the empty carafe with its lid on the warming plate.
- Press the 'CARAFE' brew button to start brewing. The coffee maker will keep the coffee warm for a set period and then automatically shut off.

Image 4.2: An overview of the different components used for brewing, including K-Cup, reusable filter, and carafe with filter basket.
4.4 Programming Delay Brew
The delay brew feature allows you to set the coffee maker to start brewing at a specific time.
- First, set the current time by pressing the 'SET TIME' button and using the hour/minute buttons to adjust.
- Prepare the coffee maker for carafe brewing as described in section 4.3.
- Press the 'DELAY BREW' button. The display will flash.
- Use the hour/minute buttons to set the desired start time for brewing.
- Press 'DELAY BREW' again to confirm. The indicator light will illuminate, and the coffee maker will start brewing at the programmed time.

Image 4.3: The control panel displaying the delay brew setting, showing how to program a start time for your coffee.
4.5 Adjusting Brew Strength and Cup Size
- Brew Strength: For carafe brewing, you can select 'Regular' or 'Bold' brew strength using the 'BREW STRENGTH' button.
- Cup Size: For single-serve brewing, use the 'CUP SIZE' button to cycle through available options (6, 8, 10 oz for pods; 6, 8, 10, 12, 14 oz for ground coffee).

Image 4.4: The control panel indicating selected brew strength and cup size options for single-serve brewing.
5. Care and Maintenance
5.1 Daily Cleaning
After each use, unplug the coffee maker and allow it to cool. Remove and wash the carafe, carafe lid, brew basket, single-serve pod holder, and reusable ground coffee filter in warm, soapy water. Rinse thoroughly and dry. The drip tray and its cover can also be removed and washed. Wipe the exterior of the coffee maker with a damp, soft cloth. Do not use abrasive cleaners or scouring pads.
5.2 Descaling (Mineral Deposit Removal)
Mineral deposits (calcium) can build up in your coffee maker over time, affecting performance and coffee taste. Descale your coffee maker every 1-3 months, depending on water hardness and frequency of use.
- Empty the water reservoir.
- Pour 1 cup of white vinegar into the water reservoir, then fill the rest with cold water up to the MAX fill line.
- Place the empty carafe on the warming plate.
- Run a full carafe brew cycle. After about 30 seconds, turn the coffee maker off and let it soak for 30 minutes.
- Turn the coffee maker back on to complete the brew cycle.
- Discard the vinegar solution.
- Fill the water reservoir with fresh, cold water and run 2-3 full carafe brew cycles with only water to rinse thoroughly.
- Repeat steps 1-7 for the single-serve side, using a large cup size setting.
6. Troubleshooting
| Problem | Possible Cause | Solution |
|---|---|---|
| Coffee does not brew. | No water in reservoir; unit not plugged in; brew cycle not initiated; mineral buildup. | Fill reservoir; check power connection; press appropriate brew button; descale the unit. |
| Coffee is too weak or too strong. | Incorrect coffee-to-water ratio; incorrect brew strength selected. | Adjust amount of coffee grounds; select 'Bold' for stronger coffee or 'Regular' for lighter; ensure K-Cup is properly seated. |
| Water leaks from unit. | Water reservoir not seated correctly; overfilling reservoir; K-Cup or reusable filter not properly inserted. | Ensure reservoir is firmly in place; do not exceed MAX fill line; ensure K-Cup or reusable filter is correctly positioned and lid is closed. |
| Single-serve side not brewing / no water comes out. | Clogged needle; K-Cup not punctured; mineral buildup. | Clean the entry and exit needles (refer to manufacturer's cleaning instructions for needles); ensure K-Cup is properly seated and lid is closed firmly; descale the unit. |
| Delay brew not working. | Not properly set; power interruption. | Ensure delay brew time is correctly set and confirmed; reset time if power was interrupted. |
7. Product Specifications
- Brand: Hamilton Beach
- Model Number: E9HB49902
- Product Dimensions: 14"D x 15.6"W x 14"H
- Weight: Approximately 14 lbs
- Color: Black
- Material: Plastic
- Capacity: 12-cup carafe, 56 oz water reservoir
- Coffee Input Type: K-Cup pods, Ground Coffee
- Special Features: Programmable, Single-Serve, Drip
- Power Source: AC adapter
- Filter Type: Reusable (for ground coffee), Paper filter compatible (for carafe)
8. Warranty and Customer Support
This Hamilton Beach FlexBrew Trio Coffee Maker is covered by a manufacturer's warranty. Please refer to the warranty card included with your product for specific terms and conditions, including warranty period and coverage details. For technical assistance, replacement parts, or warranty claims, please contact Hamilton Beach Customer Service directly. Contact information can typically be found on the manufacturer's website or on the product packaging.


