
1. Introduction
This manual provides essential information for the safe and efficient operation of your Scheppach Airforce 5 Portable Compressor. Please read these instructions carefully before using the device and keep them for future reference. The Airforce 5 is designed for inflating tires, balls, and other inflatable items, offering both 12V and 230V power options and a digital pressure display for precise control.
2. Safety Instructions
- Always ensure the compressor is placed on a stable, level surface during operation.
- Do not operate the compressor in wet conditions or expose it to rain.
- Keep children and unauthorized persons away from the operating area.
- Wear appropriate eye protection when operating the compressor.
- Never direct the air nozzle at people or animals.
- Do not exceed the maximum operating pressure of 8 bar (116 PSI).
- Disconnect the power supply before performing any maintenance or when the unit is not in use.
- Ensure proper ventilation during operation to prevent overheating.
- Check the air hose and power cables for damage before each use. Do not use if damaged.
3. Package Contents
Verify that all items are present upon unpacking:
- Scheppach Airforce 5 Portable Compressor Unit
- 600mm Compressed Air Hose
- 4 Nozzles (for car/bicycle valves, floats, balls, etc.)
- 12V Car Connection Cable
- 230V Mains Power Cable
- User Manual
4. Product Overview
Familiarize yourself with the components of your Airforce 5 compressor.
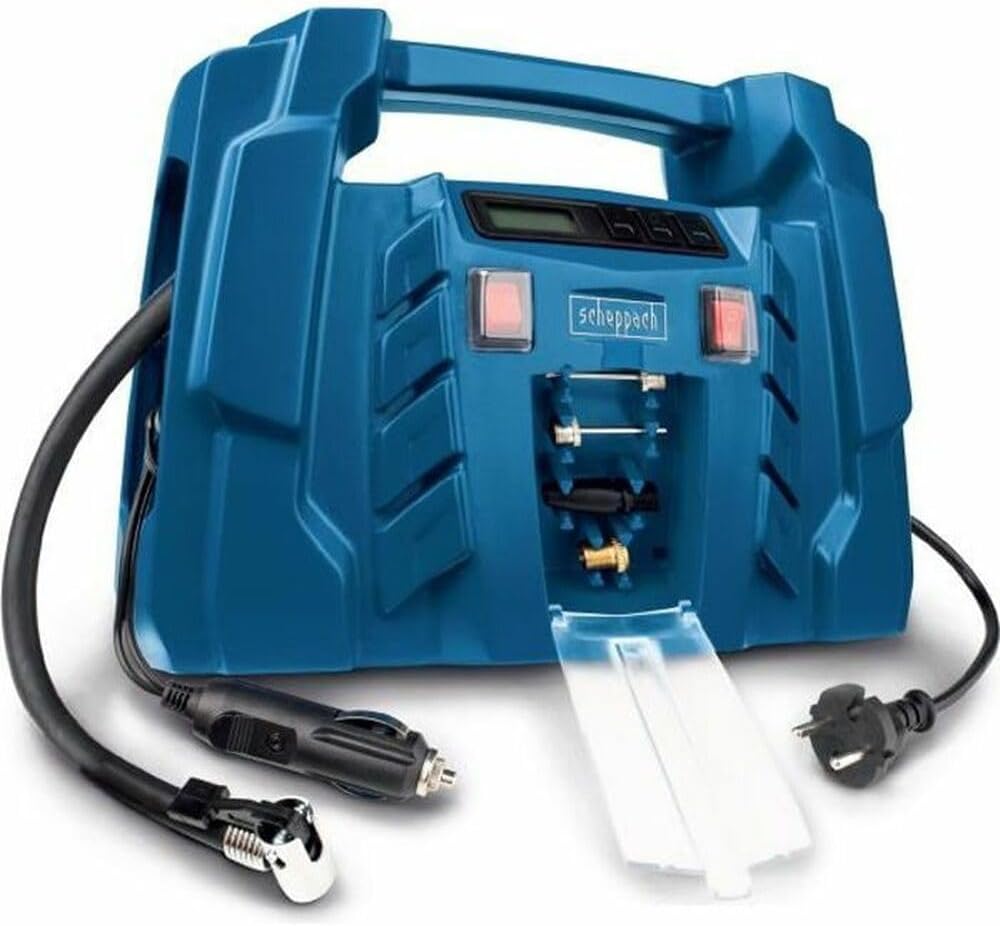
Figure 1: Scheppach Airforce 5 Portable Compressor. This image displays the blue compressor unit, featuring a digital display panel at the top, control buttons on either side of the display, and a storage compartment for various nozzles and adapters. The 12V car power adapter and the 230V mains power plug are shown connected to the unit, along with the black air hose.
- Digital Display: Shows current pressure and target pressure.
- Control Buttons: For power, unit selection, and pressure adjustment.
- Air Hose Connection: Point for attaching the compressed air hose.
- Accessory Storage Compartment: Holds various nozzles and adapters.
- 12V Car Power Input: For connection to a vehicle's cigarette lighter socket.
- 230V Mains Power Input: For connection to a standard wall outlet.
5. Setup
5.1 Power Connection
- For 230V Mains Power: Connect the 230V power cable to the compressor's 230V input port, then plug it into a standard wall outlet.
- For 12V Car Power: Connect the 12V car connection cable to the compressor's 12V input port, then plug the other end into your vehicle's cigarette lighter socket. Ensure the vehicle's engine is running for optimal performance and to prevent draining the car battery.
5.2 Attaching the Air Hose and Nozzles
- Connect the 600mm compressed air hose securely to the air hose connection port on the compressor.
- Select the appropriate nozzle for the item you wish to inflate (e.g., Schrader valve adapter for car tires, needle adapter for balls).
- Attach the selected nozzle firmly to the end of the air hose.
6. Operating Instructions
6.1 Powering On and Unit Selection
- Once powered, press the power button to turn on the compressor. The digital display will illuminate.
- Use the unit selection button (often labeled "UNIT" or similar) to cycle through available pressure units (e.g., PSI, Bar, KPA). Select the desired unit.
6.2 Setting Desired Pressure
- Attach the nozzle to the item to be inflated. The digital display will show the current pressure of the item.
- Use the "+" and "-" buttons to set your desired target pressure. Refer to the item's manufacturer recommendations for correct pressure levels.
6.3 Starting and Stopping Inflation
- Press the start button (often indicated by a play/start symbol) to begin inflation. The compressor will automatically stop once the preset target pressure is reached.
- To manually stop inflation at any time, press the stop button (often indicated by a square/stop symbol) or the power button.
- After inflation, carefully disconnect the nozzle from the item and then disconnect the air hose from the compressor.
7. Maintenance
- Cleaning: Wipe the compressor's exterior with a soft, damp cloth. Do not use harsh chemicals or abrasive cleaners. Ensure the unit is unplugged before cleaning.
- Storage: Store the compressor in a dry, cool place, away from direct sunlight and extreme temperatures. Utilize the integrated storage for cables and accessories to keep them organized and protected.
- Inspection: Regularly inspect the air hose, power cables, and nozzles for any signs of wear or damage. Replace damaged components immediately.
8. Troubleshooting
| Problem | Possible Cause | Solution |
|---|---|---|
| Compressor does not turn on. | No power supply; faulty cable; unit overheated. | Check power connection (12V or 230V). Ensure cables are not damaged. Allow unit to cool down if it was recently used. |
| Compressor runs but does not inflate. | Air hose or nozzle not properly connected; leak in hose/nozzle; item valve faulty. | Ensure all connections are secure. Check for audible air leaks. Inspect the item's valve. |
| Inaccurate pressure reading. | Incorrect pressure unit selected; sensor issue. | Verify the selected pressure unit on the digital display. If issues persist, contact support. |
| Compressor stops prematurely. | Target pressure reached; overheating. | This is normal if the preset pressure is reached. If not, allow the unit to cool down. |
9. Specifications
| Brand | Scheppach |
| Model Name | Airforce 5 |
| Voltage | 12V (DC), 230V (AC) |
| Maximum Operating Pressure | 8 Bars (116 PSI) |
| Maximum Power | 150 Watts |
| Air Flow Capacity (Suction Power) | 36.5 Liters Per Minute |
| Item Weight | 1.6 Kilograms (3.52 pounds) |
| Product Dimensions (L x W x H) | 11.02 x 4.72 x 8.27 inches (270 x 200 x 115 mm) |
| Air Hose Length | 600mm (0.6 meters) |
| Special Feature | Digital Display |
| Material | Plastic |
| Included Components | 600mm compressed air hose, 4 nozzles (car/bicycle valves, floats, balls) |
10. Warranty and Support
For warranty information, please refer to the documentation provided with your purchase or contact the retailer. For technical support or inquiries, please reach out to Scheppach customer service or your authorized dealer. Keep your proof of purchase for any warranty claims.


