
MUCAR CDL20
MUCAR CDL20 OBD2/EOBD Car Diagnostic Tool User Manual
Model: CDL20 | Brand: MUCAR
1. Introduction
The MUCAR CDL20 is a professional OBD2 diagnostic tool designed to help users quickly identify and resolve vehicle fault codes. This device provides comprehensive OBD2 functions, enabling efficient vehicle status analysis and saving time on potential workshop repairs. It is compatible with a wide range of vehicles and supports multiple languages.

Image 1.1: Front view of the MUCAR CDL20 OBD2 Diagnostic Tool, showing its display and navigation buttons.
2. Setup and Connection
The MUCAR CDL20 is a plug-and-play device that requires no batteries or app downloads. Follow these steps to connect and begin diagnosis:
- Locate the OBDII Port: The OBDII port is typically located under the dashboard on the driver's side of the vehicle. Refer to your vehicle's owner's manual if you cannot find it.
- Connect the Device: Plug the MUCAR CDL20's cable connector firmly into the vehicle's OBDII port.
- Turn on Ignition: Turn the vehicle's ignition to the 'ON' position (do not start the engine). The device will power on automatically and begin scanning for errors.

Image 2.1: Illustration of connecting the MUCAR CDL20 to a vehicle's OBDII port.
3. Operating Instructions
The MUCAR CDL20 supports 11 comprehensive OBDII diagnostic modes. Use the navigation buttons (Up, Down, OK, Back) to select and execute functions from the main menu.

Image 3.1: The MUCAR CDL20 display showing the main diagnostic menu with options like OBDII/EOBD, Lookup, Battery, and Settings.
3.1. Overview of OBDII Functions

Image 3.2: An overview of the MUCAR CDL20's supported OBDII functions, including Read Codes, Erase Codes, On-Board Monitor Test, EVAP System Test, O2 Sensor Test, Freeze Frame Data, Live Data Stream, DTC Lookup, Vehicle Information, and I/M Readiness.
- Read Codes: Retrieves and displays existing diagnostic trouble codes (DTCs) from the vehicle's control module. This function is used when a malfunction indicator lamp (MIL) is illuminated on the vehicle's instrument panel.
- Erase Codes: Clears the diagnostic trouble codes from the control module. This function should be performed after a vehicle issue has been resolved. If the underlying problem is not fixed, the code may reappear.
- Live Data: Reads and displays real-time ECU/PCM data stream. Observing this data helps technicians understand the vehicle's overall performance and diagnose issues.
- I/M Readiness Status: Indicates whether various emission-related systems in the vehicle are operating correctly and are ready for inspection and maintenance.
- O2 Sensor Test: Retrieves and displays O2 sensor monitor test results for the most recently performed tests from the vehicle's on-board computer.
- EVAP System Test: Initiates a leak test of the vehicle's EVAP (Evaporative Emission Control) system. The tool sends a signal to the vehicle's on-board computer to start the test. Consult your vehicle's service manual for specific procedures.
- On-Board Monitor Test: Retrieves and displays test results for emission-related powertrain components and systems.
- Freeze Frame Data: If a vehicle has an error, a fault code is generated, and freeze frame data can be used to display vehicle data at the moment the fault code was generated. This helps maintenance technicians evaluate the error point based on relevant data.
- Vehicle Information: Displays information such as the Vehicle Identification Number (VIN), Calibration ID (CID), and Calibration Verification Number (CVN).
- DTC Lookup: Allows you to enter a 5-digit code to view its detailed definition and diagnostic tips/solutions for current DTCs.
- Component Test: Certain vehicle components can be actuated by commands sent from the scanner to test their functionality.

Image 3.3: A vehicle dashboard showing the engine malfunction indicator lamp (MIL) turned off, indicating successful clearing of fault codes.

Image 3.4: The MUCAR CDL20 screen showing a graphical representation of live data stream from the vehicle's ECU.

Image 3.5: A vehicle dashboard indicating I/M readiness status, often used for smog checks.

Image 3.6: Visual representation of an O2 sensor test, showing oxygen bubbles emanating from car exhaust pipes.

Image 3.7: The MUCAR CDL20 display showing vehicle information, specifically the VIN number.

Image 3.8: The MUCAR CDL20 screen prompting for DTC input for lookup.
4. Maintenance
To ensure the longevity and optimal performance of your MUCAR CDL20 diagnostic tool, follow these general maintenance guidelines:
- Cleaning: Wipe the device with a soft, dry cloth. Avoid using abrasive cleaners or solvents that could damage the casing or screen.
- Storage: Store the device in a cool, dry place away from direct sunlight and extreme temperatures. Keep it protected from dust and moisture.
- Cable Care: Avoid bending or twisting the diagnostic cable excessively. Store it neatly to prevent damage to the wires or connectors.
- Software Updates: Check the official MUCAR website periodically for any available software updates to ensure compatibility with newer vehicle models and improved functionality.
5. Troubleshooting
Common Issues and Solutions:
- Q: How do I know if MUCAR CDL20 supports my vehicle?
A: The MUCAR CDL20 OBD2 scanner supports all vehicles manufactured after 1996 that are OBDII protocol compliant. This includes most American cars from 1996 onwards, European cars from 2000 onwards, and Asian-made vehicles. If you are unsure, please contact MUCAR support for verification. - Q: What should I do if I encounter a 'Link Error'?
A:- Please ensure your vehicle is OBDII protocol compliant.
- Try checking if your main diagnostic cable is functioning correctly and is not damaged.
- Please verify that your vehicle's OBD2 port is correct and undamaged.
- Q: I am completely new to OBD2 scanners, how do I use it?
A:- Read the fault code displayed by the device.
- Identify the part that needs repair based on the fault code and perform the necessary vehicle repair.
- Once the repair is complete, clear the fault code using the diagnostic tool.
Important Note on Clearing Codes: We recommend not clearing the code before the repair or maintenance has been performed. If the underlying error causing the code is not corrected, the code will reappear shortly after being cleared.
- Q: What if I cannot find my car brand after connecting?
A: If you cannot find the appropriate car brand after connecting the OBD2 interface, please select 'Every Car Brand' to diagnose your car. If you are still unable to read or diagnose codes, please contact MUCAR support to verify if your car supports the CDL20 OBD2 diagnostic device.
6. Specifications
| Feature | Detail |
|---|---|
| Manufacturer | MUCAR |
| Brand | mucar |
| Item Model Number | mucar |
| Manufacturer Serial Number | mucar CDL20 |
| Item Weight | 300 g |
| Product Dimensions (L x W x H) | 11 x 6.56 x 1.97 cm |
| Power Source | Corded Electric (via OBDII port) |
| Operating System | Android (internal system, not user-accessible) |
| Screen Size | 2.8 Inches |
| Supported Protocols | OBDII (ISO9141, KWP2000, J1850 PWM, J1850 VPW, CAN) |
| Supported Languages | English, French, Spanish, German, Russian, Italian, Portuguese |
6.1. Vehicle Compatibility
The MUCAR CDL20 is compatible with most vehicles that support the OBDII protocol:
- American cars: From 1996 onwards
- European cars: From 2000 onwards
- Asian-made vehicles: From 2000 onwards
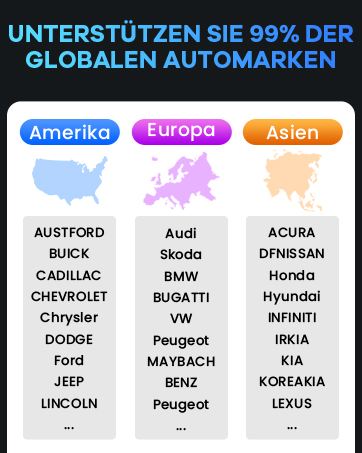
Image 6.1: Visual representation of MUCAR's support for car brands across America, Europe, and Asia.
6.2. Supported Languages

Image 6.2: Flags indicating the seven languages supported by the MUCAR CDL20 diagnostic tool.
7. Support
For any questions, technical assistance, or further support regarding your MUCAR CDL20 diagnostic tool, please contact MUCAR customer service. MUCAR offers professional online support to address your inquiries.

Image 7.1: MUCAR customer service team providing professional online support.
8. Warranty Information
Specific warranty details for the MUCAR CDL20 are not provided in the available product information. Please refer to the product packaging or the official MUCAR website for the most up-to-date warranty policy and registration information.
Related documentsCDL20


Ask a question about this manual
Ask about setup, troubleshooting, compatibility, parts, safety, or missing instructions. Manuals+ will review the question and use this page’s manual context to help answer it.