
Gevi GECMD627BK-U
Gevi 2-in-1 Coffee Maker Instruction Manual
Model: GECMD627BK-U
Introduction
This manual provides detailed instructions for the safe and efficient operation, maintenance, and troubleshooting of your Gevi 2-in-1 Coffee Maker. Please read all instructions carefully before first use and retain this manual for future reference.
Important Safety Instructions
- Always ensure the appliance is unplugged before cleaning or when not in use.
- Do not immerse the appliance, power cord, or plug in water or other liquids.
- Keep the appliance out of reach of children.
- Use only fresh, clean water in the water tank.
- Exercise caution when handling hot surfaces and steam.
- The machine features an auto shut-off function after 25 minutes of inactivity for safety and energy saving.
- Overheating protection and auto pressure relief mechanisms are integrated for safe operation.

Image: The Gevi 2-in-1 Coffee Maker highlights its safety features including auto shut-off, overheating protection, and auto pressure relief.
Product Overview
The Gevi 2-in-1 Coffee Maker is designed for both espresso extraction and milk frothing, featuring a robust 15-bar pump and a powerful 1350W heating system.
Key Features:
- Advanced Thermoblock Fast Heating System: Ensures quick heating for espresso extraction in 2-3 seconds and a full cup in approximately 45 seconds.
- 15 Bar High Pressure Extraction: Provides optimal pressure for rich espresso.
- Italian ODM Pump: For stable extraction and smooth coffee.
- 1350W Power: Delivers powerful and even steam for frothing.
- 2 Separate Thermostats: Allows precise control over water temperature for espresso (197°F for crema) and steam temperature for milk frothing (212°F for delicate foam).
- Swivel Froth Wand: Detachable, washable, and rotates 360° for convenience.
- Food-Grade Removable Water Tank: 1.25L capacity with a handle for easy removal and refilling. Includes a water tank filter to effectively filter impurities.
- Fine Mesh Filter: SUS304 stainless steel filter with 0.25mm filter holes for a smooth coffee taste.
- Detachable Drip Tray: Easy to clean and suitable for various cup sizes.
- Cup Warmer: Integrated depression design to keep your coffee at an optimal temperature.
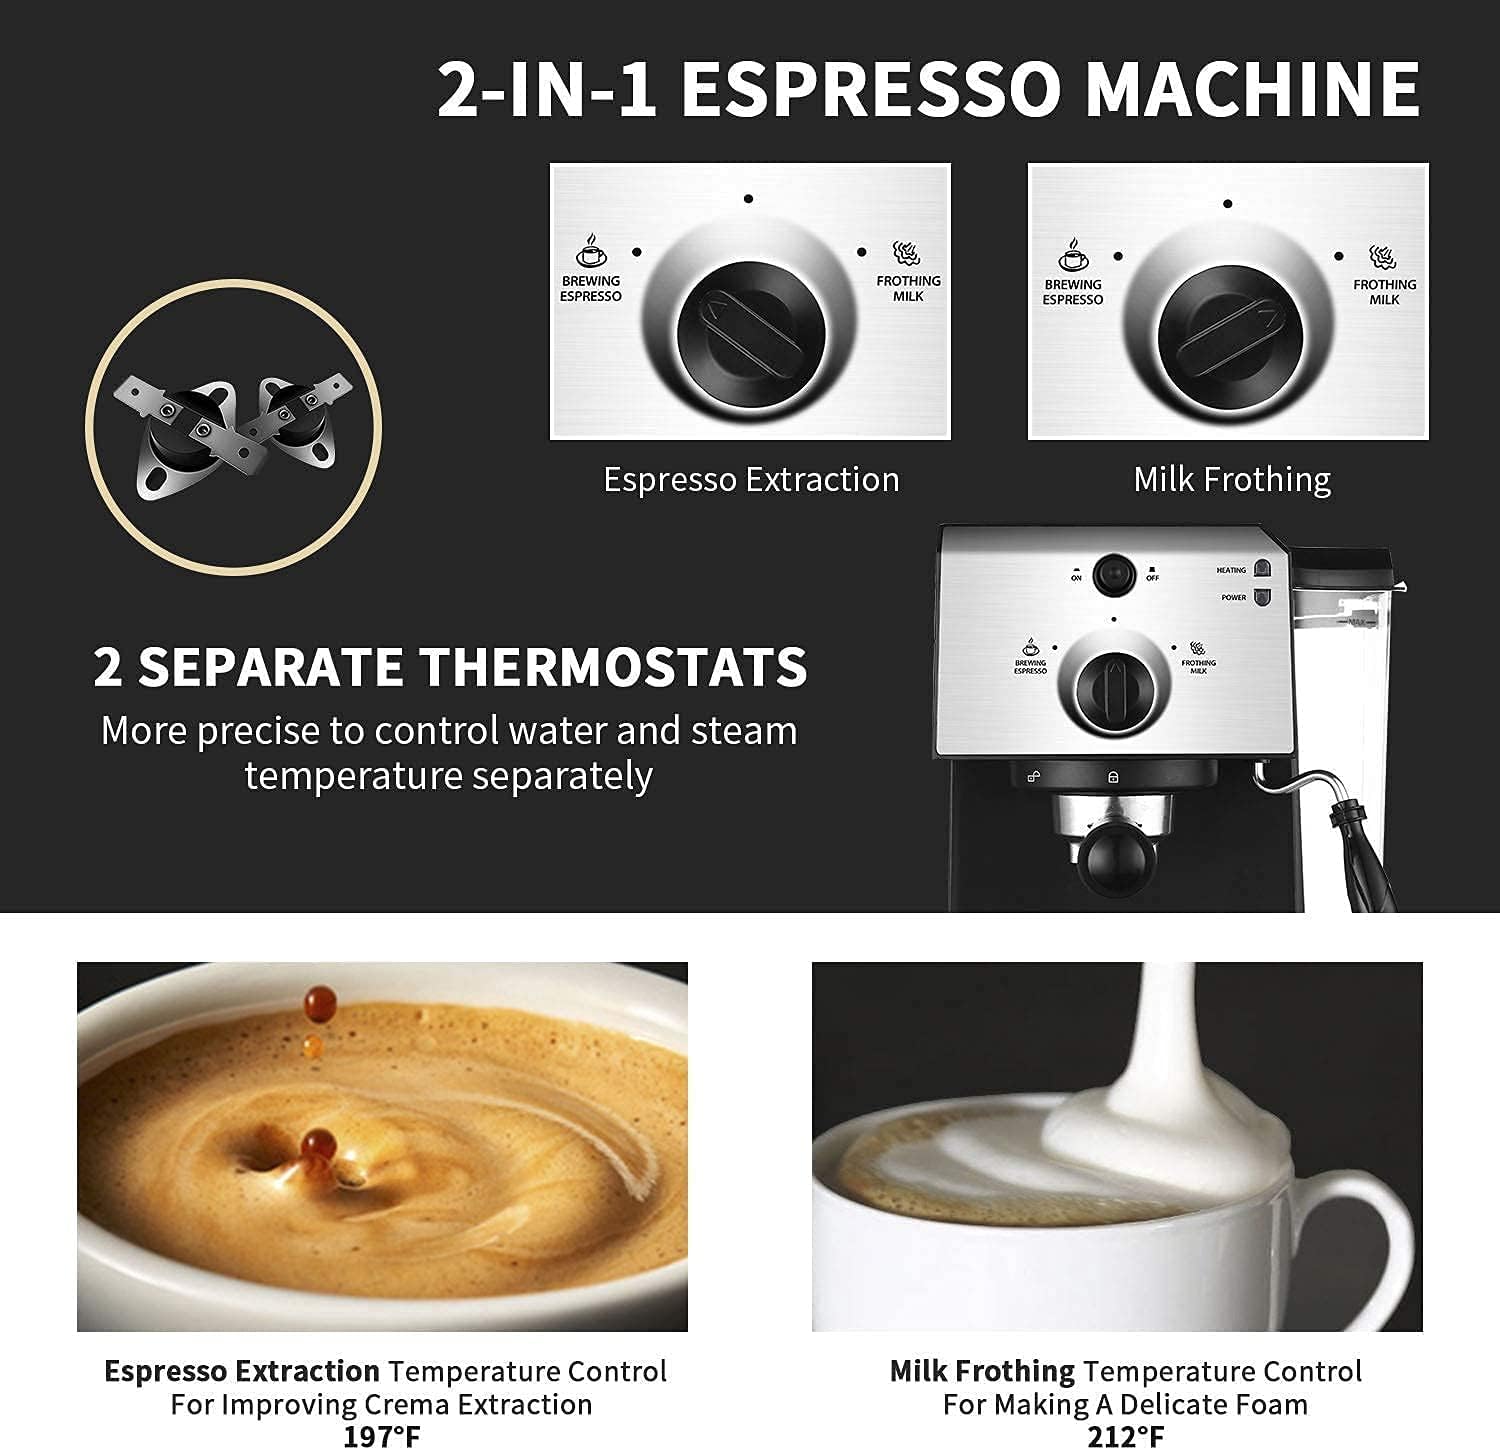
Image: The Gevi coffee maker's internal components and features, including the fast heating system and high-pressure pump.

Image: Control panel of the Gevi 2-in-1 Espresso Machine, illustrating the two separate thermostats for precise temperature control.

Image: Close-up of the Gevi coffee maker's 1350W heating element and the flexible swivel froth wand.
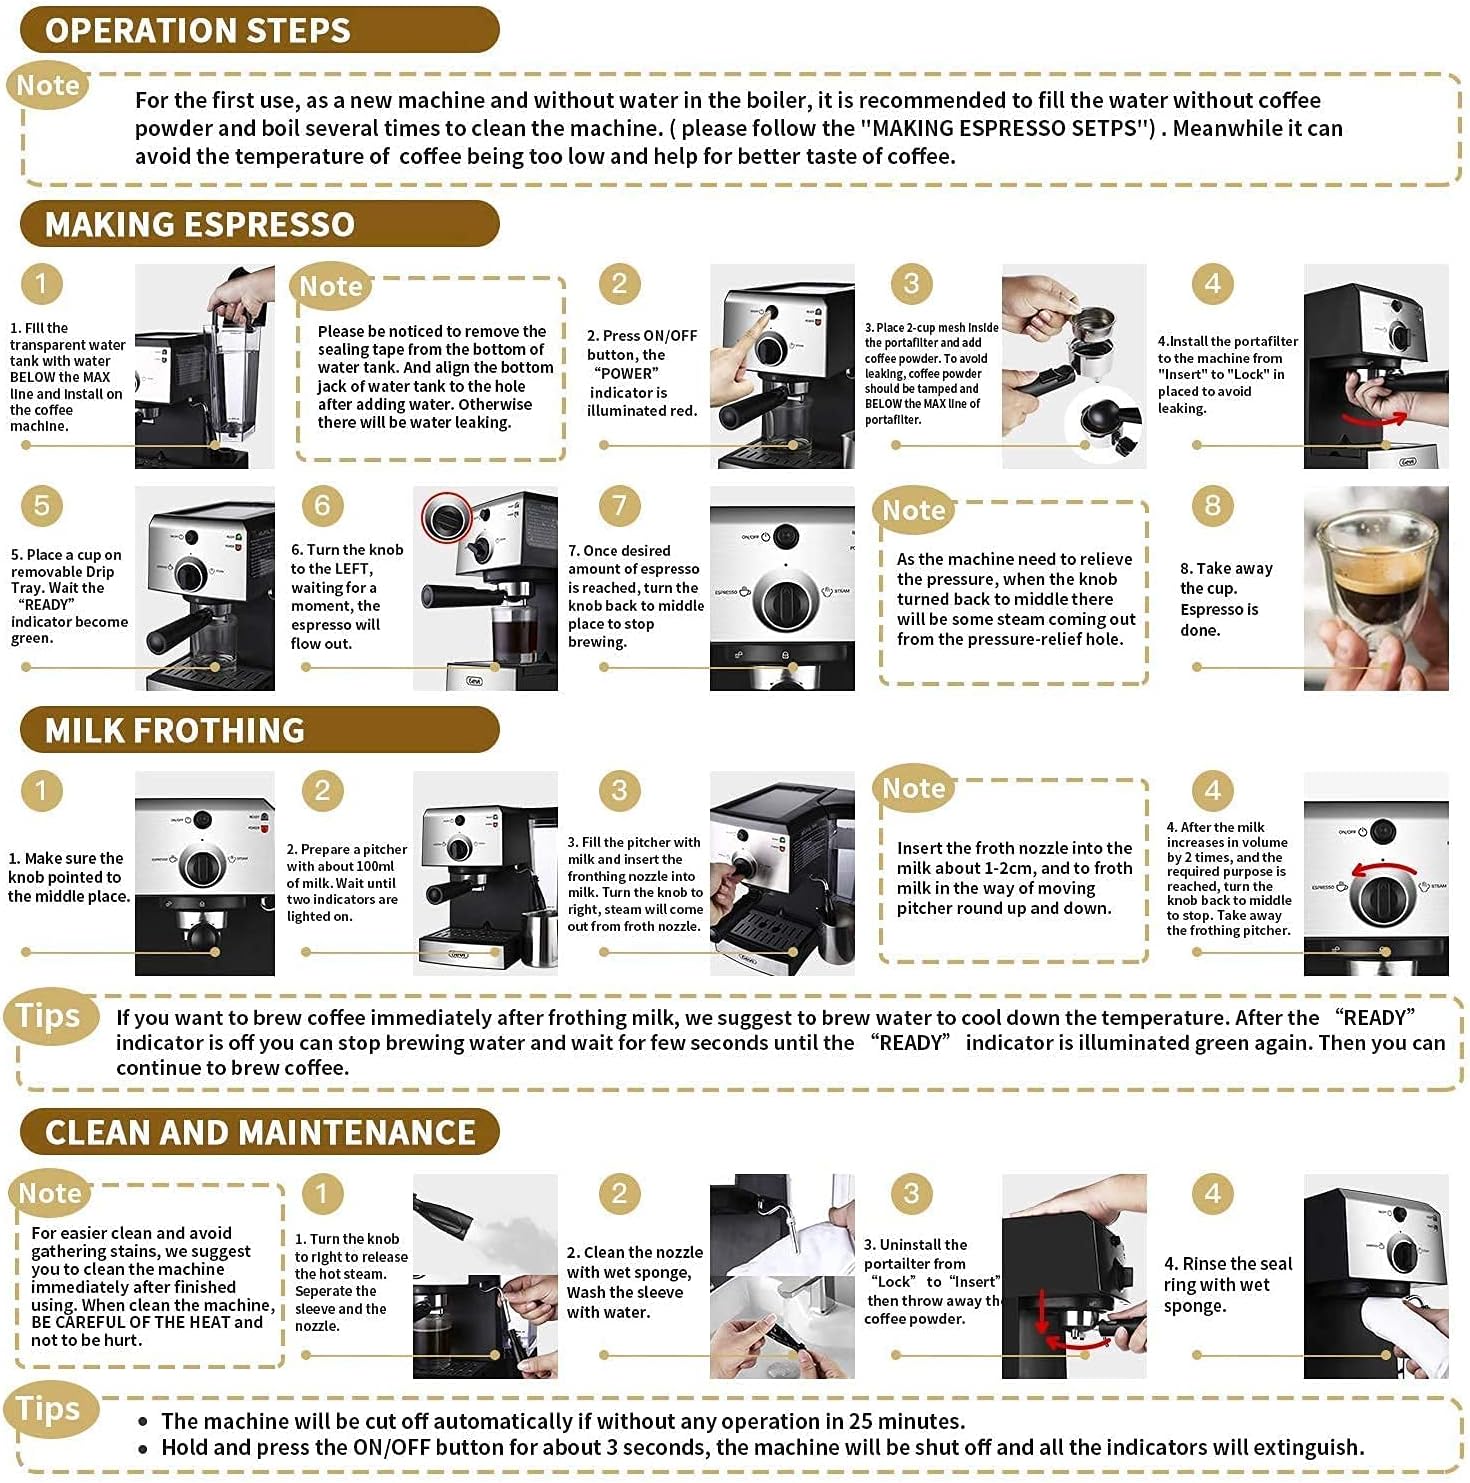
Image: Various user-friendly features of the Gevi coffee maker, including the cup warmer, removable water tank, and fine mesh filter.
Setup and First Use
- Unpack the coffee maker and remove all packaging materials.
- Place the machine on a stable, flat, heat-resistant surface.
- Fill the removable water tank with fresh, clean water up to the MAX line. Ensure the water tank filter is properly in place.
- For the first use, and when the machine has been without water in the boiler, it is recommended to run water through the system several times without coffee powder to clean the machine. This helps remove any manufacturing residues and ensures optimal performance.
- Plug the power cord into a grounded electrical outlet.
Operating Instructions
A. Making Espresso
Follow these steps to brew espresso:

Image: Visual guide for espresso preparation.
- Fill the transparent water tank with water below the MAX line.
- Remove the sealing cap from the bottom of the water filter. Ensure the filter is clean and properly seated.
- Press the ON/OFF button. The power indicator will illuminate red.
- Place 2-cup mesh inside the portafilter and add ground coffee. Tamp the coffee evenly.
- Install the portafilter onto the machine and lock it into place.
- Place a cup on the removable drip tray.
- Turn the knob to the LEFT (Brewing Espresso position). The espresso will begin to extract.
- Once the desired amount of espresso is brewed, turn the knob back to the middle (Stop position).
- The machine may release pressurized hot steam from the drip tray base after use. This is normal.
B. Milk Frothing
Follow these steps to froth milk for lattes and cappuccinos:
Image: Visual guide for milk frothing.
- Turn the knob to the middle position.
- Prepare a pitcher with cold milk. Submerge the frothing nozzle into the milk.
- Turn the knob to the RIGHT (Frothing Milk position). Steam will exit from the frothing nozzle.
- Insert the froth nozzle into the milk about 1 cm, and froth until the desired foam is achieved.
- After frothing, turn the knob back to the middle position.
Tip: If you want to brew coffee immediately after frothing milk, allow the machine to cool down. The "READY" indicator will illuminate green again when it's ready for coffee brewing.
C. 2-in-1 Powder and Nespresso Capsules Extraction
The smart portafilter accessories are compatible with both Nespresso capsule systems and ground coffee, offering versatility in brewing.

Image: Detailed steps for preparing coffee using either ground coffee or Nespresso capsules.
For Nespresso Capsules:
- Put the capsule into the capsule box.
- Close the capsule box.
- Put the capsule box into the portafilter.
- Insert the portafilter into the machine.
For Ground Coffee:
- Fix the filter into the portafilter.
- Add a corresponding amount of coffee powder to the filter with the spoon & tamper.
- Evenly tamp (press) the powder to the level indicated.
- Insert the portafilter into the machine.
Cleaning and Maintenance
Regular cleaning ensures the longevity and optimal performance of your coffee maker.

Image: Visual guide for cleaning the coffee maker and its components.
- For easy and thorough cleaning, clean all removable parts immediately after each use.
- To clean the frothing nozzle, turn the knob to the RIGHT to release steam. Then, remove the sleeve and the nozzle.
- Clean the nozzle with a wet sponge, then rinse the sleeve with water.
- Unscrew the portafilter to "Lock" to "Insert" then throw away used grounds.
- Rinse the seal ring with a wet sponge.
- The machine will automatically shut off if there is no operation for 25 minutes.
- To manually shut off, press and hold the ON/OFF button for about 3 seconds.
Troubleshooting
If you encounter issues with your Gevi 2-in-1 Coffee Maker, refer to the following common problems and solutions:
| Problem | Possible Cause | Solution |
|---|---|---|
| No power / Machine does not turn on | Not plugged in; Power switch off; Power outage. | Ensure the power cord is securely plugged into a working outlet. Press the ON/OFF button. Check your home's circuit breaker. |
| No water flow / Coffee not brewing | Water tank empty; Water tank not properly seated; Clogged filter; Air in the system. | Fill the water tank. Ensure the tank is correctly inserted. Clean the filter. Run a few cycles of hot water without coffee to prime the pump. |
| Espresso is too weak or too strong | Incorrect coffee grind size; Incorrect coffee amount; Improper tamping. | Adjust coffee grind (finer for stronger, coarser for weaker). Use the recommended amount of coffee. Ensure even and firm tamping. |
| Milk frother not producing steam or foam | Frother nozzle clogged; Not enough heating time; Insufficient milk. | Clean the frother nozzle thoroughly. Allow the machine to heat up completely before frothing. Use cold milk and ensure the nozzle is submerged correctly. |
| Water leaking from machine | Water tank not properly seated; Drip tray full; Portafilter not secured. | Re-seat the water tank firmly. Empty the drip tray. Ensure the portafilter is locked tightly into position. |
Specifications
| Feature | Detail |
|---|---|
| Brand | Gevi |
| Model Number | GECMD627BK-U |
| Capacity | 1.25 liters |
| Color | Black |
| Product Dimensions (D x W x H) | 10.9"D x 12.3"W x 12.75"H |
| Item Weight | 3.2 kg |
| Special Feature | Milk Frother |
| Coffee Maker Type | Espresso Machine |
| Specific Uses | Espresso |
| Recommended Uses | Home Brewing of Specialty Coffee Beverages |
| Operation Mode | Fully Automatic |
| Wattage | 1350 watts |
| Human Interface Input | Buttons |
| Filter Type | Reusable |
| Material | Stainless Steel |
| Exterior Finish | Stainless Steel |
Warranty and Support
For warranty information or technical support, please refer to the documentation included with your purchase or contact Gevi customer service directly. Keep your purchase receipt as proof of purchase.
Contact Information: Please visit the official Gevi website or refer to your product packaging for the most up-to-date customer support contact details.
Related documentsGECMD627BK-U


Ask a question about this manual
Ask about setup, troubleshooting, compatibility, parts, safety, or missing instructions. Manuals+ will review the question and use this page’s manual context to help answer it.