1. Product Overview
The RESIONE G217 Clear 3D Printer Resin is a high-quality, non-yellowing transparent tough resin designed for LCD/DLP/MSLA 3D printers using 405nm UV light. It offers ABS-like strength and high clarity, making it suitable for a wide range of applications requiring transparent and durable parts.

Overview of RESIONE G217 Clear Tough Resin highlighting its key features: high-quality raw materials, non-yellowing, clear, and tough as ABS.
- Exceptional Clarity: Formulated with pure, transparent raw materials, ensuring prints are clear with a slight bluish tint, which can be enhanced to crystal clarity through proper post-processing.
- Non-Yellowing Properties: Unlike ordinary resins, G217 resists yellowing over time. Any temporary yellowing after post-curing typically fades within a few days.
- ABS-Like Strength: Prints exhibit mechanical properties similar to tough thermoplastic materials, offering high tensile strength and excellent impact resistance, allowing for repeated machining.
- High-Quality Raw Materials: RESIONE prioritizes high-purity and low-irritating raw materials, ensuring no harmful substances remain in the final product.
- Mixability: G217 resin can be mixed with F69/F39/F39T resins to produce parts with enhanced toughness and durability, preventing long-term brittleness.
2. Safety Precautions
Always prioritize safety when handling 3D printer resins. G217 resin is for professional use and should be handled with care.
- Personal Protective Equipment (PPE): Always wear chemical-resistant gloves (nitrile or neoprene) and protective eyewear (safety goggles) to prevent skin and eye contact.
- Ventilation: Work in a well-ventilated area to minimize exposure to resin fumes. If possible, use a fume extractor or work outdoors.
- Skin Contact: In case of skin contact, immediately wash the affected area thoroughly with soap and water. Do not use solvents.
- Eye Contact: In case of eye contact, flush eyes immediately with plenty of water for at least 15 minutes and seek medical attention.
- Ingestion: Do not ingest. If swallowed, do not induce vomiting. Rinse mouth and seek immediate medical attention.
- Children and Pets: Keep resin and all printing materials out of reach of children and pets.
- Fire Hazard: Keep resin away from open flames, sparks, and heat sources.
- Disposal: Dispose of uncured resin, contaminated cleaning solutions, and cured resin waste according to local environmental regulations. Never pour uncured resin down drains.
3. Setup and Preparation
Proper preparation ensures optimal printing results and safety.
- Workspace Preparation: Set up your 3D printer in a clean, well-ventilated area. Lay down protective coverings (e.g., disposable mats) to catch any spills.
- Printer Calibration: Ensure your 3D printer's build plate is properly leveled and clean. Refer to your printer's manual for specific leveling instructions.
- Resin Temperature: For best results, ensure the resin is at an optimal temperature, ideally between 25-30°C (77-86°F). If the resin is too cold, it may be too viscous, leading to print failures.
- Shake Resin Bottle: Before pouring, gently shake the G217 resin bottle for at least 1 minute to ensure all components are well mixed.
- Pour Resin: Carefully pour the desired amount of G217 resin into the printer's resin vat. Avoid overfilling.
4. Operating Instructions (Printing)
G217 resin is compatible with LCD/DLP/MSLA 3D printers using a 405nm UV light source.
- Slicer Settings: Import your 3D model into your preferred slicing software (e.g., Chitubox, Lychee Slicer).
- Exposure Parameters:
- Layer Height: Typically 0.02mm to 0.05mm for detailed prints.
- Bottom Exposure Time: Start with 30-55 seconds for initial layers to ensure strong adhesion to the build plate.
- Normal Exposure Time: Begin with 2.3-13.4 seconds per layer. Optimal exposure time will vary depending on your specific printer model, screen resolution, and desired print quality. Conduct exposure tests to fine-tune settings.
- Lift Speed: Adjust lift speed to prevent suction issues, especially with larger prints.
- Wait Before Print: Consider adding a 4-second wait time before printing each layer, especially for thicker resins like G217, to allow the resin to settle.
- Supports: Add appropriate supports to your model to prevent deformation and ensure successful printing, especially for overhangs and intricate details.
- Start Printing: Transfer the sliced file to your 3D printer and initiate the printing process. Monitor the first few layers to ensure proper adhesion.
5. Post-Processing for Optimal Clarity
Achieving the signature clarity of G217 resin requires specific post-processing steps.
Visual guide for advanced post-processing techniques to enhance the clarity of G217 resin prints.
- Washing:
- After printing, carefully remove the print from the build plate.
- Wash the print thoroughly in Isopropyl Alcohol (IPA) (95% or higher) or a dedicated resin cleaning solution. Use a soft brush if necessary to remove all uncured resin from surfaces and crevices.
- Rinse the print in a second bath of clean IPA for optimal cleanliness.
- Drying: Allow the print to air dry completely or use a fan/compressed air to ensure no residual IPA remains. Ensure the print is dry before proceeding to curing.
- Initial Curing: Place the cleaned and dried print in a UV curing station or under direct 405nm UV light. Cure until the print is solid and tack-free. Note that prints may exhibit a slight yellowish tint immediately after curing, which is normal and typically fades.
- Clarity Enhancement (Choose one method):
- Method A (Sanding & Recoating):
- After initial curing, sand the print with progressively finer wet/dry sandpaper (e.g., starting from 400 grit up to 2000+ grit) to remove layer lines and achieve a smooth, frosted finish.
- Clean the sanded print to remove any dust.
- Dip the sanded print into a small amount of fresh G217 resin, allowing excess to drip off. This fills micro-scratches and creates a smooth surface.
- Cure the print again under UV light until the resin coating is fully hardened and clear.
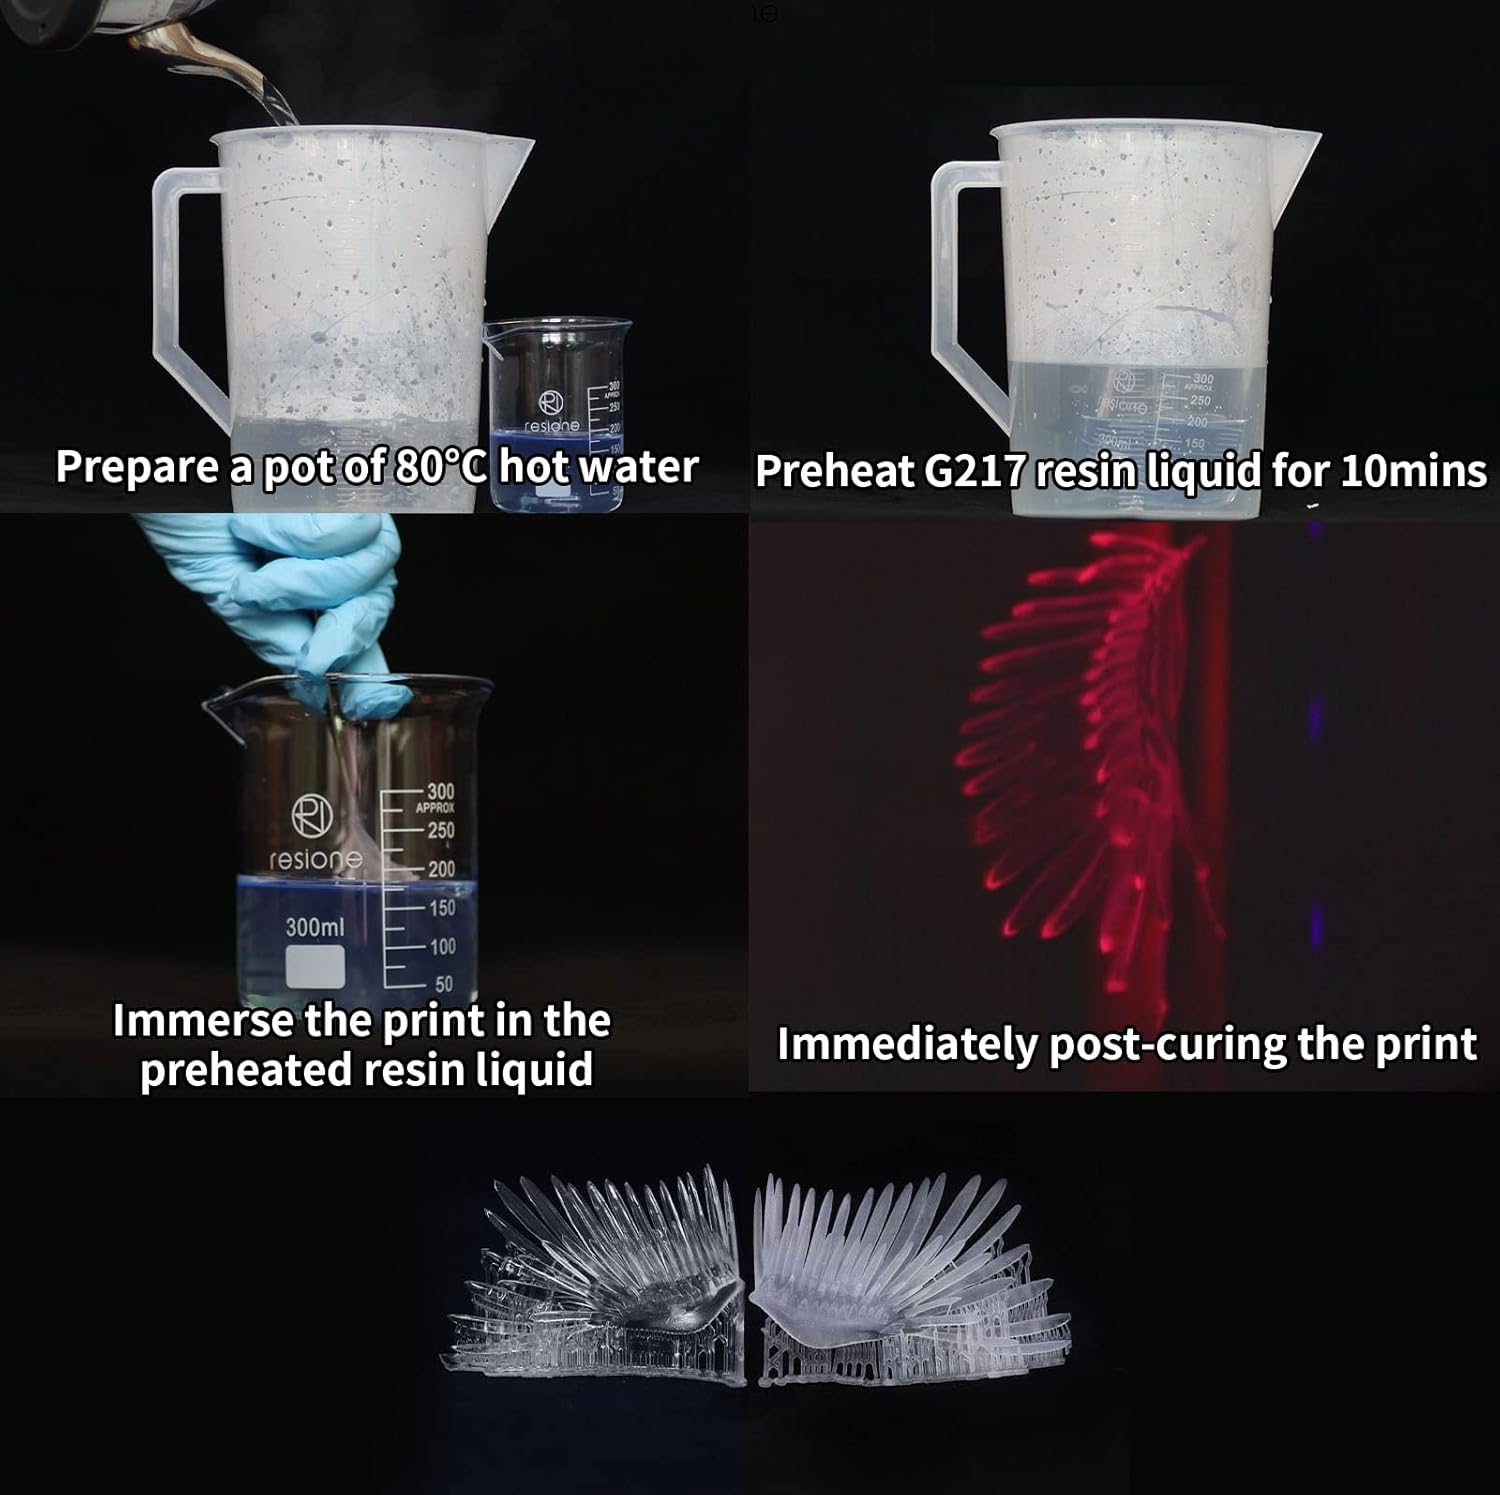
- Method B (Hot Water Immersion):
- After initial UV curing, prepare a pot of hot water at approximately 80°C (176°F).
- Preheat a small amount of G217 resin liquid by placing its container in the hot water for about 10 minutes.
- Immerse the cured print into the preheated resin liquid.
- Immediately post-cure the print while it is still immersed in the preheated resin, or immediately after removing it. This technique can significantly improve transparency.
- Method A (Sanding & Recoating):
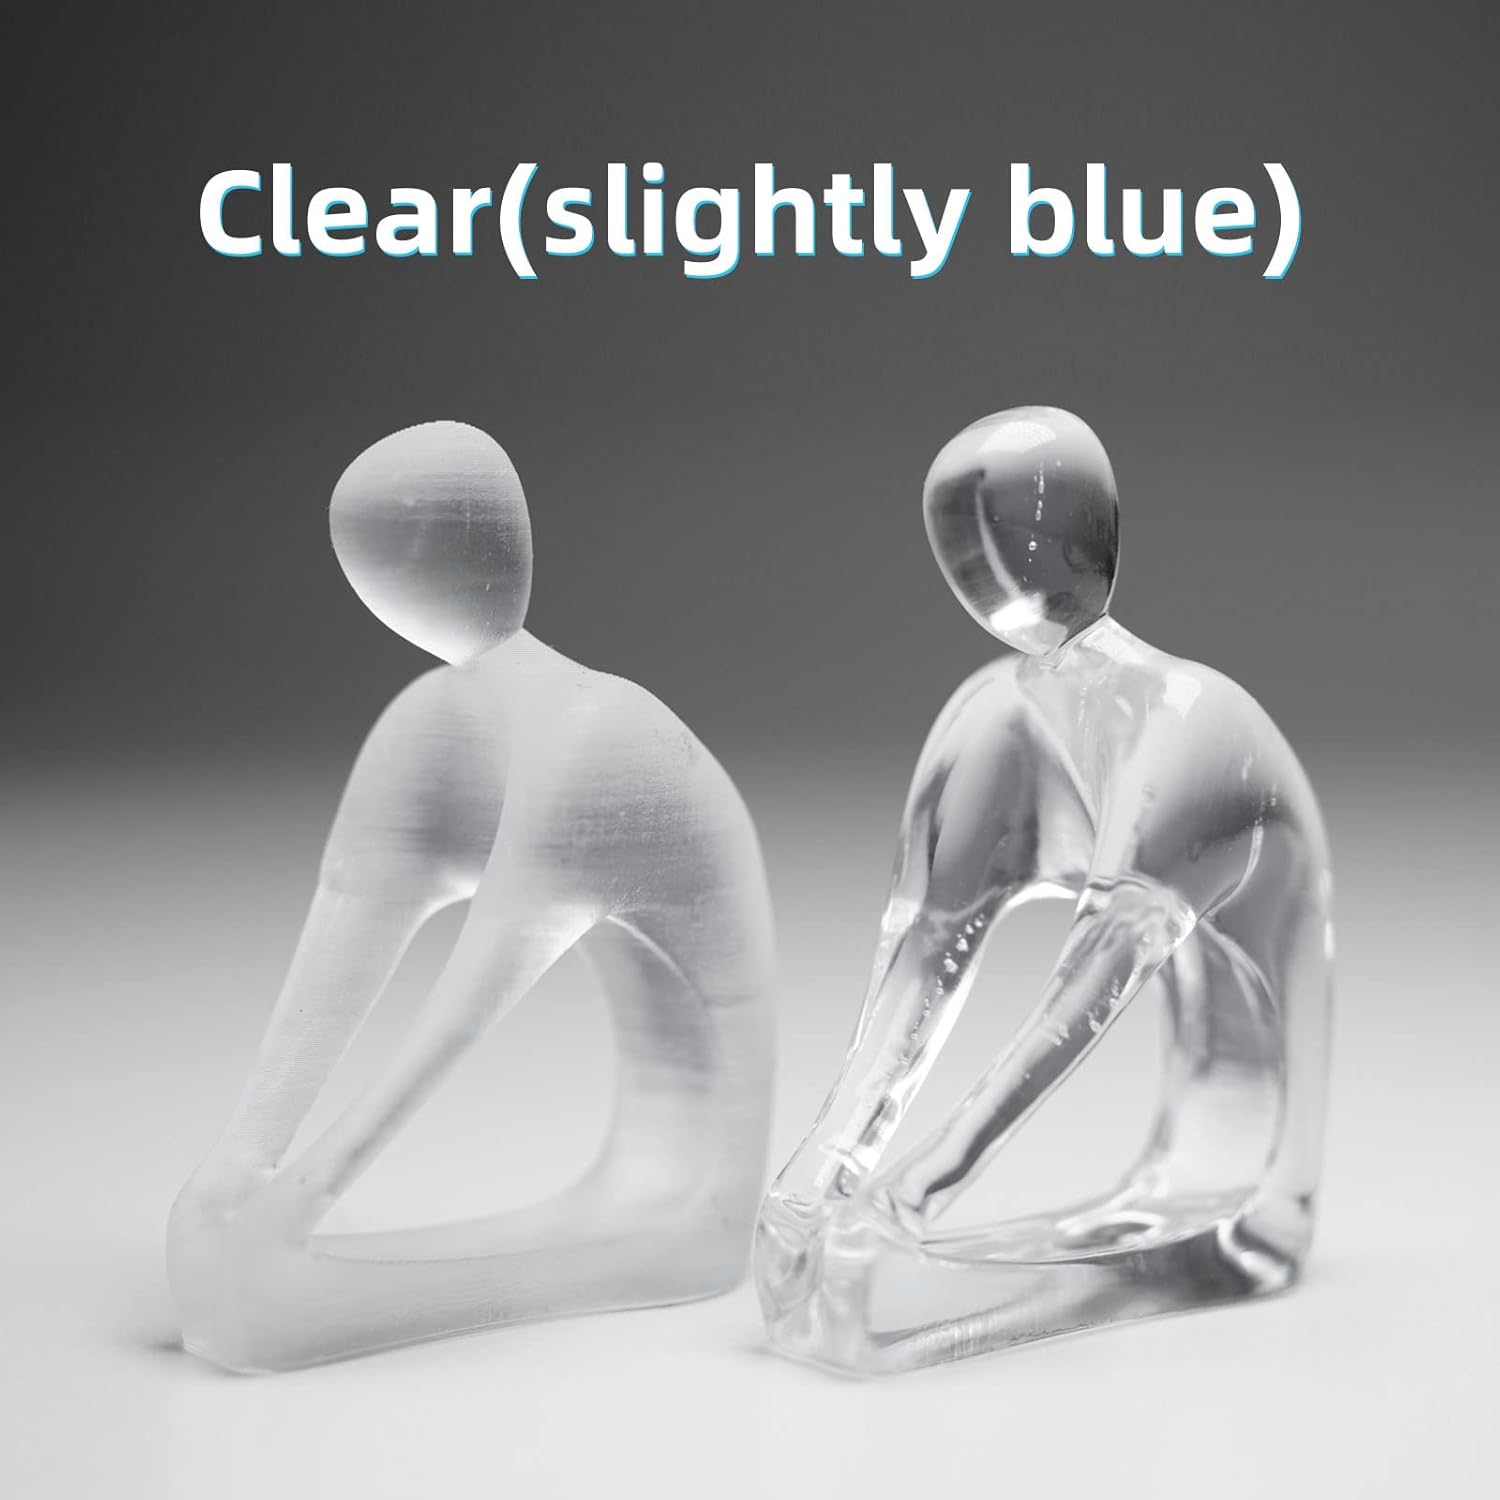
Demonstration of G217 resin's clarity, showing a frosted print before clarity enhancement and a clear print after.

Examples of G217 resin prints demonstrating their non-yellowing properties over time.
6. Maintenance and Storage
Proper maintenance and storage extend the life of your resin and ensure consistent print quality.
- Resin Storage: Store G217 resin in its original sealed, shading, and cool place. Keep it away from direct sunlight, UV light, and fire.
- Resin in Vat: If the resin in the 3D printer's vat is not used for more than 1 day, it is recommended to filter the resin using a filter funnel to remove any cured particles or debris. Pour the filtered resin into an empty, opaque container.
- Avoid Contamination: Never pour used resin from the vat back into the original bottle to prevent contamination of fresh resin.
- Printer Cleaning: Regularly clean your resin vat and build plate according to your 3D printer's manufacturer guidelines. Ensure no cured resin bits are left in the vat, as they can damage the FEP film or screen.
7. Troubleshooting
Common issues and their potential solutions when using G217 resin.
| Problem | Possible Cause | Solution |
|---|---|---|
| Prints are cloudy or frosted after curing. | Insufficient washing; improper curing; lack of clarity enhancement steps. | Ensure thorough washing with clean IPA. Apply clarity enhancement steps (sanding and recoating with resin, or hot water immersion). |
| Prints appear yellow. | Temporary yellowing after initial post-curing (should fade); excessive UV exposure during curing. | Allow a few days for temporary yellowing to fade. Optimize curing times; avoid over-curing. Ensure proper post-processing. |
| Print failures (e.g., parts not sticking to build plate, incomplete prints). | Incorrect exposure settings; unleveled build plate; resin too cold; insufficient supports. | Adjust bottom and normal exposure times. Re-level the build plate. Ensure resin is at optimal temperature (25-30°C). Add or reinforce supports. |
| Resin is too viscous. | Resin temperature is too low. | Ensure resin is at room temperature or slightly warmer (25-30°C). Consider a longer wait time before printing each layer. |
8. Product Specifications
- Brand: RI RESIONE
- Model: G217
- Color: Clear
- Material Type: G217 Clear Non-yellowing Tough Resin
- Curing Wavelength: 405nm UV
- Net Weight: 1000g (1KG)
- Item Weight: Approximately 1.32 pounds (0.6 Kilograms)
- Package Dimensions: Approximately 8.07 x 3.31 x 3.23 inches
- First Available Date: July 31, 2021
9. Warranty and Support
RESIONE G217 Clear 3D Printer Resin is manufactured to high-quality standards. For any product-related inquiries or technical support, please contact RESIONE customer service through the retailer's platform or the official RESIONE website.
Return Policy: This product is typically eligible for returns within 30 days of receipt, subject to the retailer's return policy.


