
1. Introduction
The Dryzone Dual-Use Moisture Meter is an essential tool designed for quick and accurate detection of moisture levels in both wood and building materials. This device is engineered to help identify hidden water leaks, assess dampness, and prevent damage caused by excessive moisture. This user manual provides comprehensive instructions on how to operate, maintain, and troubleshoot your device to ensure optimal performance and accurate readings for identifying various damp issues.
2. Product Features
- Dual-Use Hygrometer: Features an easy-to-read backlit LCD for quick and accurate moisture identification in wood and building materials.
- Wide Measurement Range: Measures moisture in wood from 6% to 60% and in building materials from 0% to 40%.
- Comprehensive Damp Detection: Provides a rapid and precise method for finding hidden water leaks or obtaining moisture profiles necessary to identify rising damp, penetrating damp, or condensation. Includes a practical masonry moisture profiling guide.
- Wood Calibration Scales: Offers 8 calibration scales to accurately measure moisture content in many different types of wood, useful for firewood, flooring installers, and timber suppliers.
- Ergonomic Design: Easy-to-use with moisture levels indicated by a numerical display, a bar scale, and acoustic alerts for high moisture levels (above 20% in building materials and 15% in wood).
- Additional Functions: Includes automatic shut-off after 3 minutes of inactivity, a hold function to freeze readings, and a lightweight, compact design (126g with batteries, 15cm x 60cm).
- Accuracy: Provides an accuracy of ±2% for wood measurements.
3. Setup
Before using your Dryzone Moisture Meter, please follow these setup instructions:
- Battery Installation: Locate the battery compartment cover on the back of the device. Open the cover and insert 2x AAA batteries, ensuring correct polarity (+/-). Close the cover securely. (Note: Batteries are not included.)
- Power On: Press the Power button to turn on the device. The backlit LCD screen will illuminate, displaying the current temperature and moisture reading.
- Remove Protective Cap: Carefully remove the black protective cap from the measurement pins at the top of the device. Keep this cap for safe storage.

This image shows the Dryzone Dual-Use Moisture Meter in its upright position, with the protective cap removed from the two metal pins at the top. The LCD screen is visible, displaying numerical readings and a bar graph. The device is orange and black, with control buttons below the screen.
4. Operating Instructions
Follow these steps to take accurate moisture readings:
- Select Material Mode: Press the MODE button to toggle between 'WOOD' and 'BLDG' (Building Material) modes. Ensure the correct mode is selected for the material you are testing.
- Take a Measurement: Gently press the two measurement pins into the surface of the material you wish to measure. Ensure both pins penetrate the surface for an accurate reading. The moisture percentage will be displayed on the LCD screen.
- Interpreting Readings:
- Wood: Readings between 6% and 15% are generally considered dry. Readings above 15% indicate elevated moisture levels, triggering an acoustic alert.
- Building Materials: Readings between 0% and 20% are generally considered dry. Readings above 20% indicate elevated moisture levels, triggering an acoustic alert.
- Hold Function: Press the HOLD button to freeze the current reading on the display. Press HOLD again to release the reading.
- Temperature Unit: Press the °C/°F button to switch between Celsius and Fahrenheit temperature display.

This image shows a hand holding the Dryzone Moisture Meter against a brick wall, demonstrating how to take a reading on building materials. The meter's pins are inserted into the mortar joint, and the screen displays a moisture percentage.

This image depicts a hand holding the Dryzone Moisture Meter against a wooden beam, illustrating how to measure moisture in wood. The pins are inserted into the wood, and the screen shows a moisture reading.
5. Understanding Moisture Readings and Damp Profiles
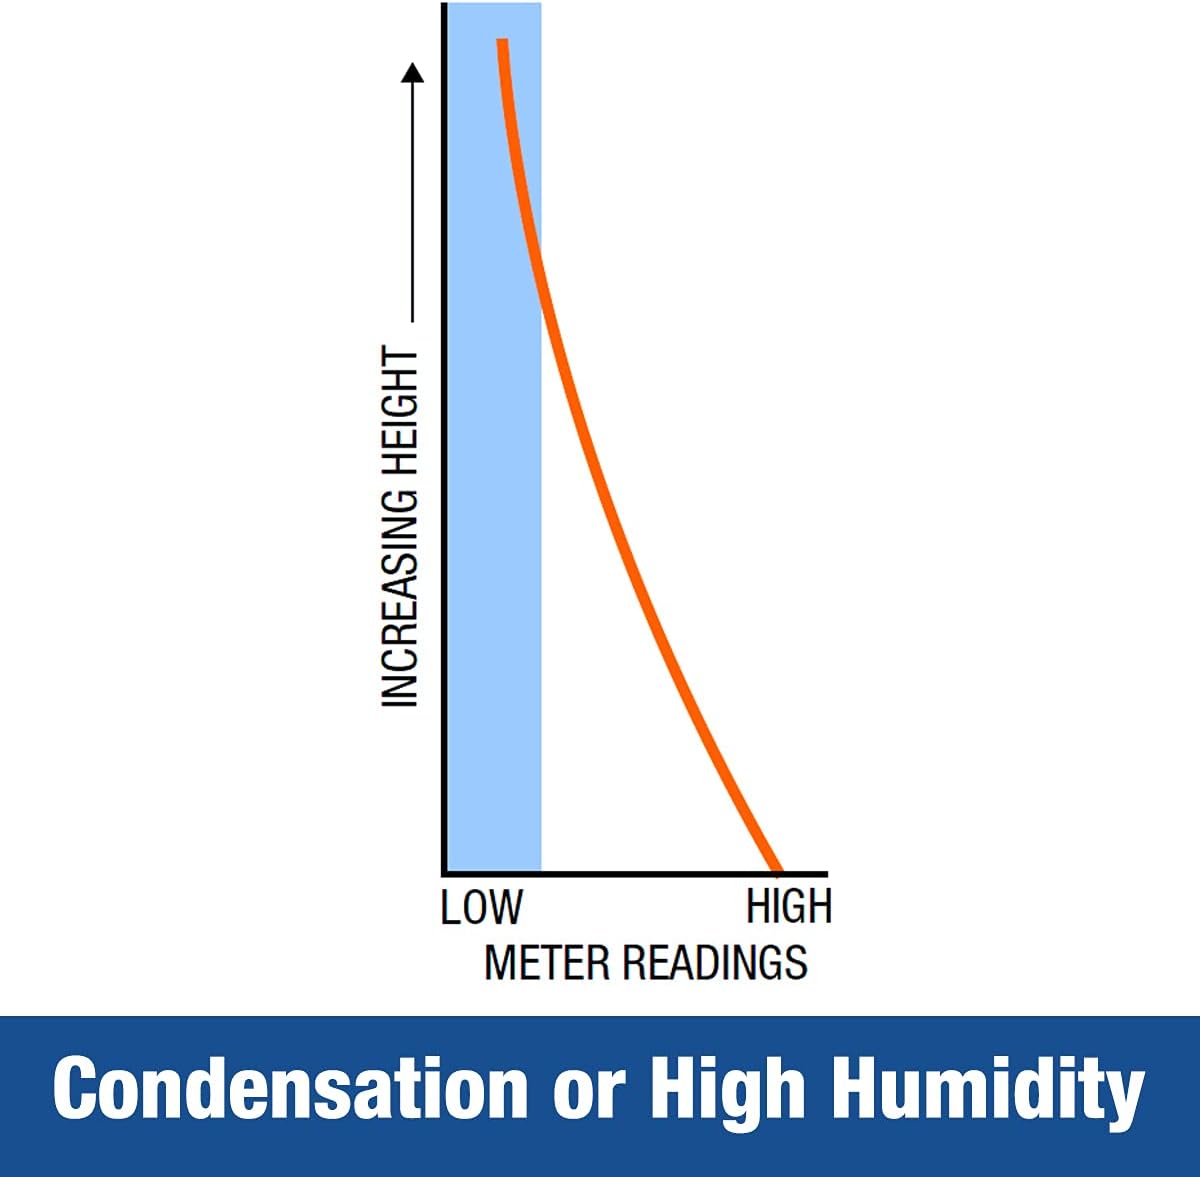
To accurately diagnose the type of damp, it is recommended to create a moisture profile by taking readings at regular intervals (e.g., every 300mm) horizontally and vertically across the affected area. Different damp issues present distinct moisture patterns:
- Typical Rising Damp: Characterized by high moisture readings at the base of a wall, gradually decreasing with increasing height.
- Penetrating Damp: Often localized high readings, not necessarily decreasing with height, and may be associated with external defects like faulty gutters or cracks.
- Condensation: High moisture readings typically found on cooler surfaces, often at higher levels on walls or ceilings, and may be accompanied by mold growth. Readings tend to be more uniform across the affected area.
- Failed Damp-Proofing Treatment: May show a pattern where moisture readings are high above a previous damp-proof course, indicating its failure.

This graph illustrates a typical rising damp profile, showing low meter readings at increasing height and high meter readings at lower heights, indicating moisture rising from the ground.
This graph depicts a moisture profile indicative of a failed damp-proofing treatment, where moisture readings are high above a certain height, suggesting the damp-proof course is no longer effective.
6. Maintenance
Proper maintenance will ensure the longevity and accuracy of your Dryzone Moisture Meter:
- Cleaning: Wipe the device with a soft, dry cloth. Do not use abrasive cleaners, solvents, or immerse the device in water.
- Pin Care: Keep the measurement pins clean and free from debris. Always replace the protective cap when the device is not in use to prevent damage to the pins and accidental injury.
- Storage: Store the meter in a cool, dry place, away from direct sunlight and extreme temperatures. Remove batteries if the device will not be used for an extended period to prevent battery leakage.
7. Troubleshooting
If you encounter issues with your Dryzone Moisture Meter, refer to the following troubleshooting guide:
| Problem | Possible Cause | Solution |
|---|---|---|
| No display / Device not turning on | Low or dead batteries; Incorrect battery installation | Check battery polarity; Replace batteries with new AAA batteries |
| Inaccurate readings | Pins not fully inserted; Incorrect material mode selected; Dirty or damaged pins | Ensure pins penetrate surface; Switch to correct WOOD/BLDG mode; Clean pins or inspect for damage |
| No acoustic alert | Moisture level below threshold; Device malfunction | Ensure moisture exceeds 15% (wood) or 20% (building materials); If problem persists, contact support |
If the problem persists after attempting these solutions, please contact customer support.
8. Specifications
Detailed technical specifications for the Dryzone Moisture Meter:
| Specification | Detail |
|---|---|
| Manufacturer | Safeguard Europe Ltd |
| Model Number | Moisture Meter |
| Dimensions (L x W x H) | 17 x 7 x 4.2 cm |
| Weight | 150 g |
| Color | Orange |
| Power Source | Battery Powered |
| Batteries Required | Yes (2x AAA, not included) |
| Measurement Range (Wood) | 6% - 60% |
| Measurement Range (Building Materials) | 0% - 40% |
| Accuracy (Wood) | ±2% |
| Automatic Shut-off | After 3 minutes of inactivity |
9. Warranty and Support
For warranty information, technical support, or any inquiries regarding your Dryzone Moisture Meter, please refer to the manufacturer's official website or contact their customer service department directly. It is advisable to keep your purchase receipt as proof of purchase for any warranty claims.

