1. Introduction and Overview
Thank you for choosing the PXN 9607X Wireless Switch Controller. This manual provides detailed instructions on how to set up, operate, and maintain your controller for an optimal gaming experience on Nintendo Switch, Switch Lite, and OLED models.

Image: The PXN 9607X Wireless Switch Controller in yellow, showcasing its ergonomic design.
The PXN 9607X controller is designed to enhance your gaming with features such as wireless connectivity, adjustable Turbo function, NFC Amiibo support, 6-axis gyroscope, and dual vibration motors. Its ergonomic design ensures comfortable gameplay for extended periods.
2. Product Features
- Wireless Connectivity: Seamless connection to Nintendo Switch, Switch Lite, and OLED consoles.
- Adjustable Turbo Function: Customize rapid-fire settings for enhanced gameplay.
- NFC Amiibo Support: Interact with Amiibo figures for in-game bonuses and features.
- 6-Axis Gyroscope: Provides precise motion control for immersive gaming.
- Dual Vibration Motors: Offers three levels of adjustable vibration feedback for realistic immersion.
- Long Battery Life: Built-in 550mAh battery for extended play sessions.
- One-Key Wake-up: Conveniently wake up your Switch console from sleep mode.
Video: Official product video showcasing the PXN 9607X controller's features, including wake-up, Turbo function, and multi-player use.
3. Setup and Connection
3.1 Initial Pairing
- On your Nintendo Switch console, navigate to the HOME Menu.
- Select "Controllers" > "Change Grip/Order".
- On the PXN 9607X controller, press and hold the Home button and the Y button simultaneously until the LED indicators begin to flash rapidly.
- Once the controller is successfully paired, the LED indicators will stop flashing and remain solid.
3.2 Reconnecting
To reconnect the controller to a previously paired Switch console, simply press the Home button. The controller will automatically attempt to connect.
3.3 Clearing Pairing Data (Reset)
To clear all stored pairing data from the controller:
- Press and hold the T button and the Minus (-) button simultaneously. This will clear all setup button functions and pairing information.
3.4 Wake-up Function
Press the Home button on the controller to wake up the Nintendo Switch console remotely from sleep mode.

Image: Instructions for setting and clearing controller connections, with LED status indicators.
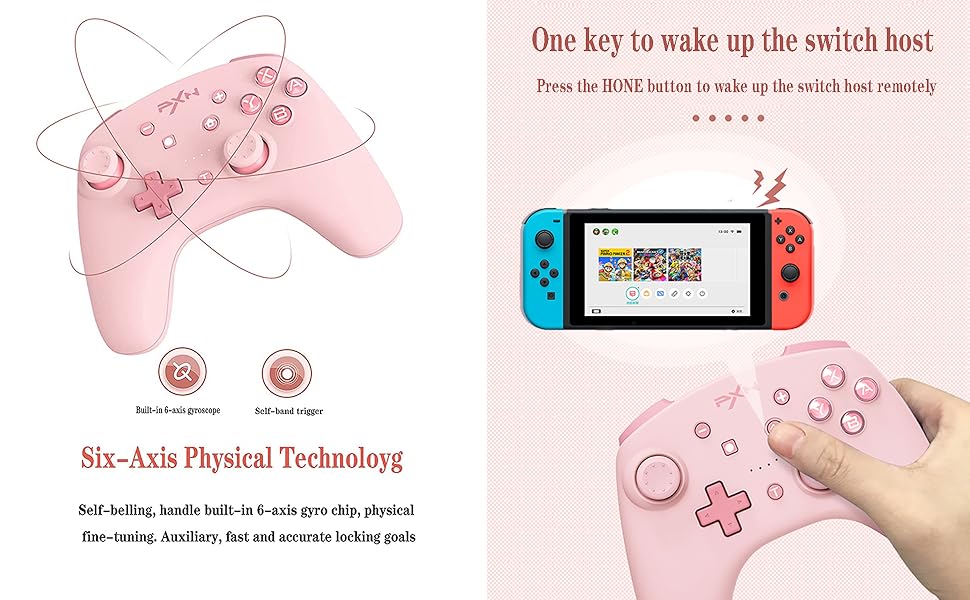
Image: The controller's one-key wake-up feature for the Nintendo Switch console.
4. Operating Instructions
4.1 Button Layout

Image: A comprehensive diagram labeling all buttons and ports on the PXN 9607X controller, including R, L, ZR, ZL, Micro USB Port, Capture, Minus (-), Left Stick, Directional Button, Home, Plus (+), ABXY Buttons, LED, Right Stick, and TURBO button.
4.2 TURBO Function
The Turbo function allows for rapid, repeated input of a button press. There are two modes: Manual Turbo and Auto Turbo.
- Setting Manual Turbo: Press the TURBO button and one or more desired action buttons simultaneously to activate the Turbo function for those buttons.
- Clearing Manual Turbo: Repeat the same operation (press TURBO button and the action button) to clear the Turbo function for that specific button.
- Clearing All Turbo Functions: Press the TURBO button and the Minus (-) button simultaneously to clear all set Turbo functions.

Image: Visual representation of the Turbo function being activated on the controller.
4.3 NFC Amiibo Support
The controller supports NFC functionality, allowing you to use Amiibo figures to unlock extra features and content in compatible games. Simply place your Amiibo figure over the NFC detection area (usually around the PXN logo or center of the controller) to activate it.

Image: The controller's NFC function in use with various Amiibo figures.
4.4 6-Axis Gyroscope
The built-in 6-axis gyro chip provides sensitive somatosensory control, allowing for precise aiming and movement in games that support motion controls. This feature enhances immersion and accuracy.

Image: The 6-axis gyroscope in action, providing motion control for precise in-game actions.
4.5 Dual Vibration
The controller features asymmetric dual vibration motors with three adjustable intensity levels (strong, medium, weak). This provides tactile feedback for in-game events like impacts, explosions, and environmental effects, enhancing the gaming experience.

Image: Internal view highlighting the dual vibration motors within the controller.

Image: Diagram illustrating the three adjustable vibration levels: strong, medium, and weak.
5. Charging and Battery
The PXN 9607X controller is equipped with a high-performance built-in lithium battery.
- Battery Capacity: Approximately 550 mAh
- Charging Time: Approximately 2 hours
- Continuous Use: Approximately 20 hours
The controller features a power-on smart sleep/wake-up function to efficiently manage battery life and provide longer game time.

Image: Visual display of battery capacity, charging time, and continuous usage time.
6. Specifications
| Feature | Detail |
|---|---|
| Model | PXN 9607X |
| Compatibility | Nintendo Switch, Switch Lite, Switch OLED |
| Connectivity | Wireless |
| Battery Capacity | 550 mAh Lithium-ion |
| Charging Time | Approx. 2 hours |
| Continuous Playtime | Approx. 20 hours |
| Special Features | NFC, Turbo, 6-Axis Gyro, Dual Vibration (3 levels), One-Key Wake-up |
| Item Weight | 13.9 ounces (approx. 394 grams) |
| Package Dimensions | 7.48 x 5.71 x 3.15 inches |
7. Troubleshooting
7.1 Connection Issues
- Controller not connecting: Ensure the Switch console is in "Change Grip/Order" mode. Make sure the controller is charged. Try clearing the controller's pairing data (Section 3.3) and re-pairing.
- Intermittent connection: Ensure no strong wireless interference sources are nearby. Move closer to the Switch console.
7.2 Button/Function Not Responding
- Buttons unresponsive: Check if the controller is properly connected. If a specific button's Turbo function is active, try clearing it (Section 4.2).
- Gyroscope not working: Ensure the game supports motion controls. Try recalibrating the gyroscope in the Switch system settings.
- NFC not detecting Amiibo: Ensure the Amiibo is placed correctly over the NFC area. Check if the game supports Amiibo functionality.
7.3 Charging Issues
- Controller not charging: Ensure the USB cable is securely connected to both the controller and a power source. Try a different USB cable or charging port.
8. Maintenance
- Keep the controller away from extreme temperatures, direct sunlight, and moisture.
- Clean the controller with a soft, dry cloth. Avoid using harsh chemicals or abrasive materials.
- Store the controller in a safe place when not in use to prevent damage.
9. Warranty and Support
The PXN 9607X Wireless Switch Controller comes with a standard manufacturer's warranty. For detailed warranty information, product support, or technical assistance, please refer to the official PXN website or contact their customer service directly.
Please retain your proof of purchase for warranty claims.


