
Barsetto 738530979557
Barsetto Gevi 15-Bar Espresso Machine
Model: 738530979557
1. Introduction
This manual provides essential information for the safe and efficient operation of your Barsetto Gevi 15-Bar Espresso Machine. Please read all instructions carefully before using the appliance and retain this manual for future reference.
2. Safety Instructions
- Always ensure the machine is unplugged before cleaning or maintenance.
- Do not immerse the appliance, power cord, or plug in water or other liquids.
- Keep children and pets away from the appliance during operation.
- Use only ground coffee or compatible Nespresso capsules.
- Exercise caution when handling hot surfaces and steam. The steam wand can cause burns.
- Ensure the water tank is filled to the appropriate level before use.
- Do not operate the machine if any part is damaged. Contact customer support for assistance.
3. Product Overview
Familiarize yourself with the components of your espresso machine:

Figure 3.1: Key Features Overview
This image illustrates the internal workings and key performance features of the espresso machine, including its double volume boiler for consistent heat, Italian ODM pump for stable 20-bar pressure extraction, and a rapid 25-second warm-up time.
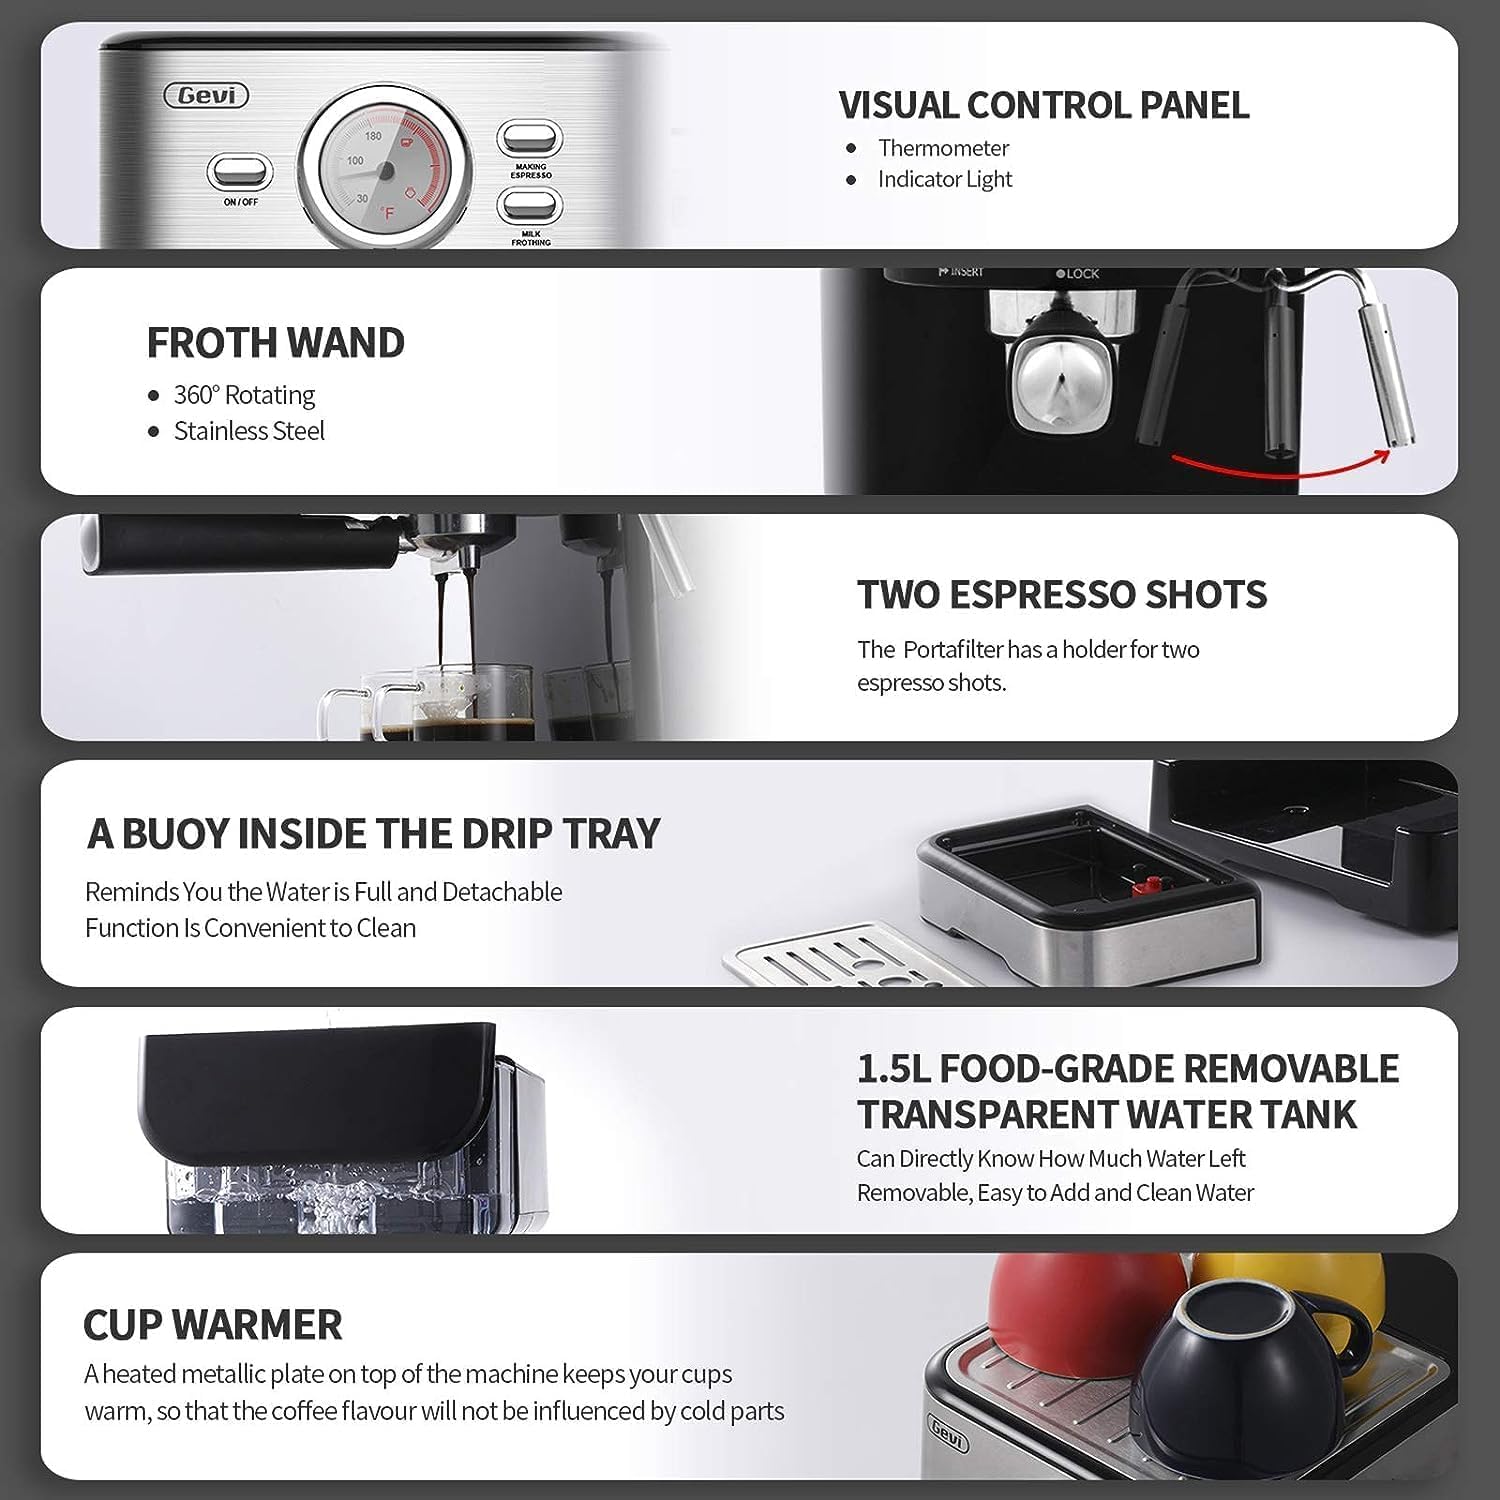
Figure 3.2: Machine Components
A closer look at the machine's external features: the visual control panel with thermometer and indicator lights, the 360° rotating stainless steel froth wand, the portafilter designed for two espresso shots, the removable drip tray with a water level buoy, the 1.5L transparent water tank, and the integrated cup warmer.

Figure 3.3: Active Temperature Control
This image highlights the active temperature control system with two separate thermostats, allowing precise temperature management for optimal espresso extraction at 197°F and milk frothing at 212°F.

Figure 3.4: Powerful Steam Wand
A visual representation of the powerful steam wand, featuring a pin-socket type design for efficient steam delivery and the creation of silky smooth micro-foam, ideal for latte art.
4. Setup
- Unpacking: Carefully remove all packaging materials. Ensure all components are present.
- Placement: Place the machine on a stable, flat, heat-resistant surface, away from water sources and heat.
- Water Tank: Remove the 1.5L removable water tank, rinse it, and fill it with fresh, cold water up to the MAX line. Place it back securely.
- Initial Cleaning Cycle: Before first use, perform an initial cleaning cycle without coffee.
- Fill the water tank.
- Plug in the machine and press the ON/OFF button. The indicator light will illuminate.
- Once the temperature gauge reaches the brewing zone, place a cup under the portafilter (without coffee) and turn the control knob to the "Brewing Espresso" position. Let water run through for 30 seconds.
- Turn the control knob to the "Milk Frothing" position and let steam release from the wand for 30 seconds.
- Turn the control knob back to the OFF position.
5. Operating Instructions
5.1 Making Espresso (Ground Coffee)
- Prepare Portafilter: Insert the desired filter basket (single or double shot) into the portafilter. Fill with finely ground espresso coffee.
- Tamp Coffee: Use the tamper to press the coffee grounds firmly and evenly. Wipe any excess grounds from the rim.
- Attach Portafilter: Insert the portafilter into the brew head and turn it to the right until it is securely locked.
- Pre-heat Cups: Place your espresso cups on the cup warmer on top of the machine.
- Brew Espresso: Once the temperature gauge indicates the optimal brewing temperature (around 197°F), place pre-heated cups under the portafilter spouts. Turn the control knob to the "Brewing Espresso" position.
- Stop Brewing: Monitor the espresso flow. Once the desired volume is reached (typically 25-30ml per shot), turn the control knob back to the OFF position to stop the flow.

Figure 5.1: Espresso Brewing and Drink Varieties
This image demonstrates the machine brewing espresso into two cups, alongside visual examples of different coffee beverages that can be prepared, such as cappuccino, latte, mocha, and macchiato.
5.2 Making Espresso (Nespresso Capsules)
This machine supports 2-in-1 extraction for both ground coffee and Nespresso capsules.
- Prepare Capsule: Insert a Nespresso capsule into the capsule box, then close the capsule box.
- Insert Portafilter: Place the capsule box into the portafilter and insert the portafilter into the machine, locking it securely.
- Brew Espresso: Follow steps 4-6 from the "Making Espresso (Ground Coffee)" section.

Figure 5.2: 2-in-1 Extraction System
This diagram illustrates the step-by-step process for using both ground coffee and Nespresso capsules with the machine's versatile portafilter system.
5.3 Milk Frothing
- Prepare Milk: Fill a frothing pitcher with cold milk (dairy or non-dairy) to just below the spout.
- Activate Steam: Once the temperature gauge indicates the optimal frothing temperature (around 212°F), turn the control knob to the "Milk Frothing" position.
- Froth Milk: Immerse the steam wand tip just below the surface of the milk. Angle the pitcher slightly. Steam will be released, heating and frothing the milk.
- Stop Steaming: Once the desired texture and temperature are achieved, turn the control knob back to the OFF position. Immediately wipe the steam wand with a damp cloth to prevent milk residue from drying.
6. Maintenance
- Daily Cleaning:
- Empty and rinse the drip tray after each use. The buoy will indicate when it's full.
- Clean the portafilter and filter basket thoroughly after each use.
- Wipe down the exterior of the machine with a damp cloth.
- Steam Wand Cleaning: After frothing milk, immediately wipe the steam wand with a damp cloth. Periodically, remove the steam wand nozzle and clean any milk residue.
- Water Tank Cleaning: Clean the water tank regularly with mild detergent and rinse thoroughly.
- Descaling: Descale the machine every 2-3 months, or more frequently with hard water, to prevent mineral buildup. Follow the descaling instructions provided with your descaling solution or refer to the manufacturer's guidelines.
7. Troubleshooting
| Problem | Possible Cause | Solution |
|---|---|---|
| No coffee flow | Water tank empty, clogged filter, coffee too fine/tamped too hard. | Fill water tank, clean filter, use coarser grind/lighter tamp. |
| Weak espresso | Coffee too coarse, not enough coffee, insufficient tamp. | Use finer grind, increase coffee amount, tamp more firmly. |
| Water leaking | Portafilter not properly locked, water tank not seated correctly. | Ensure portafilter is locked, reseat water tank. |
| No steam from wand | Steam wand clogged, machine not at frothing temperature. | Clean steam wand nozzle, wait for frothing temperature. |
8. Specifications
- Brand: Barsetto
- Model Number: 738530979557
- Pressure: 15 Bar
- Water Tank Capacity: 1.5 Liters
- Power: 1100W (from product title)
- Coffee Input Type: Ground Coffee, Nespresso Capsules
- Special Features: Cup Warmer, Milk Frother, Removable Water Tank, Active Temperature Control
- Dimensions: 129.96"D x 180.96"W x 164.4"H
- Item Weight: 9.79 pounds
9. Warranty and Support
For warranty information, technical support, or service inquiries, please refer to the warranty card included with your product or visit the official Barsetto website. Keep your purchase receipt as proof of purchase.
Ask a question about this manual
Ask about setup, troubleshooting, compatibility, parts, safety, or missing instructions. Manuals+ will review the question and use this page’s manual context to help answer it.