
ieGeek K302
ieGeek K302 Bluetooth Car Radio User Manual
Model: K302 | Brand: ieGeek
Introduction
Thank you for purchasing the ieGeek K302 Bluetooth Car Radio. This manual provides detailed instructions for installation, operation, and maintenance of your new car audio system. Please read this manual thoroughly before using the product to ensure proper functionality and safety.
Safety Information
- Always ensure the vehicle is parked safely before operating the car radio controls.
- Do not attempt to disassemble or modify the unit. This may cause damage and void the warranty.
- Keep the unit away from water and moisture to prevent electric shock.
- Ensure proper wiring connections to avoid short circuits or damage to the vehicle's electrical system.
- Consult a professional for installation if you are unsure about the wiring process.
Package Contents
Please check the package for the following items:
- ieGeek K302 Car Radio Unit
- Remote Control
- Power Wiring Harness
- Installation Keys/Tools
- User Manual (this document)
- External Microphone (optional, depending on package)
Product Overview
Familiarize yourself with the main components and controls of your ieGeek K302 car radio.

Figure 1: Front view of the ieGeek K302 car radio unit and its accompanying remote control. The unit features a dual LCD display, various control buttons, USB ports, and an AUX input. The remote allows for convenient operation from a distance.
Front Panel Controls and Ports

Figure 2: Detailed diagram showing the front panel layout and rear connections of the ieGeek K302 car radio.
- Radio Antenna Interface
- Left Channel Audio Output
- Right Channel Audio Output
- Speaker Cable Socket-A
- Power Cable Socket-B
- 15A Fuse
- LED Clock Display
- Multifunction LCD Screen
- SD Card Slot
- USB Music Interface
- USB Charger Interface
Setup and Installation
Proper installation is crucial for the performance and safety of your car radio. It is recommended to have the unit installed by a qualified professional if you are not familiar with car audio wiring.
Wiring Diagram

Figure 3: Detailed wiring connections for the ieGeek K302 car radio, showing speaker and power connections.
- A1-Violet: Right Rear Speaker Positive (+)
- A2-Violet/Black: Right Rear Speaker Negative (-)
- A3-Gray: Right Front Speaker Positive (+)
- A4-Gray/Black: Right Front Speaker Negative (-)
- A5-White: Left Front Speaker Positive (+)
- A6-White/Black: Left Front Speaker Negative (-)
- A7-Green: Left Rear Speaker Positive (+)
- A8-Green/Black: Left Rear Speaker Negative (-)
- B4-Yellow: +12V Car Battery Positive (+)
- B5-Blue: Automatic Antenna Power Supply (ANT)
- B7-Red: ACC Key Line (Ignition Switch)
- B8-Black: Car Battery Negative (-) / Ground Wire
Installation Steps:
- Disconnect the vehicle's negative battery terminal before starting installation.
- Carefully remove the existing car radio or blanking plate from the dashboard.
- Connect the wiring harness provided with the ieGeek K302 to your vehicle's wiring according to the diagram above. Ensure all connections are secure and insulated.
- Connect the antenna cable to the radio antenna interface (1).
- Slide the ieGeek K302 unit into the dashboard opening until it clicks into place.
- Reconnect the vehicle's negative battery terminal.
- Test all functions of the car radio before fully reassembling the dashboard.
Operating Instructions
Power On/Off and Basic Controls
- Press the Power button (
 ) to turn the unit on or off.
 - Rotate the Volume knob to adjust the sound level.
- Press the MUTE button to mute or unmute the audio.
- Press the MODE/CLK button to switch between different audio sources (FM, AM, Bluetooth, USB, SD, AUX) and to set the clock.
Radio Operation (FM/AM/RDS)
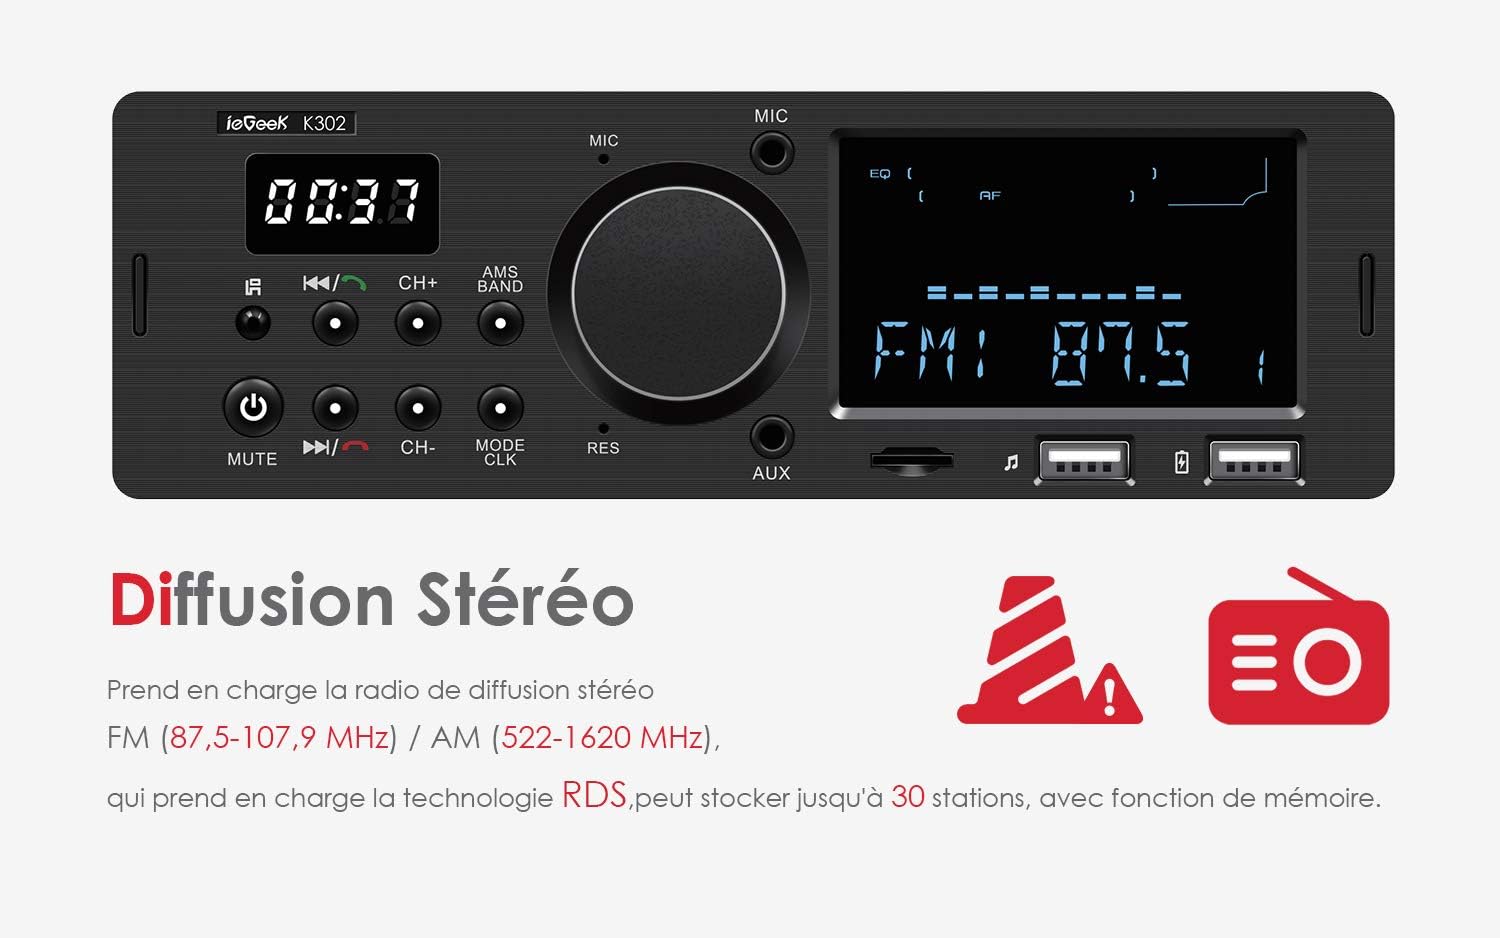
Figure 4: The car radio displaying an FM frequency, indicating stereo broadcast capability.
- Press the MODE button to select FM or AM radio mode.
- Press the CH+/CH- buttons to manually tune to a station or to navigate through preset stations.
- Press and hold the CH+/CH- buttons for automatic station seeking.
- The unit supports FM (87.5-107.9 MHz) and AM (522-1620 KHz) stereo broadcast.
- RDS (Radio Data System): The car radio supports RDS, providing traffic information and allowing the AF (Alternative Frequencies) function to find stronger signals for the current station.
- Memory Function: The unit can store up to 30 stations. The power-off save system remembers your settings and stations even after power interruption.
Bluetooth Connectivity

Figure 5: Demonstrates the hands-free Bluetooth calling feature, allowing safe communication while driving.
- Ensure Bluetooth is enabled on your mobile device.
- Select Bluetooth mode on the car radio using the MODE button.
- On your device, search for Bluetooth devices and select "ieGeek K302" (or similar name) to pair.
- Once paired, you can stream audio from your device or make/receive hands-free calls.
- For calls, a short press of the Play/Pause button (
 ) will answer/end a call.
 - The unit supports an external 3.5mm microphone for clearer voice quality during calls.
USB/SD Card/AUX Playback

Figure 6: Illustrates the use of AUX-IN for playing various audio formats, enhancing the in-car entertainment experience.
- Insert a USB flash drive (up to 32GB) into the USB Music Interface (10) or an SD card (up to 32GB) into the SD Card Slot (9).
- Connect an external audio device (e.g., smartphone, MP3 player) to the AUX input using a 3.5mm audio cable.
- The unit supports multiple audio formats including MP3, WMA, WAV, and FLAC (lossless quality).
- Use the Play/Pause, Next/Previous buttons to control playback.
- The USB Charger Interface (11) can be used to charge compatible devices.
Setting the Clock

Figure 7: The separate clock display on the car radio, which remains visible when the engine is on, allowing for quick time checks.
- Press and hold the MODE/CLK button to enter clock setting mode.
- Use the CH+/CH- buttons to adjust the hours and minutes.
- Press the MODE/CLK button again to confirm and exit clock setting mode.
- The LCD clock display (7) shows the exact time and is always visible when the engine is on.
Remote Control Operation

Figure 8: The remote control provides convenient access to various functions of the car radio, enhancing user experience.
The included remote control allows for convenient operation of the car radio from a distance. Refer to the remote control's button layout for specific functions such as power, mode, volume, track skip, station tuning, EQ settings, and more.
Maintenance
- Clean the unit's front panel with a soft, dry cloth. Do not use abrasive cleaners or solvents.
- Keep the USB ports and SD card slot free from dust and debris.
- Ensure proper ventilation around the unit to prevent overheating.
- If the fuse blows, replace it with a fuse of the same rating (15A).
Troubleshooting
| Problem | Possible Cause | Solution |
|---|---|---|
| No power | Loose power connection; Blown fuse; Vehicle battery issue. | Check power wiring harness connections. Replace 15A fuse if blown. Check vehicle battery. |
| No sound | Volume too low; Mute activated; Incorrect speaker wiring; Incorrect audio source. | Increase volume. Deactivate mute. Check speaker connections. Select correct audio source. |
| Poor radio reception | Antenna not connected; Weak signal area; Damaged antenna. | Ensure antenna is securely connected. Try AF function for stronger signal. Check antenna for damage. |
| Bluetooth not connecting | Bluetooth not enabled on device; Incorrect pairing mode; Interference. | Ensure Bluetooth is on and discoverable on your device. Select Bluetooth mode on radio. Try re-pairing. Move away from interference sources. |
| USB/SD not playing | Unsupported file format; Corrupted files; USB/SD card not inserted correctly; Card capacity exceeded. | Ensure files are MP3/WMA/WAV/FLAC. Reinsert USB/SD card. Check card for errors. Ensure card is 32GB or less. |
Specifications

Figure 9: Physical dimensions of the ieGeek K302 car radio unit.
| Feature | Detail |
|---|---|
| Model Number | K302 |
| Brand | ieGeek |
| Connectivity Technology | Bluetooth |
| Compatible Devices | Speaker, iOS, Android devices |
| Connector Type | 3.5 mm Jack |
| Audio Output Mode | Stereo, Surround |
| Surround Sound Channel Configuration | 4.0 |
| Output Power | 60 Watts |
| Number of Channels | 4 |
| Supported Audio Formats | MP3, WMA, WAV, FLAC |
| USB/SD Card Support | Up to 32GB |
| Radio Frequencies | FM (87.5-107.9 MHz), AM (522-1620 KHz) |
| Dimensions (W x H x D) | Approx. 188 mm x 58 mm x 100 mm |
Warranty and Support
ieGeek products are designed and manufactured to the highest quality standards. For warranty information and technical support, please refer to the warranty card included with your product or visit the official ieGeek website. If you encounter any issues not covered in this manual, please contact ieGeek customer service for assistance.
ieGeek Official Store: Visit ieGeek Store on Amazon
Ask a question about this manual
Ask about setup, troubleshooting, compatibility, parts, safety, or missing instructions. Manuals+ will review the question and use this page’s manual context to help answer it.