
1. Introduction
This manual provides detailed instructions for the installation, operation, and maintenance of your Nilight 3 Gang Rocker Switch Panel. This multi-functional panel is designed for 12V-24V vehicles, offering control for various electrical appliances, along with USB charging and a cigarette lighter socket. Please read this manual thoroughly before installation and use to ensure proper function and safety.
2. Key Features
- 5 Pin SPST Design: Features a 5-pin on-off rocker switch with Single Pole Single Throw (SPST) design. Includes a pre-wired wiring harness for simplified installation.
- Durable Construction: Manufactured with a high-quality aluminum panel, superior ABS&PC switches, and well-conductive pins. Marine-grade construction ensures IP65 waterproof rating, scratch-proof, and corrosion resistance.
- Multi-functional Panel: Integrates a 3-gang switch panel with a 12V cigarette socket and a dual USB charger. Suitable for various circuit control and charging requirements.
- Wide Application: Universally compatible with 12V-24V vehicles, including trucks, jeeps, trailers, RVs, caravans, buses, marine boats, and yachts.
- Easy Installation: The switch panel can be mounted horizontally or vertically. The pre-wired harness facilitates straightforward installation in both 12V and 24V systems.
3. Package Contents
Verify that all items listed below are present and in good condition upon opening the package.
- 1x Pre-wired 3 Gang Rocker Switch Panel
- 4x Mounting Screws
- 1x Wiring Diagram

4. Product Specifications
| Specification | Value |
|---|---|
| Product Dimensions | 5 x 3 x 1 inches |
| Weight | 1 Pound |
| Model Number | 90172B |
| Operation Mode | OFF-NONE-ON |
| Current Rating | 20 Amps |
| Operating Voltage | 12 Volts (DC) - 24 Volts (DC) |
| Contact Type | Normally Closed |
| Connector Type | Plug In |
| Terminal Type | SPST |
| Circuit Type | 5-way |
| Actuator Type | Toggle |
| Waterproof Rating | IP65 |
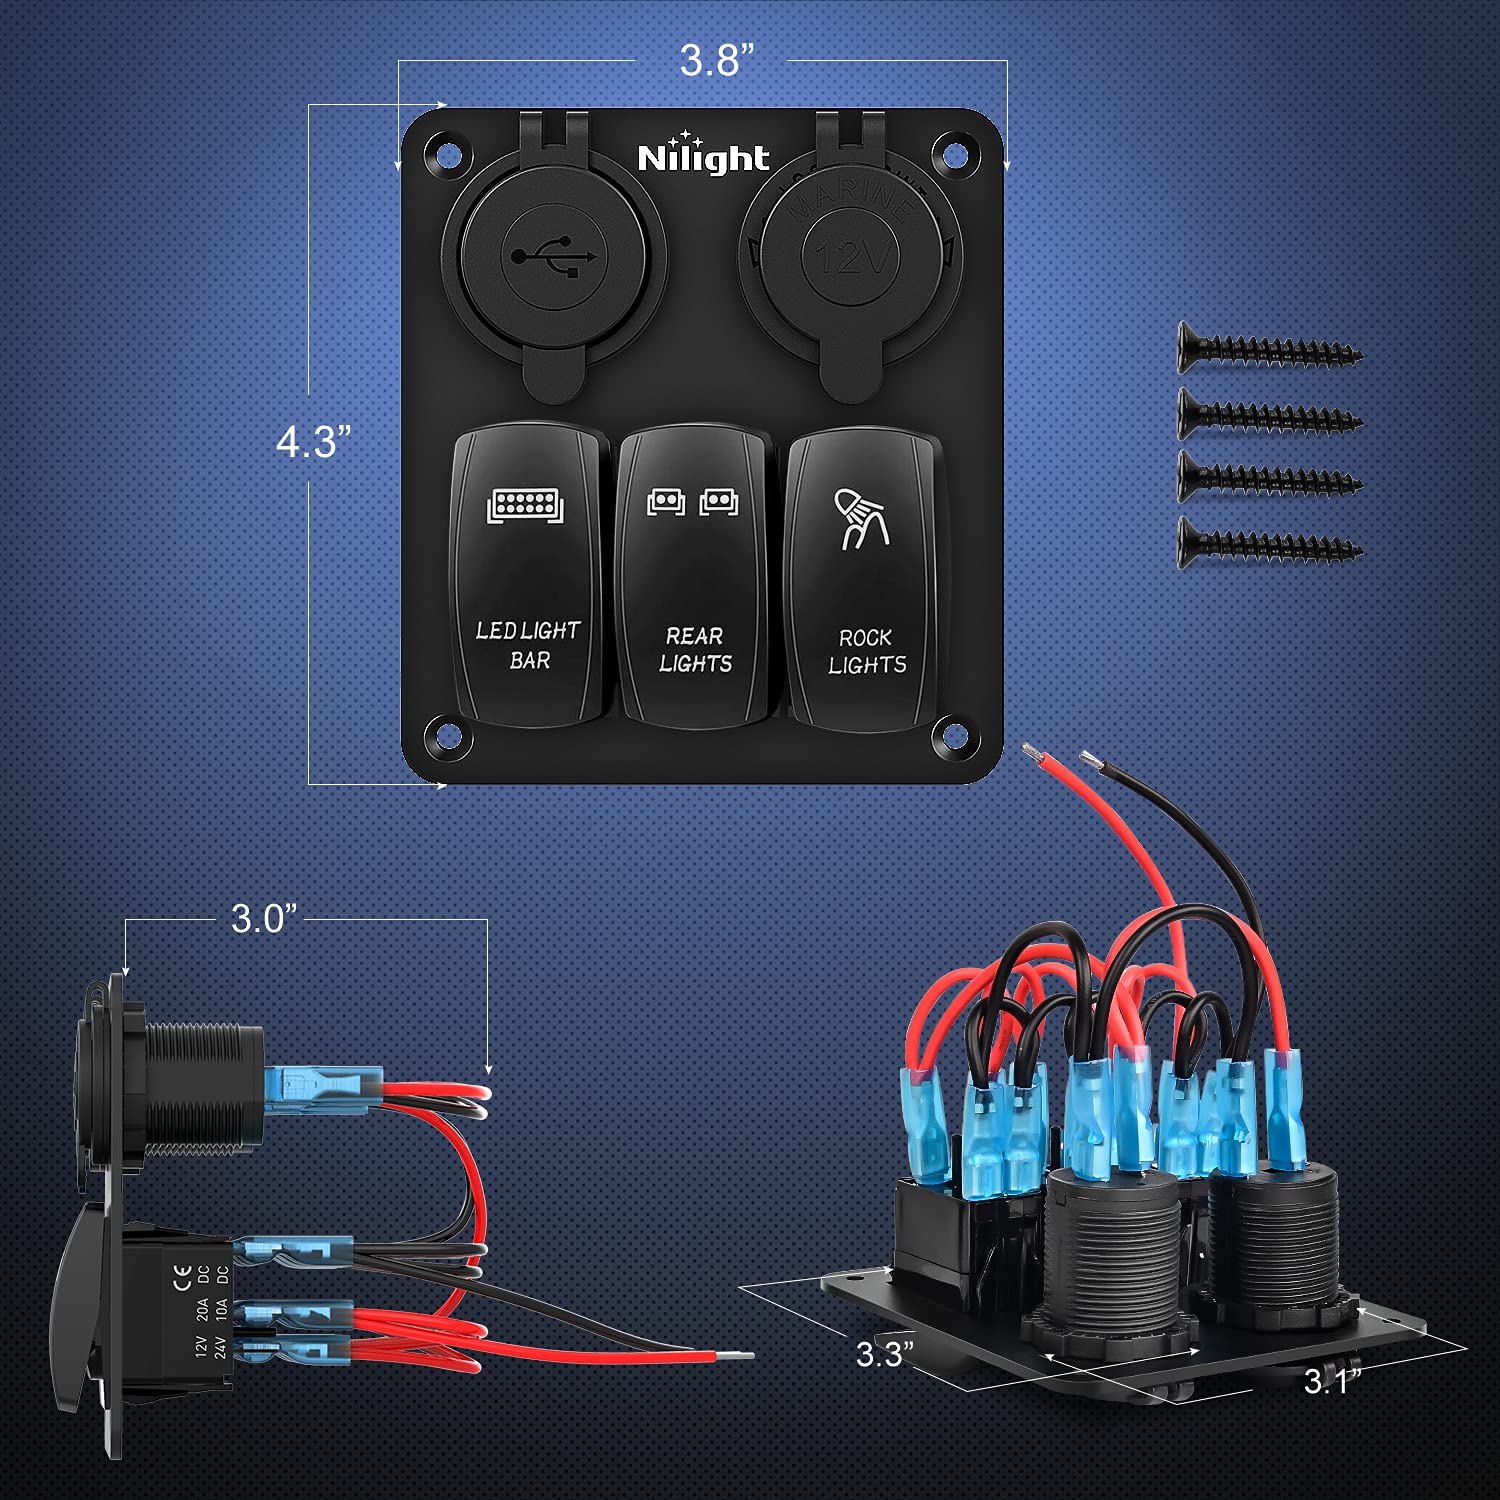
5. Setup and Installation
Before beginning installation, ensure the vehicle's power supply is disconnected to prevent electrical hazards. Refer to the included wiring diagram for specific connections.
5.1 Mounting the Panel
- Choose a suitable flat surface in your vehicle for mounting. The panel can be installed horizontally or vertically.
- Using the panel as a template, mark the four screw holes and the cutout area required for the panel's body and wiring.
- Carefully cut the opening and drill the screw holes. Ensure the opening is large enough for the panel to fit snugly but not so large that it compromises stability.
- Insert the switch panel into the cutout and secure it with the provided mounting screws.

5.2 Wiring Connections
The panel comes with a pre-wired harness for simplified connection. Each switch is rated for 20 Amps. Ensure your connected accessories do not exceed this rating per switch or the overall panel capacity.
- Connect the main positive (+) wire from the panel's harness to your vehicle's 12V-24V power source (e.g., battery or fuse box) via an appropriate fuse.
- Connect the main negative (-) wire from the panel's harness to a suitable ground point on your vehicle chassis.
- Connect the positive (+) wires from your electrical accessories (e.g., LED light bar, rear lights, rock lights) to the corresponding output wires of the rocker switches on the panel.
- Ensure all connections are secure and properly insulated to prevent short circuits.

6. Operating Instructions
Once installed and wired correctly, the Nilight 3 Gang Rocker Switch Panel is ready for operation.
6.1 Rocker Switches
- Each rocker switch controls a connected electrical appliance.
- Press the top part of the switch to turn the connected device ON. The integrated LED light on the switch will illuminate, indicating the device is active.
- Press the bottom part of the switch to turn the connected device OFF. The LED light will extinguish.

6.2 Dual USB Charger
- The dual USB charger provides 5V 1A and 5V 2.1A outputs for charging mobile devices.
- Connect your USB charging cable to the appropriate USB port on the panel.
- The USB ports are continuously powered when the panel receives power.

6.3 Cigarette Lighter Socket
- The 12V cigarette lighter socket can be used to power compatible 12V accessories.
- Insert your 12V accessory plug into the socket.
- The cigarette lighter socket is continuously powered when the panel receives power.

7. Maintenance
Regular maintenance ensures the longevity and optimal performance of your switch panel.
- Cleaning: Wipe the panel surface with a soft, damp cloth. Avoid abrasive cleaners or solvents that could damage the finish or markings.
- Connection Check: Periodically inspect all wiring connections to ensure they remain tight and free from corrosion. Loose connections can lead to intermittent operation or overheating.
- Waterproof Seals: Ensure the protective caps for the USB ports and cigarette lighter socket are properly seated when not in use to maintain the IP65 waterproof rating.
8. Troubleshooting
If you encounter issues with your Nilight 3 Gang Rocker Switch Panel, refer to the following common problems and solutions.
| Problem | Possible Cause | Solution |
|---|---|---|
| Switch does not illuminate or operate connected device. | No power to the panel; loose wiring connection; blown fuse; faulty switch. | Check main power connection to the panel. Inspect all wiring for secure connections. Verify vehicle fuse and any inline fuses are intact. If the switch is faulty, it may need replacement. |
| USB charger or cigarette lighter socket not working. | No power to the panel; loose wiring connection; device drawing too much current. | Ensure the panel is receiving power. Check wiring connections. Confirm the device being charged or powered is within the specified current limits for the ports. |
| Panel feels hot during operation. | Overloaded circuit; loose connection; insufficient wire gauge. | Reduce the load on the panel. Check all connections for tightness. Ensure appropriate wire gauges are used for the current draw. Discontinue use if overheating persists. |
9. Warranty and Support
Nilight products are designed for durability and performance. For specific warranty information, please refer to the documentation included with your purchase or visit the official Nilight website. If you require technical assistance or have questions regarding your product, please contact Nilight customer support through their official channels.
You can find more information and support at the Nilight Store on Amazon.

