1. Introduction
This manual provides essential information for the safe and efficient operation, installation, and maintenance of your HASWING Protruar G 3.0 Electric Trolling Motor. Please read this manual thoroughly before using the product to ensure proper function and longevity.

Figure 1: Overview of the HASWING Protruar G 3.0 Electric Trolling Motor.
2. Safety Information
Always prioritize safety when operating any marine equipment. Failure to follow these instructions may result in injury or damage to the product or vessel.
- Read All Instructions: Familiarize yourself with all features and operating procedures before use.
- Battery Safety: Always connect the motor to a compatible 24V deep cycle battery system. Ensure proper polarity (+ to + and - to -). Disconnect battery power when the motor is not in use or during maintenance.
- Propeller Safety: Keep hands, feet, and clothing clear of the propeller at all times, especially when the motor is connected to power.
- Kill Switch: Always use the provided kill switch lanyard. Attach it to yourself or the boat to ensure immediate power cut-off in an emergency.
- Water Conditions: Operate the motor cautiously in shallow water or areas with submerged obstacles to prevent propeller damage.
- Ventilation: Ensure adequate ventilation around batteries to prevent accumulation of explosive gases.
- Children: Keep children away from the motor and controls.
3. Package Contents
Verify that all items are present in the package:
- HASWING Protruar G 3.0 Trolling Motor with 35.4-inch shaft
- Extendable Tiller Handle
- Transom Mount Bracket
- 3-Blade Propeller (11.8-inch diameter)
- Kill Switch Lanyard
- Mounting Hardware (screws, washers, nuts)
- Instruction Manual

Figure 2: Key components of the trolling motor, including the kill switch, battery meter, stepless speed control, foldable handle, bracket, durable motor, and anti-impact propeller.
4. Specifications
| Feature | Specification |
|---|---|
| Model | Protruar G 3.0 |
| Shaft Power | 3HP |
| Peak Thrust | 110 LBS |
| Max Voltage | DC 24V |
| Max Power | 1200W |
| Max Amp | 50A |
| Depth Adjustment | Depth Collar |
| Prop Type/Size | 3 Blade Prop/11.8 In. Diam |
| Pro Speed at Full Power | Max. 630rpm underwater |
| Battery Type | 2 x 10⁵ AH Deep Cycle (recommended) |
| Steering Ratio | 360 Degree Control |
| Decibel Level (db) | 65db |
| Weight | 8.0kg/17.6lb |
| Shaft Length | 900mm/35.4 Inch |
| Max Boat Length & Load | 7m/22.9ft |
| Mounting Type | Transom Mount |
5. Setup
5.1 Mounting the Motor
The Protruar G 3.0 is designed for transom mounting. Follow these steps to securely attach the motor to your boat:
- Position the transom mount bracket on the stern of your boat.
- Tighten the clamp screws on the bracket firmly to secure it to the transom. Ensure the motor is centered and stable.
- Adjust the motor's shaft depth using the depth collar to ensure the propeller is submerged at the desired level, avoiding contact with the bottom or excessive splashing.
- The motor offers 7 levels of tilting positions. Adjust the tilt to optimize performance and propeller depth.
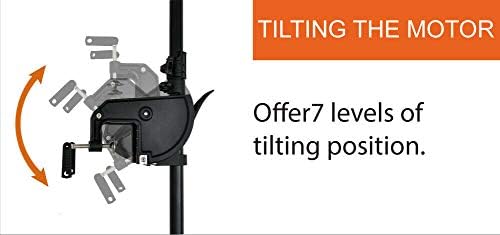
Figure 3: Adjusting the motor's tilt for optimal operation.
5.2 Battery Connection
The Protruar G 3.0 requires a 24V power supply. This typically involves two 12V deep cycle batteries connected in series. The motor includes a 60A resettable inline fuse for protection.
- Ensure the motor is OFF and the kill switch is disengaged before connecting batteries.
- Connect the positive (+) terminal of the first 12V battery to the negative (-) terminal of the second 12V battery using a short jumper cable.
- Connect the motor's positive (+) cable (red) to the remaining positive (+) terminal of the battery series.
- Connect the motor's negative (-) cable (black) to the remaining negative (-) terminal of the battery series.
- Secure all connections tightly.
WARNING: Incorrect battery connection can cause severe damage to the motor and pose a safety hazard.
5.3 Handle Assembly
The tiller handle is extendable and foldable for convenience.
- To extend the handle, pull it outwards until it locks into position.
- To fold the handle, release the locking mechanism and fold it down. The handle can fold at angles of 0-100 degrees.
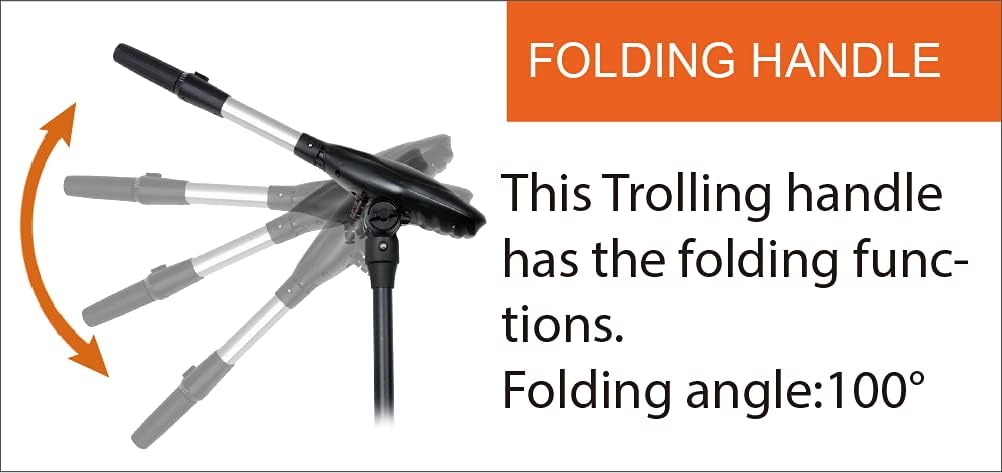
Figure 4: The tiller handle can be folded for storage or adjusted for comfortable operation.
6. Operation
6.1 Power On/Off and Speed Control
The motor features digital stepless forward and reverse speed control directly from the tiller handle.
- Attach the kill switch lanyard to the motor and yourself or the boat.
- To engage forward motion, rotate the tiller handle clockwise. The further you rotate, the higher the speed.
- To engage reverse motion, rotate the tiller handle counter-clockwise. The further you rotate, the higher the reverse speed.
- To stop the motor, return the tiller handle to the neutral (OFF) position.

Figure 5: Digital stepless speed control for precise adjustments.
6.2 Battery Indicator
The motor head features a 5-level power display to indicate the battery's charge status.
- Monitor the display regularly to avoid unexpected power loss.
- Recharge batteries when the indicator shows low power.

Figure 6: The 5-level battery meter on the motor head.
6.3 Emergency Stop
The kill switch provides an immediate power cut-off for safety.
- In an emergency, pull the kill switch lanyard to instantly stop the motor.
- Always ensure the kill switch is properly engaged before starting the motor.
7. Maintenance
7.1 Propeller Care
The anti-impact propeller features a prop-clutch ability to prevent damage if it strikes an object.
- Regularly inspect the propeller for weeds, fishing line, or damage. Clear any obstructions.
- If the propeller is damaged, replace it with an authentic HASWING replacement propeller.
- Do not overtighten the propeller nut, as this can damage the motor if the prop strikes an object.

Figure 7: The prop-clutch mechanism helps prevent damage to the propeller and motor.
7.2 Cleaning and Storage
- After each use, especially in saltwater, rinse the motor thoroughly with fresh water.
- Wipe down all surfaces to remove salt, dirt, and debris.
- Store the motor in a dry, well-ventilated area, away from direct sunlight and extreme temperatures.
- Disconnect batteries during long-term storage.
8. Troubleshooting
| Problem | Possible Cause | Solution |
|---|---|---|
| Motor does not start |
|
|
| Reduced power or speed |
|
|
| Excessive vibration or noise |
|
|
9. Warranty and Support
For warranty information, technical support, or replacement parts, please refer to the official HASWING website or contact your authorized dealer. Keep your purchase receipt as proof of purchase.


