1. Introduction
Thank you for choosing the Sofirn Universal 4-Bay Smart Battery Charger. This device is designed to provide efficient and safe charging, discharging, capacity testing, and repair functions for a wide range of rechargeable batteries. Please read this manual thoroughly before use to ensure proper operation and to maximize the lifespan of your batteries and charger.

This image displays the Sofirn Universal 4-Bay Smart Battery Charger, showcasing its four independent charging slots and the integrated LCD screen. Different battery types, including Li-ion and Ni-MH, are shown inserted into the bays, illustrating the charger's versatility.
2. Safety Instructions
- Use this charger only for specified rechargeable batteries. Attempting to charge non-rechargeable batteries may lead to explosion, rupture, or leakage, causing personal injury or property damage.
- Do not disassemble, modify, or short-circuit the charger.
- Keep the charger away from water, moisture, and high temperatures.
- Ensure proper ventilation during operation. Do not cover the charger.
- Unplug the charger from the power outlet when not in use or before cleaning.
- Keep out of reach of children.
- If any abnormal conditions occur (e.g., smoke, unusual smell, excessive heat), immediately unplug the charger and discontinue use.
3. Package Contents
Verify that all items are present in your package:
- Sofirn S4 Plus Fast Charger Unit
- Power Adapter
- User Manual (this document)

This image displays the items included in the product package: the S4 Plus Fast Charger unit, a power adapter, and the user manual.
4. Product Overview
Key Features:
- 4 Independent Charging Bays: Each bay operates independently, allowing for simultaneous charging, discharging, or testing of different battery types and sizes.
- Wide Compatibility: Supports various battery types including Li-ion (10440, 14500, 16340, 18350, 18650, 21700, 26650, etc.) and Ni-MH/Ni-Cd (AA, AAA, C). Compatible with battery diameters 10-26mm and heights 34-75mm.
- Fast Charging: Capable of charging at up to 3A per slot, with a total output of 12A. A 2500mAh battery can be fully charged in approximately 1 hour.
- Multi-functional Modes: Offers Charge, Discharge, Capacity Test, and Repair modes.
- LCD Display: Provides real-time information on charge/discharge capacity, voltage, current, time, internal resistance, and temperature for each slot.
- Intelligent Temperature Control: Equipped with a temperature sensor to prevent overheating. Charging current automatically decreases if the battery temperature rises excessively.
- Flexible Control: Features a switch to toggle between Automatic and Manual operating modes for current selection.

This diagram highlights the charger's fast charging feature, capable of delivering up to 3A per slot simultaneously, totaling 12A. It indicates that a 2500mAh battery can be fully charged in approximately one hour.

This image illustrates the wide compatibility of the charger, supporting batteries with diameters from 10-26mm and heights from 34-75mm. It lists compatible Li-ion types (e.g., 18650, 21700, 14500) and Ni-MH/Ni-Cd types (AA, AAA, C), noting sufficient space for 20700/21700 batteries.

This diagram shows the charger's specialized design for efficient heat dissipation. It highlights the cooling fins and airflow paths that help manage internal temperatures during operation.

This image describes the charger's automatic intelligent temperature control system. It explains that a built-in temperature sensor automatically reduces charging current if the battery becomes too hot, ensuring safety and stability.
5. Setup
- Connect the power adapter to the charger's DC input port.
- Plug the power adapter into a suitable wall outlet. The LCD screen will illuminate, indicating the charger is ready.
- Observe the 'Manual & Auto' switch on the side of the charger. For most users, the 'Auto' mode is recommended for automatic current selection. For advanced users, switch to 'Manual' mode to set charging parameters.

This image highlights the 'Manual & Auto' switch located on the side of the charger. This switch allows users to toggle between automatic current selection and manual control over charging parameters.
6. Operating Instructions
Inserting Batteries:
Carefully insert one or more rechargeable batteries into the charging bays, ensuring correct polarity (+/-). The charger will automatically detect the battery type and display information on the LCD.
Automatic Mode:
In 'Auto' mode, the charger intelligently selects the optimal charge current based on the battery's internal resistance and type. This is the default and recommended mode for general use.

This image demonstrates the charger's intelligent function to automatically select the optimal charge current. The LCD screen shows the charger assessing the battery's internal resistance to determine the most suitable charging rate.
Manual Mode (Setting Charge Current):
If the 'Manual & Auto' switch is set to 'Manual', you can adjust the charge current:
- After inserting a battery, press the MODE button to select the desired function (Charge, Discharge, Cap Test, Repair).
- Press the CURRENT button to cycle through available charge current options: 250mA, 500mA (default), 1000mA, 1500mA, 2000mA, 2500mA, 3000mA.
- The selected current will be applied to the battery in that slot. Each slot can have different settings.
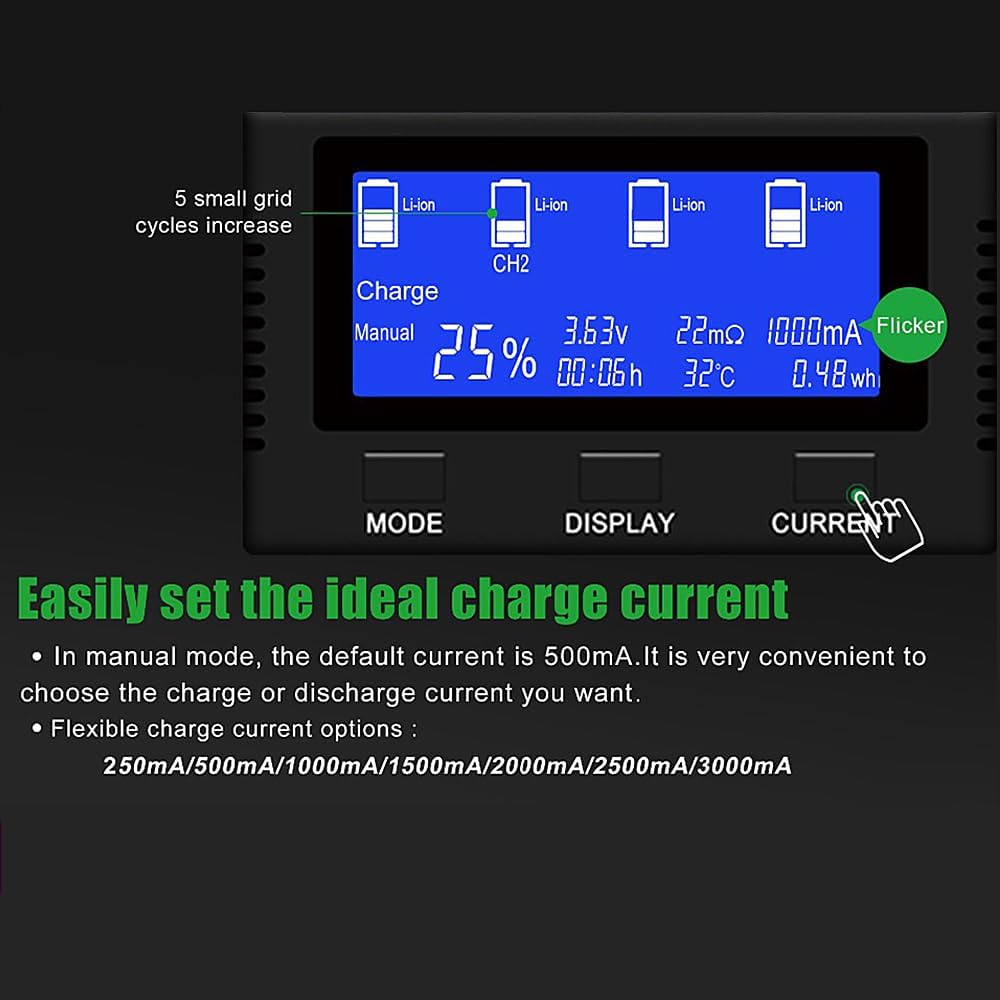
This image displays the manual mode interface on the LCD screen, allowing users to select specific charge currents. Available options include 250mA, 500mA (default), 1000mA, 1500mA, 2000mA, 2500mA, and 3000mA.
Discharge Mode:
The Discharge mode is used to analyze the actual capacity of a battery. It discharges the battery at a specified current.
- Insert the battery.
- Press the MODE button until 'Discharge' is selected.
- The charger will begin discharging the battery. The LCD will show discharge progress and capacity.
- For example, a 21700 5000mAh battery discharged at 1A will take approximately 5 hours.

This image illustrates the discharge mode on the charger's LCD. This function is used to analyze battery capacity by discharging at a set current, such as 1A for the first and fourth slots.
Capacity Test Mode:
This mode measures the true capacity of a battery by performing a full charge-discharge-charge cycle.
- Insert the battery.
- Press the MODE button until 'Cap Test' is selected.
- The charger will first fully charge the battery, then fully discharge it to measure capacity, and finally recharge it to full.
- The measured capacity will be displayed on the LCD.

This image depicts the capacity test mode on the LCD. In this mode, the charger fully charges a battery, then fully discharges it to measure its actual capacity, and finally recharges it.
Repair Mode:
The Repair function is designed to help restore the capacity of low-voltage or older Ni-MH batteries through a series of charge/discharge cycles. This process can take an extended period.
- Insert the battery.
- Press the MODE button until 'Repair' is selected.
- The charger will initiate a repair cycle. Monitor the battery during this process.
7. Display Information
The LCD screen provides detailed real-time data for each battery. Use the DISPLAY button to cycle through the information for each slot.

This image provides a comprehensive guide to the information displayed on the charger's LCD screen. It labels indicators for battery capacity status, battery type, charge mode (Auto/Manual), battery percentage, charge time, voltage, internal resistance, battery temperature, and energy in Wh.
- Battery Capacity Status: Visual representation of charge level.
- Battery Type: Indicates detected battery chemistry (e.g., Li-ion, NiMH/NiCd).
- Charge Mode: Shows current operating mode (Charge, Discharge, Cap Test, Repair).
- Auto/Manual: Indicates whether automatic or manual current selection is active.
- Battery Percentage: Estimated charge level.
- Charge Time: Duration of the current operation.
- Voltage: Real-time battery voltage.
- Internal Resistance: Displays the battery's internal resistance (mΩ).
- Current: Displays the charging or discharging current (mA).
- Temperature: Real-time battery temperature (°C).
- Energy (Wh): Accumulated energy transferred.
8. Maintenance
- Cleaning: Disconnect the charger from power before cleaning. Use a soft, dry cloth to wipe the surface. Do not use abrasive cleaners or solvents.
- Contact Points: Periodically inspect and gently clean the battery contact points on both the charger and your batteries. Dirt or corrosion can affect charging performance.
- Storage: Store the charger in a cool, dry place away from direct sunlight and extreme temperatures when not in use.
9. Troubleshooting
- Charger Not Powering On: Ensure the power adapter is securely connected to both the charger and a working wall outlet. Check if the outlet has power.
- Battery Not Detected/Charging:
- Ensure the battery is inserted with correct polarity.
- Clean the battery terminals and the charger's contact points with a dry cloth.
- Verify the battery is a rechargeable type and within the charger's supported specifications.
- Inconsistent Capacity Readings: Ensure battery terminals and charger contacts are clean. Repeat the capacity test if necessary.
- Charger Beep Volume Too Low: This version (V3) allows you to turn the beep and display off. Refer to the manual's specific instructions for adjusting these settings if available, or note that the volume is fixed.
- Battery Overheating: The charger has an automatic temperature control system that reduces current if overheating is detected. Ensure adequate ventilation around the charger. If overheating persists, discontinue use and contact support.
- Slow Charging: In Manual mode, ensure a higher charge current is selected if desired. In Auto mode, the charger selects an optimal current which may be lower for battery health.
10. Specifications
| Parameter | Value |
|---|---|
| Model Number | LSY-AAZV-IT-20230804-27150 |
| Input Voltage | 5 Volts |
| Output Voltage | 5 Volts (DC) |
| Max Charge Current | 3A per slot |
| Compatible Battery Diameter | 10-26mm |
| Compatible Battery Height | 34-75mm |
| Supported Battery Types | Li-ion (10440, 14500, 16340, 18350, 18650, 21700, 26650, etc.), Ni-MH/Ni-Cd (AA, AAA, C) |
| Item Weight | 1.57 pounds (0.71 Kilograms) |
| Package Dimensions | 8.03 x 7.36 x 2.52 inches |
| Color | Black |
11. Warranty and Support
Sofirn products are manufactured to high-quality standards. For warranty information or technical support, please refer to the contact details provided with your purchase or visit the official Sofirn website. Keep your purchase receipt as proof of purchase for warranty claims.


