
1. Introduction
This manual provides essential information for the safe and efficient operation, installation, and maintenance of your Midea MF200W90B/E 9kg Freestanding Washing Machine. Please read these instructions carefully before using the appliance and retain them for future reference.
2. Safety Information
2.1 General Safety
- Ensure the appliance is used only by adults and under supervision if children are present.
- Do not allow children to play with the appliance.
- Keep packaging materials out of reach of children.
- Do not attempt to repair or modify the appliance yourself. Contact qualified service personnel.
2.2 Electrical Safety
- Connect the appliance to a properly grounded power outlet.
- Do not use extension cords or multiple adapters.
- Ensure the power cord is not damaged or pinched.
- Unplug the appliance before cleaning or performing any maintenance.
2.3 Installation Safety
- The appliance must be installed on a firm, level surface.
- Ensure adequate clearance around the machine for ventilation and operation.
- All transport bolts must be removed before first use.
- Connect water inlet hoses securely to prevent leaks.
3. Product Overview
The Midea MF200W90B/E is a freestanding washing machine designed for efficient and thorough laundry care. It features a BLDC motor for quiet operation and durability, a bright LED display, and specialized functions like Health Guard and Steam for enhanced hygiene.

Figure 3.1: Front view of the Midea MF200W90B/E Washing Machine. This image shows the main body of the washing machine, including the large front-loading door and the control panel at the top.
3.1 Control Panel
The washing machine features an intuitive control panel with a central Lunar Dial and touch-sensitive buttons for program selection and setting adjustments.

Figure 3.2: Close-up of the Lunar Dial. This dial is used to select wash programs and displays the remaining time or selected settings.

Figure 3.3: Control panel detailing various wash programs including HealthGuard options like Cotton, Mix, Synthetic, Jeans, Cold Wash, Allergy Care, and Steam Care, alongside quick wash cycles and spin options.
4. Setup
4.1 Unpacking and Positioning
Carefully remove all packaging materials. Position the washing machine on a flat, stable surface. Ensure there is sufficient space around the appliance for proper ventilation and access.

Figure 4.1: Recommended installation clearance. This diagram illustrates the minimum space required around the washing machine for optimal performance and safety, showing dimensions of 59.5W x 56.5L x 85H cm for the unit and recommended clearances.
4.2 Removing Transport Bolts
Before operating the washing machine, it is crucial to remove the transport bolts located at the rear of the appliance. Failure to do so can cause significant damage during operation.

Figure 4.2: Installation Guide for transport bolt removal. This diagram shows a step-by-step process for safely removing the four transport bolts from the back of the washing machine and storing them.
4.3 Water Supply and Drainage
Connect the water inlet hose to a cold water tap. Ensure connections are tight to prevent leaks. Position the drain hose into a standpipe or secure it over a sink, ensuring it is not kinked or blocked.
4.4 Leveling the Machine
Adjust the adjustable feet at the bottom of the washing machine to ensure it is perfectly level. Use a spirit level to verify. A level machine reduces vibration and noise during operation.
4.5 Initial Calibration Cycle
After installation, it is recommended to run a calibration cycle without laundry to optimize the machine's performance. Refer to the specific instructions in your full user manual for initiating this cycle, as the duration may vary.
5. Operating Instructions
5.1 Loading Laundry
Open the washing machine door and load laundry loosely into the drum. Do not overload the machine; ensure there is enough space for clothes to move freely. Close the door firmly.
5.2 Adding Detergent
Pull out the detergent dispenser drawer. Add the appropriate amount of detergent and fabric softener to their respective compartments according to the detergent manufacturer's instructions and your laundry load size.
5.3 Selecting a Wash Program
Turn the Lunar Dial to select your desired wash program. The LED display will show the default settings for the chosen program.
- Common Programs: Cotton, Mix, Synthetic, Jeans, Cold Wash, Wool.
- Special Programs: Allergy Care, Steam Care, Drum Clean.
- Quick Programs: Quick 15', Rapid 45'.
- Other Options: ECO 40-60, Bulky, Rinse & Spin, Spin Only.
5.4 Adjusting Settings
After selecting a program, you can adjust settings such as temperature, spin speed, and delay start using the touch buttons on the control panel. The display will update to reflect your selections.
5.5 Starting a Wash Cycle
Press the Start/Pause button to begin the wash cycle. The machine will automatically proceed through the selected program.
5.6 Special Functions
- Health Guard: Combines Steam Care and Auto Clean to maintain optimal machine hygiene and enhance cleaning performance.
- Steam Care: Utilizes steam to remove 99.9% of bacteria and reduce wrinkles, promoting healthier and easier-to-iron clothes.
- Allergy Care: Specifically designed to remove common allergens from fabrics, suitable for sensitive skin.
- Drum Clean: A dedicated cycle that cleans the inner and outer drum with 90°C water to refresh the machine and prevent odor buildup.
- Pre-Selection Function (Delay Start): Allows you to set a delayed start time for your wash cycle, offering flexibility to suit your schedule.

Figure 5.1: Steam Care function in operation. This image shows steam being generated inside the washing machine drum, indicating the activation of the Steam Care cycle for deep cleaning and sanitization.
6. Maintenance
6.1 Cleaning the Detergent Dispenser
Regularly remove and clean the detergent dispenser drawer to prevent residue buildup. Rinse it under running water and reinsert.
6.2 Cleaning the Drum
Utilize the dedicated 'Drum Clean' program to clean the inner and outer drum with hot water, ensuring hygiene and preventing odors. This should be done periodically.
6.3 Cleaning the Door Seal
Wipe the rubber door seal after each wash to remove any lint, hair, or debris. This prevents mold growth and ensures a tight seal.
6.4 Cleaning the Drain Pump Filter
Locate the drain pump filter, usually at the bottom front of the machine. Open the cover, drain any residual water, and carefully remove and clean the filter of any foreign objects or lint. Reinstall securely.
6.5 External Cleaning
Wipe the exterior of the washing machine with a soft, damp cloth. Do not use abrasive cleaners or solvents.
7. Troubleshooting
If you encounter issues with your washing machine, refer to the following common problems and solutions before contacting service.
| Problem | Possible Cause | Solution |
|---|---|---|
| Machine does not start | Power cord unplugged, door not closed, program not selected, Start/Pause not pressed. | Check power connection, ensure door is latched, select program, press Start/Pause. |
| Water leakage | Loose hose connections, clogged drain filter, excessive detergent. | Tighten hose connections, clean drain filter, use correct detergent amount. |
| Excessive vibration/noise | Transport bolts not removed, machine not level, uneven load. | Remove transport bolts, adjust leveling feet, redistribute laundry in drum. |
| Water pressure error | Low water pressure, kinked inlet hose, clogged inlet filter. | Check water supply, straighten hose, clean inlet filter. If issue persists, consult a plumber. |
| Clothes not clean | Overloading, insufficient detergent, incorrect program. | Reduce load size, use appropriate detergent, select suitable wash program. |
8. Specifications
Key technical specifications for the Midea MF200W90B/E washing machine:
| Feature | Specification |
|---|---|
| Model Number | MF200W90B/E |
| Capacity | 9 Kilograms |
| Dimensions (D x W x H) | 56.5 x 59.5 x 85 cm |
| Item Weight | 71 Kilograms |
| Maximum Spin Speed | 1400 RPM |
| Energy Class | B |
| Noise Level (Spin) | 76 dB |
| Special Features | BLDC Motor, Hygiene Steam, Reload Function |
| Access Location | Front Load |
| Controls Type | Push Button |
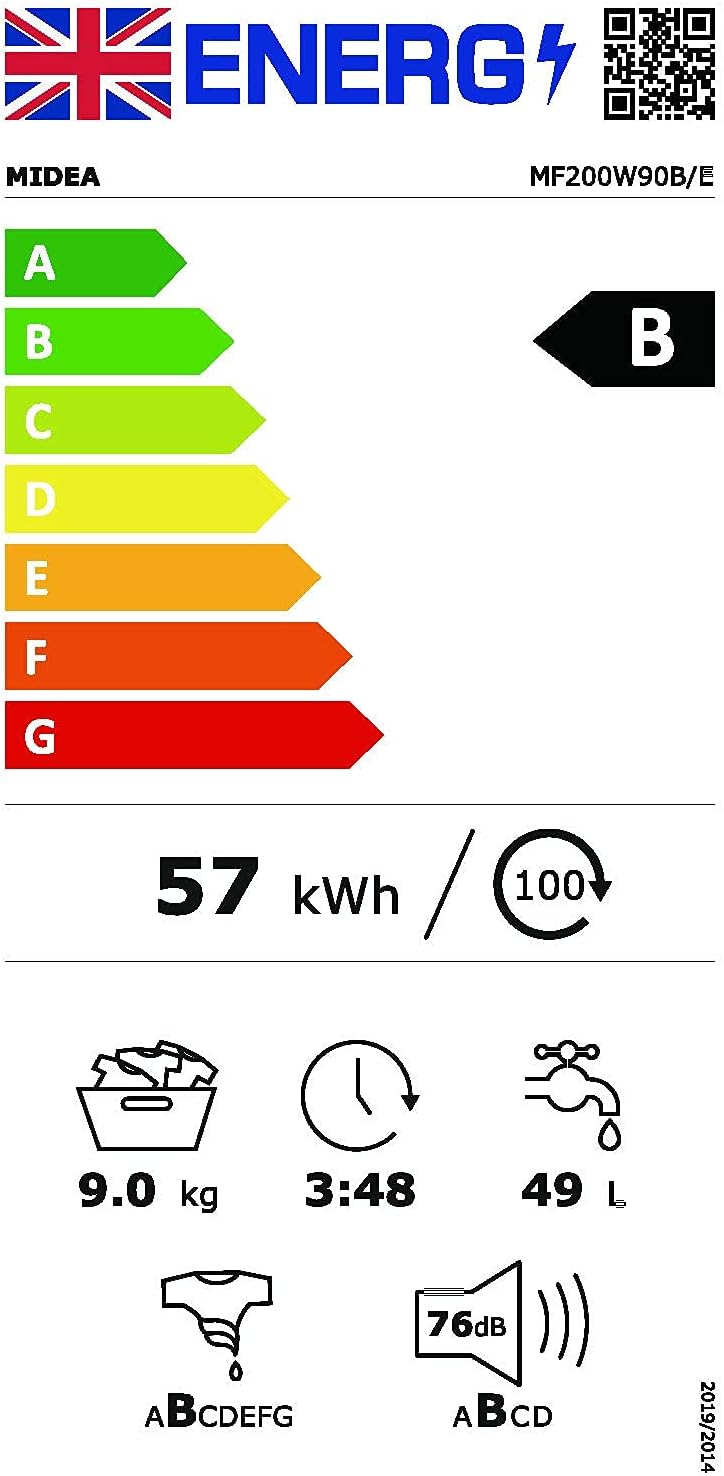
Figure 8.1: EU Energy Label. This label displays the energy efficiency class (B), energy consumption (57 kWh/100 cycles), water consumption (49 L/cycle), capacity (9.0 kg), program duration (3:48), and noise level (76 dB) for the Midea MF200W90B/E.

Figure 8.2: Product Information Sheet. This document provides detailed technical data and compliance information for the Midea MF200W90B/E washing machine, including rated capacity, energy efficiency, water consumption, spin speed, and noise emissions.
9. Warranty and Support
9.1 Warranty Information
This Midea washing machine comes with a 1-year warranty from the date of purchase. Please retain your proof of purchase for warranty claims. The warranty covers manufacturing defects under normal use conditions.
9.2 Customer Support
For technical assistance, spare parts, or warranty service, please contact Midea customer support. You can find contact details on the official Midea website or through your retailer.
Official Midea Website: https://www.midea-group.com/


