
1. Introduction
This manual provides instructions for the installation, operation, and maintenance of your Cornat Round Matte Black Basin Siphon, Model T31760311. This siphon is designed to connect standard washbasins to the wastewater system while effectively preventing unpleasant odors from entering your living space.
2. Product Overview
2.1 Components Included
Please verify that all the following components are present in your package:
- 1 x Plunge tube
- 1 x Odor trap siphon body
- 1 x Outlet pipe
- 1 x Wall rosette
- Connection nuts and seals

Image: All individual components of the Cornat siphon laid out.
2.2 Key Features
- Connects standard basins to the wastewater system.
- Integrated odor trap function prevents unpleasant sewer gases.
- Space-saving design with a low installation depth.
- Wall connection pipe can be shortened to desired length.
- Easy and quick cleaning via the removable siphon cup.
- Attractive matte black finish for modern aesthetics.

Image: Fully assembled Cornat Round Matte Black Basin Siphon.
3. Safety Information
Please read and understand these safety guidelines before proceeding with installation:
- Always turn off the main water supply to the basin before beginning any plumbing work to prevent water damage.
- Wear appropriate personal protective equipment (PPE), such as gloves and eye protection, during installation.
- Ensure all connections are securely tightened to prevent leaks. Do not overtighten, as this can damage components.
- If you are unsure about any step of the installation process, consult a qualified plumber.
4. Setup and Installation
Follow these steps for proper installation of your Cornat basin siphon:
- Preparation: Unpack all components and verify against the parts list in Section 2.1. Ensure the main water supply to the basin is turned off.
- Attach Plunge Tube: Insert the plunge tube into the basin drain opening. Secure it from below with the provided connection nut and seal, ensuring a watertight fit.
- Connect Siphon Body: Attach the main odor trap siphon body to the bottom of the plunge tube. Hand-tighten the connection nut.
- Measure and Cut Outlet Pipe: Hold the outlet pipe in position between the siphon body and the wall drain. Measure the required length and carefully cut the pipe if necessary to ensure a proper fit.
- Install Wall Rosette: Slide the wall rosette onto the outlet pipe.
- Final Connections: Connect the outlet pipe to the siphon body and the wall drain using the remaining connection nuts and seals. Ensure all seals are correctly seated.
- Tighten Connections: Hand-tighten all connection nuts first. Then, use a wrench to gently tighten them further, being careful not to overtighten.
- Leak Test: Turn on the main water supply and allow water to run into the basin. Carefully inspect all connections for any signs of leaks. If leaks are detected, tighten the respective connection slightly until the leak stops.

Image: Cornat siphon installed under a basin.
5. Operation
The Cornat basin siphon operates by creating a water seal, also known as an odor trap. When water drains from your basin, a small amount remains in the curved section of the siphon body. This standing water acts as a barrier, preventing unpleasant sewer gases from rising through the drain and entering your bathroom. Regular use of the basin ensures the water seal is maintained and refreshed.
6. Maintenance
Regular maintenance helps ensure the longevity and proper function of your siphon:
- Routine Cleaning: The siphon cup can be easily unscrewed from the bottom for manual cleaning. Periodically remove it to clear any accumulated hair, soap scum, or debris that could cause blockages or odors.
- Flushing: Occasionally flush the basin with hot water to help dissolve minor grease or soap build-ups within the pipes.
- Seal Inspection: During cleaning, inspect the seals and gaskets for any signs of wear or damage. Replace them if necessary to prevent leaks.
7. Troubleshooting
Here are solutions to common issues you might encounter:
- Issue: Leaks at Connections
Solution: Check all connection nuts for tightness. Ensure that all seals and gaskets are correctly seated and are not damaged. If a seal is damaged, it may need replacement. - Issue: Slow Drainage
Solution: The siphon or basin drain may be partially blocked. Follow the maintenance steps in Section 6 to clean the siphon cup. Check the basin drain for visible hair or debris. - Issue: Unpleasant Odors
Solution: Ensure the siphon cup contains water, which forms the odor seal. If the basin has not been used recently, run water for a few seconds to refill the siphon. If odors persist, clean the siphon cup as per maintenance instructions to remove any odor-causing build-up.
8. Specifications
Detailed technical specifications for the Cornat Round Matte Black Basin Siphon:
| Specification | Detail |
|---|---|
| Model Number | T31760311 |
| Connection Size | 1 1/4" |
| Outlet Diameter | Ø 32 mm |
| Material | Metal Brass |
| Color | Matte Black |
| Dimensions (L x W x H) | 36 x 12 x 6.5 cm |
| Weight | 716 grams |
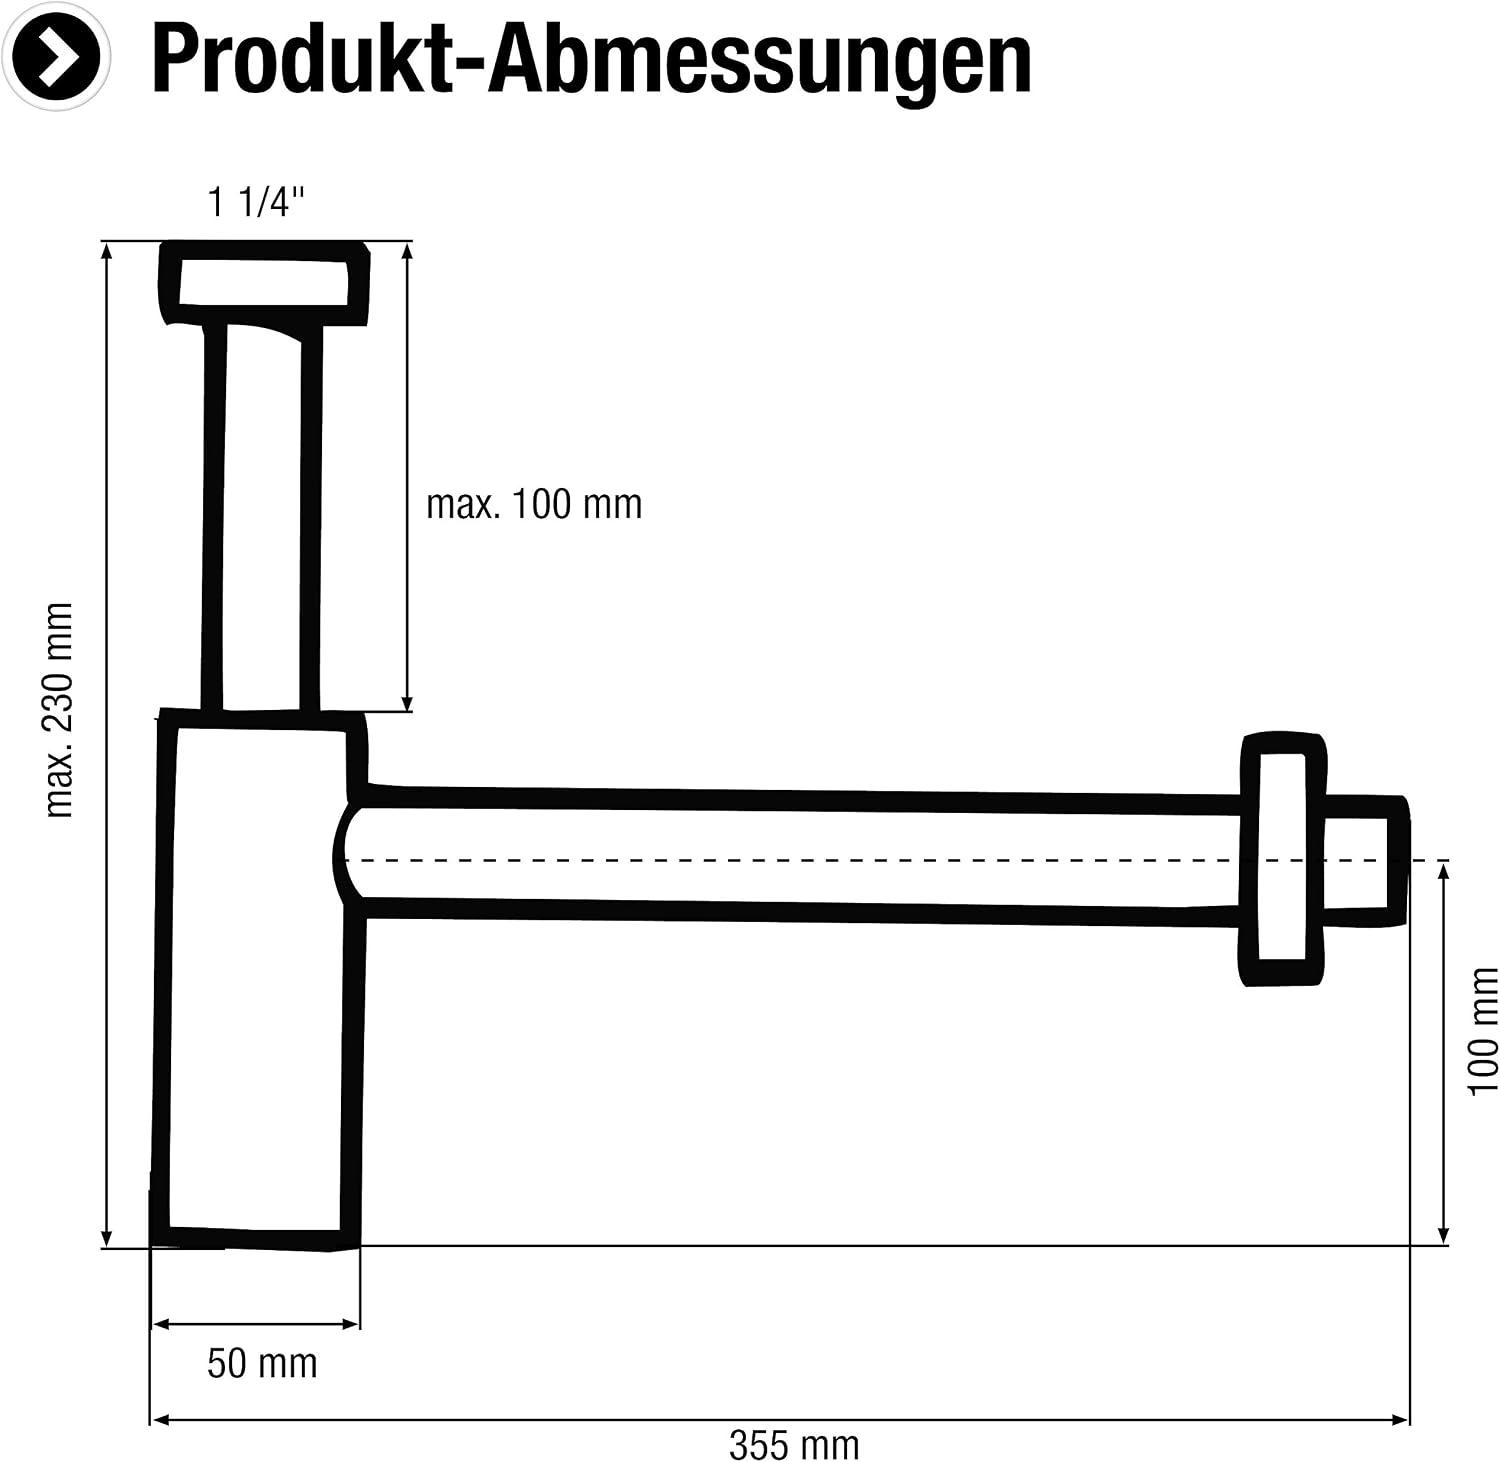
Image: Product dimensions diagram.
9. Warranty and Support
For specific warranty information regarding your Cornat Round Matte Black Basin Siphon, please refer to the documentation provided with your purchase or contact your retailer directly. For technical support or further assistance with installation or troubleshooting, please contact Cornat customer service through their official channels.