Introduction
This manual provides comprehensive instructions for the installation, operation, and maintenance of your AeroCool Miragebk ATX PC Case. The Miragebk features an ARGB LED strip on the front panel, a hinged tempered glass side panel, and a 12 cm ARGB fan, designed for optimal component visibility and cooling performance.
Package Contents
- AeroCool Miragebk ATX PC Case
- Accessory kit (screws, standoffs, cable ties)
- User Manual (this document)
Safety Information
Please read and understand all safety instructions before installing or operating this product. Failure to do so may result in injury or damage to the product.
- Always disconnect the power supply from the wall outlet before performing any installation or maintenance.
- Avoid placing the case in direct sunlight or near heat sources.
- Keep the case away from water and excessive humidity.
- Handle the tempered glass panel with care to prevent breakage.
- Ensure proper grounding to prevent electrical hazards.
Setup and Installation
Follow these steps to set up your AeroCool Miragebk PC case and install components.
1. Preparing the Case
- Place the case on a stable, flat surface.
- Carefully open the hinged tempered glass side panel. This panel provides full access to the interior.
- Remove any protective films from the glass and other surfaces.

Figure 1: Front view of the AeroCool Miragebk PC case, showcasing the ARGB LED strip and tempered glass panel.
2. Motherboard Installation
- Install the I/O shield into the rear opening of the case.
- Align your ATX, Micro ATX, or Mini ITX motherboard with the standoffs inside the case.
- Secure the motherboard using the provided screws.
3. Power Supply Installation
- Install the power supply unit (PSU) into the dedicated compartment at the bottom of the case.
- Secure the PSU with screws from the rear of the case.
4. Storage Drive Installation (HDDs/SSDs)
The case supports up to 7 HDDs and SSDs.
- Locate the drive bays or mounting points.
- Mount your 2.5" SSDs or 3.5" HDDs using the appropriate screws.
5. Graphics Card (GPU) Installation
The case supports graphics cards up to 356mm in length.
- Remove the necessary expansion slot covers at the rear of the case.
- Insert your graphics card into the PCIe slot on the motherboard.
- Secure the graphics card with screws.
6. Cooling System Installation (Fans/Liquid Cooling)
The case supports up to 8 fans and liquid cooling on the front, top, and rear.
- Install additional fans as needed for optimal airflow.
- For liquid cooling, mount radiators to the designated areas (front, top, or rear).
- The case includes one 12 cm ARGB fan.
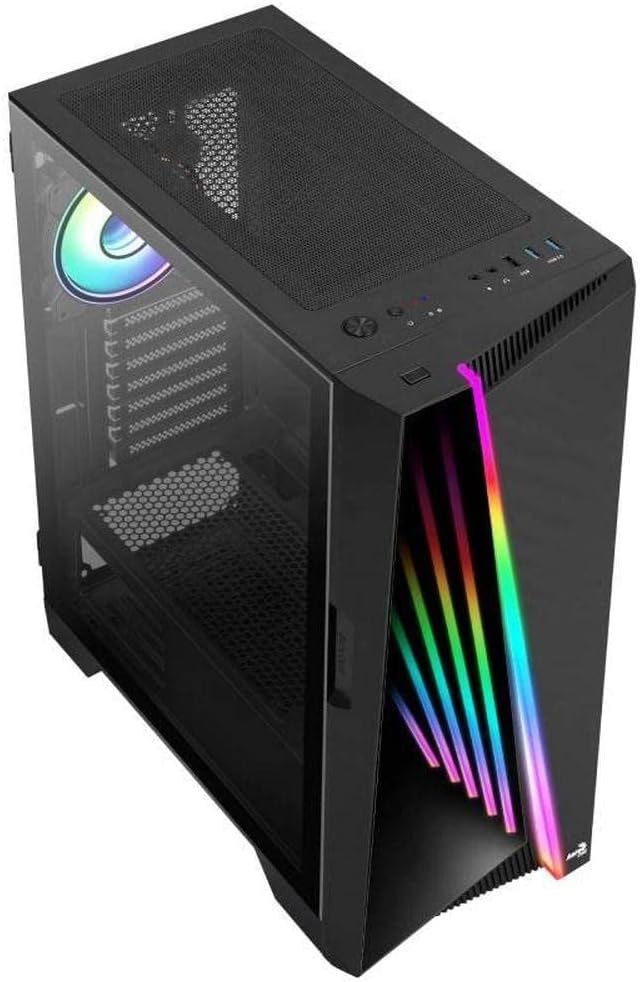
Figure 2: Angled view of the AeroCool Miragebk PC case, highlighting the top mesh for ventilation and the front panel design.
7. Cable Management
Utilize the cable routing cutouts and tie-down points behind the motherboard tray to manage cables for improved airflow and aesthetics.
8. Closing the Case
Once all components are installed and cables are managed, close the tempered glass side panel and secure it.
Operating Instructions
Front Panel I/O
The top panel of the AeroCool Miragebk provides convenient access to essential ports and controls:
- Power Button: Turns the PC on/off.
- Reset Button: Restarts the PC.
- LED Control Button: Cycles through ARGB lighting modes or syncs with the motherboard.
- USB 3.0 Ports (x2): For high-speed data transfer.
- USB 2.0 Port (x1): For standard USB devices.
- HD Audio & Microphone Jacks: For audio input and output.
ARGB Lighting Control
The ARGB lighting on the front panel and included fan can be controlled in two ways:
- LED Control Button: Press the dedicated LED button on the top panel to cycle through various pre-set ARGB lighting effects.
- Motherboard Sync: Connect the ARGB lighting to a compatible 3-pin +5V ARGB header on your motherboard. This allows software control of 16.8 million colors and synchronization with other ARGB components. The Mirage control hub supports up to 6 ARGB fans and 2 additional 3-pin ARGB accessories.
Maintenance
Regular maintenance helps ensure optimal performance and longevity of your PC case.
- Dust Filters: Periodically remove and clean the dust filters (if present) to maintain good airflow and prevent dust buildup inside the case.
- Exterior Cleaning: Wipe the exterior surfaces with a soft, damp cloth. Avoid abrasive cleaners or solvents.
- Interior Cleaning: Use compressed air to remove dust from internal components and fans. Ensure the PC is powered off and unplugged before cleaning.
- Tempered Glass: Clean the tempered glass panel with a microfiber cloth and a glass cleaner designed for electronics.
Troubleshooting
If you encounter issues with your AeroCool Miragebk case, refer to the following common solutions:
- PC Not Powering On:
- Ensure the power supply is properly connected to the wall outlet and switched on.
- Verify all internal power cables (24-pin ATX, CPU, GPU) are securely connected.
- Check that the front panel power switch cable is correctly connected to the motherboard.
- ARGB Lighting Not Working:
- Confirm the ARGB cables are correctly connected to the motherboard's 3-pin +5V ARGB header or the internal control hub.
- If using motherboard sync, ensure the motherboard's ARGB software is installed and configured correctly.
- Try pressing the LED control button on the top panel to see if pre-set modes function.
- Poor Airflow/Overheating:
- Check if all installed fans are spinning correctly.
- Clean any dust filters and internal components.
- Ensure proper fan orientation (intake/exhaust) for optimal airflow.
Specifications
| Feature | Detail |
|---|---|
| Brand | AeroCool |
| Model Name | MIRAGEBK |
| Case Type | Tower (Semitower) |
| Motherboard Compatibility | ATX, Micro ATX, Mini ITX |
| Material | Tempered Glass |
| Color | Black |
| Item Weight | 12.98 pounds |
| Product Dimensions (LxWxH) | 19.65 x 8.5 x 16.46 inches |
| Number of USB 3.0 Ports | 2 |
| Number of USB 2.0 Ports | 1 |
| Power Supply Mounting Type | Bottom Mount |
| Cooling Method | Air |
| Fan Size (Included) | 12 Centimeters (ARGB) |
| Max CPU Cooler Height | 162mm |
| Max GPU Length | 356mm |
| Drive Bays | 7 (HDDs and SSDs) |
Warranty and Support
For warranty information or technical support, please refer to the official AeroCool website or contact their customer service department. Keep your proof of purchase for warranty claims.


