Introduction
This manual provides detailed instructions for the installation, operation, and maintenance of your IMAYCC 80cc 2-Stroke Gas Bicycle Engine Conversion Kit. Please read this manual thoroughly before beginning installation or operation to ensure proper function and safety. This kit is designed to convert compatible 26-28 inch bicycles into motorized bikes.

Image: Overview of the IMAYCC 80cc 2-Stroke Gas Bicycle Engine Conversion Kit components.
Package Contents
Verify that all components listed below are present in your kit before beginning installation.

Image: Detailed diagram of all components included in the IMAYCC 80cc Bicycle Engine Kit.
- 80cc 2-Stroke Engine (x1)
- NT Carburetor (x1)
- CDI Ignition (x1)
- Chrome Muffler (x1)
- Clutch Cable (x1)
- Drive Chain Idler Pulley (x1)
- 415 Bike Engine Drive Chain (x1)
- Drive Chain Guard (x1)
- 2-Stroke Spark Plug (x1)
- Locking Alloy Clutch Lever (x1)
- Twist Throttle and Cable With Grip (x1)
- Throttle Cable (x2)
- 2.5L Black Teardrop Gas Tank (x1)
- Fuel Line (x1)
- Fuel Filter (x1)
- Gasoline Tank Switch (x1)
- Sprocket Clamp Assembly (x1)
- 44 Tooth Chrome Drive Sprocket (x1)
- Large Spring (Heat Shield Spring) (x1)
- Extension Spring (Recoil Spring) (x1)
- Required Hardware (x1 set)
- Wired Digital Computer (x1)
- Instruction Manual (x1)
Specifications
| Engine Type | Single-cylinder, Air-cooled, Two-stroke |
| Engine Model | 1E47FA |
| Displacement | 80cc |
| Power/Speed | 2.1Kw / 5000rpm |
| Starting Method | Foot Pedal Starting |
| Ignition Method | CDI Ignition |
| Spark Plug Model | Z8C M14×1.25 |
| Drive Chain | 415 Heavy Duty Chain (110 knots) |
| Sprocket Tooth Count | 44 teeth |
| Fuel Tank Capacity | 2.5L |
| Fuel Type | 90# Gasoline |
| Fuel Consumption | 2-2.5L per 100Km (at 20-25Km/h) |
| Product Dimensions | 17.6 x 8.2 x 17.6 inches; 25.35 Pounds |

Image: Dimensions of the IMAYCC 80cc 2-Stroke Bicycle Engine.
Compatibility
The IMAYCC 80cc engine kit is suitable for most 26-28 inch wheeled bicycles with V-frames. This includes mountain bikes, cruisers, and road bikes. Ensure there is at least 10 inches of clearance between the bottom bracket and the top bar of the bicycle frame for proper installation.
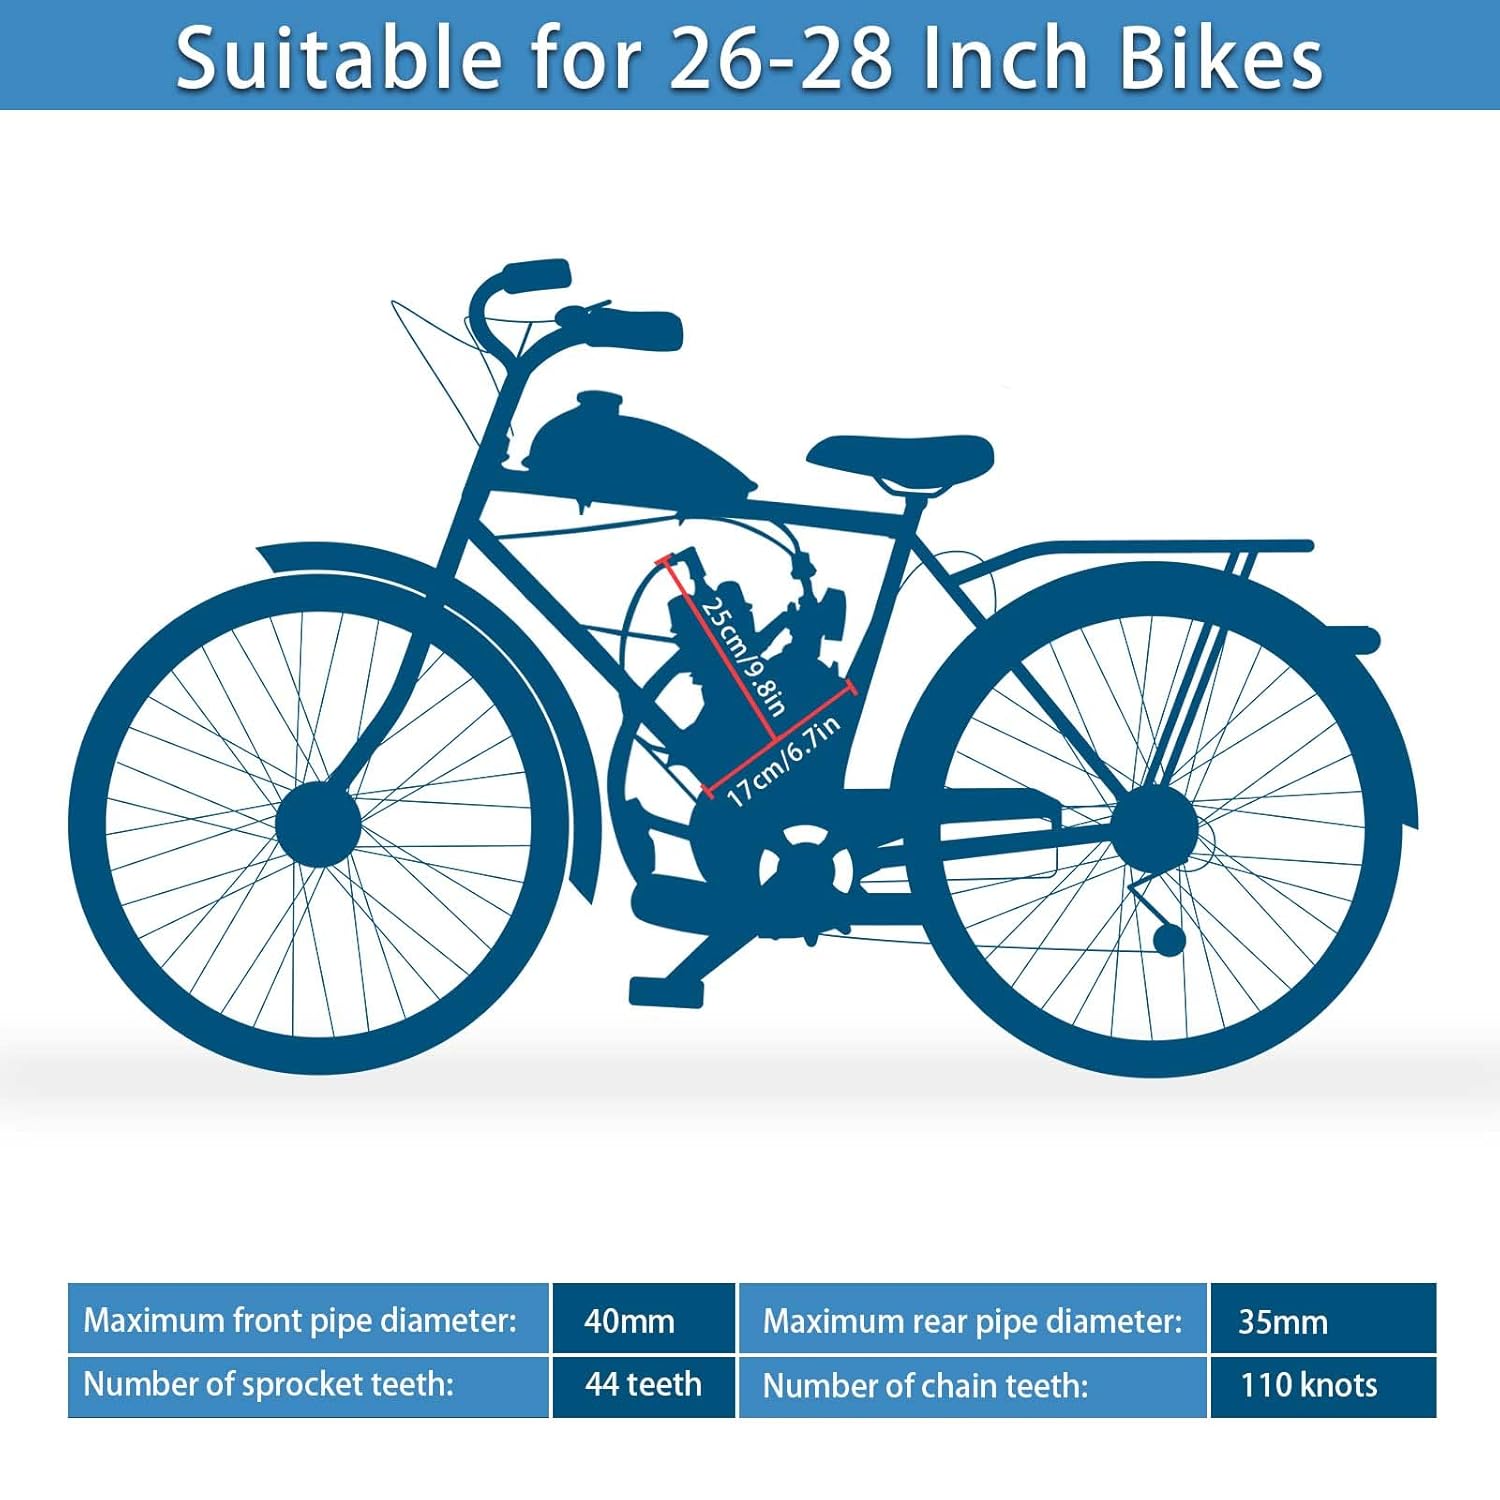
Image: Bicycle compatibility diagram showing required frame dimensions for installation.
Setup and Installation
Installation requires basic hardware skills and tools. The process typically takes 2-4 hours, including fine-tuning. For visual guidance, it is recommended to search for "IMAYCC 80cc bicycle engine kit" on video platforms like YouTube.
Engine Structure Overview

Image: Engine Structure Diagram, highlighting key components such as the spark plug socket, exhaust interface, carburetor interface, magneto coil, clutch lever, and drive gear.
Fuel Tank Installation
The 2.5L fuel tank requires careful installation to prevent leaks. Ensure the leak-proof gasket is properly seated. The fuel valve has two positions: UP for OFF and DOWN for ON. Always close the fuel valve when parking the bicycle.

Image: Fuel Tank Installation Procedure, showing the connection of the fuel line and filter.
Wiring Connections
Follow these steps for connecting the electrical wires:
- Connect the blue wire to the blue wire.
- Connect the black wire to the black wire.
- The white wire from the magnetic coil does not need to be connected. It should be wrapped with electrical tape for insulation.

Image: Wiring diagram for the IMAYCC Bicycle Engine Kit, detailing blue and black wire connections.
Throttle and Clutch Assembly
The kit includes a locking alloy clutch lever and a twist throttle with cables. Ensure these are securely mounted and properly adjusted for safe operation.

Image: Components for throttle and clutch control, including the locking alloy clutch lever, clutch cable, twist throttle, and throttle cables.
Operating Instructions
Fuel Mixing Ratio
The engine requires a specific mixture of 90# gasoline and 2-stroke engine oil.
- New Equipment: 16:1 (Gasoline to Oil)
- Run-in Period (after 500km): 20:1 (Gasoline to Oil)
Ensure the fuel and oil are thoroughly mixed before adding to the fuel tank.
Starting the Engine
The engine is started using the foot pedal. Engage the clutch, pedal the bicycle to gain some speed, then release the clutch to start the engine. Refer to the throttle and clutch lever instructions for proper engagement and disengagement.
Break-in Period
During the initial break-in period, it is recommended to use a slightly richer fuel mixture (e.g., 30:1 for the first three full tanks) and vary throttle settings. Avoid prolonged high-speed operation during this time to allow engine components to seat properly. Regularly check and tighten all nuts and bolts, as vibrations can cause them to loosen during this period.
Maintenance
Regular maintenance is crucial for the longevity and performance of your engine kit.
- Fuel Lines: The small fuel lines can harden over time. Replace them after each season of riding, or sooner if the bicycle sits for extended periods, to prevent leaks.
- Chain: The included chain is a 415 heavy-duty chain. Ensure it is properly tensioned and lubricated. If you need to shorten the chain, note that it is larger than standard bike chains and may require specific tools or methods for removal of links.
- Fasteners: Periodically check and tighten all nuts, bolts, and mounting hardware, especially after the break-in period, to prevent components from vibrating loose. Using a torque wrench for critical hardware is recommended.
- Carbon Buildup: If the engine shows signs of carbonization or soot buildup, adding a small amount (e.g., a couple of tablespoons) of Automatic Transmission Fluid (ATF) to the fuel and running it until dry can help clean the engine.
- Engine Mounts: To reduce vibration and stress on the engine and bike frame, consider placing cut pieces of tire inner tube between the engine mounts and the bicycle frame.
Troubleshooting
This section addresses common issues you might encounter.
- Clutch Engagement Issues: If the clutch does not engage or disengage properly, check the clutch engagement rod for wear or insufficient length. Ensure the clutch cable is correctly adjusted and lubricated.
- Muffler Detachment: Ensure the muffler is securely fastened. Vibrations can cause it to loosen. Regular checks are advised.
- Engine Not Starting: Verify fuel mixture, spark plug condition, and CDI ignition connections. Ensure the fuel valve is open.
- Vibration-Related Loosening: Regularly inspect all fasteners. Components like engine mounts and chain tensioners are particularly susceptible to loosening due to engine vibration.
Many common issues and solutions can be found through online searches for 80cc engine kits, as most share similar maintenance and repair processes.
Warranty and Support
IMAYCC is committed to providing high-quality products and customer satisfaction.
- Warranty: If there is any quality problem with the product you purchased, IMAYCC provides one year of long-term guidance or free replacement of brand new products.
- Customer Support: For any product support, please visit the 'Contact Seller' option in your Amazon order details. We are available to assist you.


