Introduction
The WORKPRO 2-in-1 Pneumatic Brad Nailer and Crown Stapler is a versatile tool designed for various woodworking, carpentry, and DIY projects. It is compatible with 18 gauge brad nails and 18 gauge staples, offering efficient and powerful fastening for tasks such as general repairs, craftwork, interior/exterior decorative trim, and upholstery. This air-powered tool requires connection to an air compressor (not included) and operates within a pressure range of 60 to 100 PSI.
Key features include a depth adjustment wheel for precise fastening, a 360-degree adjustable exhaust, and a quick, tool-free jam clearing mechanism for ease of use and maintenance.
Safety Information
Always read and understand all safety warnings, instructions, illustrations, and specifications provided with this power tool. Failure to follow all instructions listed below may result in electric shock, fire, and/or serious injury.
- Always wear eye protection (safety glasses) and hearing protection when operating the tool.
- Ensure the air compressor is disconnected before performing any maintenance, clearing jams, or loading/unloading fasteners.
- Never point the tool at yourself or others.
- Keep hands and body parts away from the discharge area of the tool.
- Use the correct type and size of fasteners for your application.
- Do not operate the tool if it is damaged or malfunctioning.
- Maintain a firm grip on the tool and ensure stable footing during operation.
- Add oil regularly to all air tools as specified in the maintenance section.
Components and Parts
Familiarize yourself with the various components of your WORKPRO Pneumatic Brad Nailer and Crown Stapler:

Figure 1: Labeled diagram of the WORKPRO 2-in-1 Pneumatic Brad Nailer and Crown Stapler, highlighting key components such as the swivel air-outlet, compressed air connection, trigger catch, depth control wheel, magazine release latch, staples/nails reload window, magazine, jam clearing latch, and safety nose.
- Swivel Air-Outlet: Directs exhaust air away from the user.
- Compressed Air Connection: Point for connecting the air hose from the compressor.
- Trigger Catch: Activates the firing mechanism.
- Depth Control Wheel: Adjusts the depth at which fasteners are driven.
- Magazine Release Latch: Releases the magazine for loading fasteners.
- Staples/Nails Reload Window: Allows visibility of fastener levels in the magazine.
- Magazine: Holds the fasteners (nails or staples).
- Jam Clearing Latch: Provides quick access to clear jammed fasteners.
- Safety Nose: Must be pressed against the workpiece to activate the tool, preventing accidental firing.
Setup
1. Connecting to Air Compressor
The WORKPRO nailer is air-powered and requires an air compressor (not included) for operation. Ensure your air compressor is set to a working pressure between 60-100 PSI (4.0-7 bar) and has a 1/4 NPT air inlet connection.

Figure 2: Proper connection of the pneumatic nailer to an air compressor hose. The air compressor is not included with the tool.
For a visual guide on connecting the air compressor, please watch the official product video below:
Video 1: Official WORKPRO video demonstrating the connection of the pneumatic nailer to an air compressor and general operation. This video also shows loading fasteners and clearing jams.
2. Loading Fasteners (Nails/Staples)
This 2-in-1 tool is compatible with 18 gauge brad nails (5/8" - 2" / 15mm - 50mm) and 18 gauge staples (5/8" - 1-9/16" / 16mm - 40mm). The tool comes with 400pcs brad nails and 300pcs staples to get you started.
- Ensure the air supply is disconnected from the tool for safety.
- Press the magazine release latch and pull the magazine open.
- Insert the strip of nails or staples into the magazine, ensuring they are oriented correctly.
- Slide the magazine back until it locks into place.
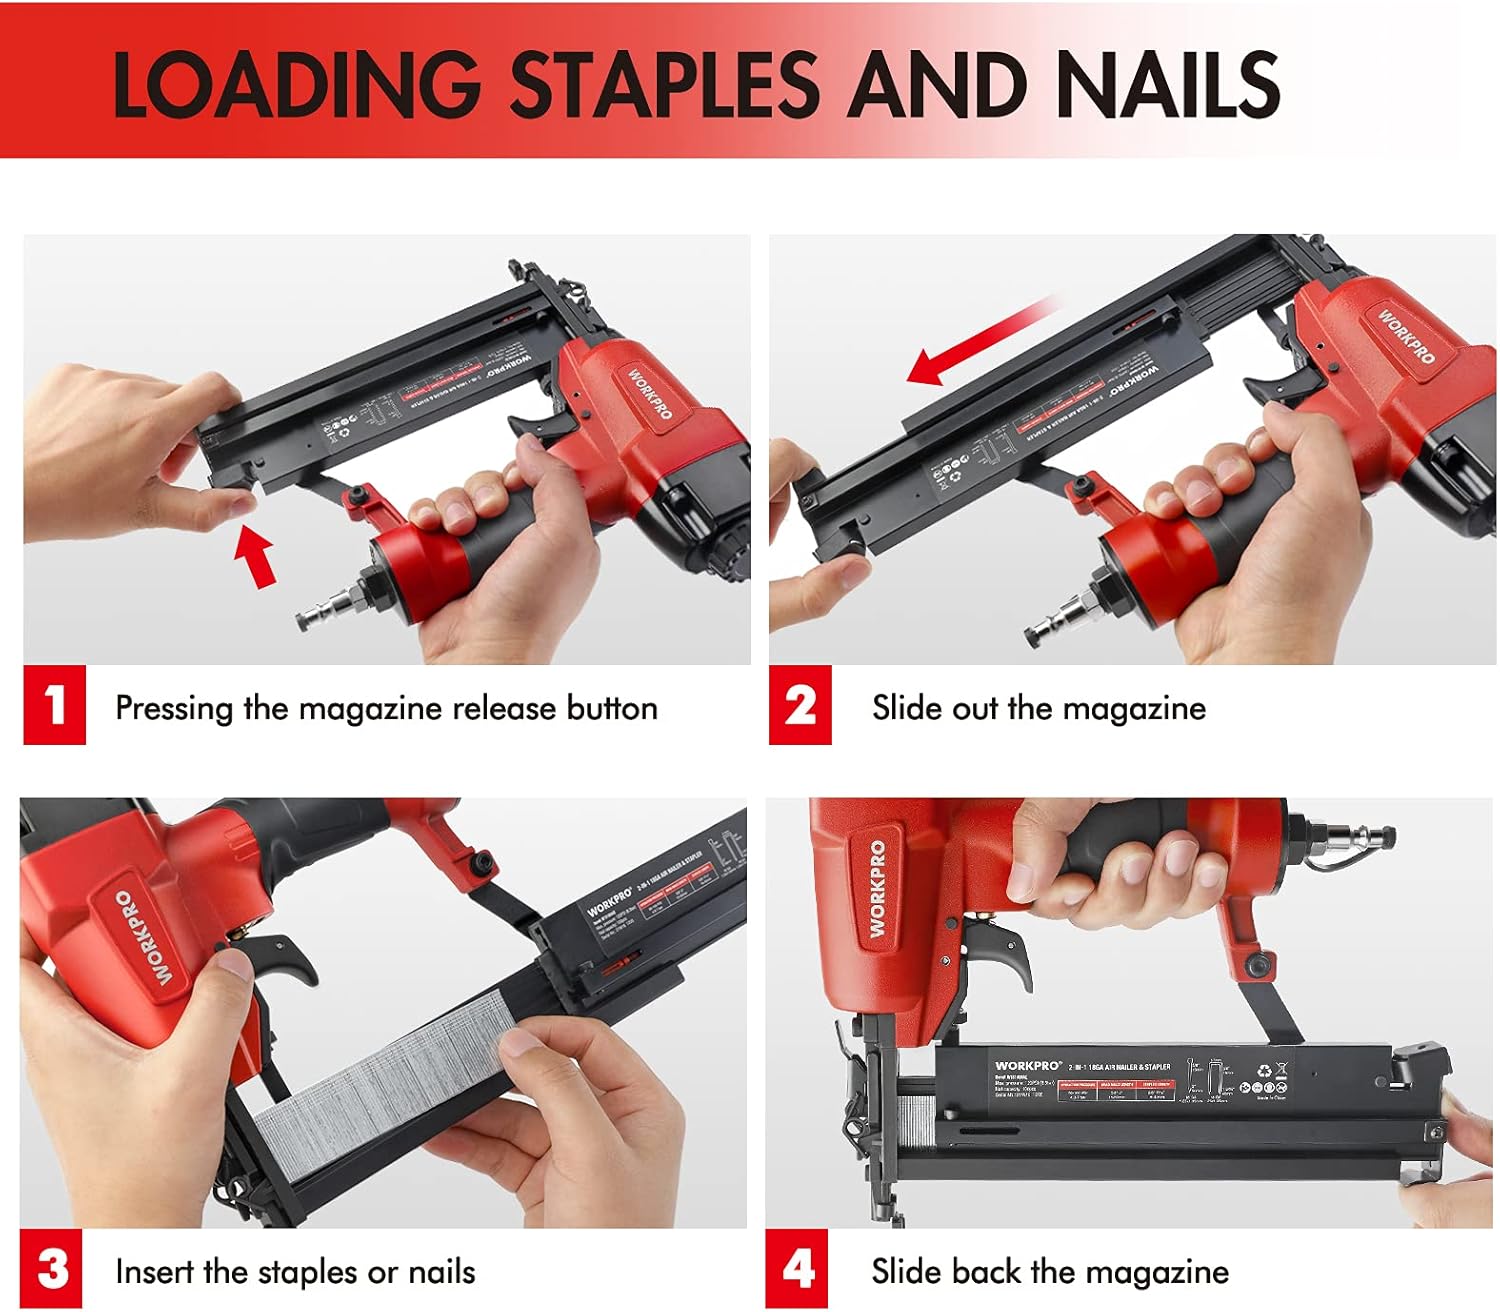
Figure 3: Step-by-step visual guide on how to load staples or nails into the tool's magazine. This involves pressing the release button, sliding out the magazine, inserting fasteners, and sliding the magazine back.
Refer to Video 1 for a demonstration of loading fasteners.
Operating Instructions
1. Adjusting Depth
The depth control wheel allows you to adjust how deep the nails or staples are driven into the workpiece. This is crucial for protecting the work surface and adapting to different material thicknesses.
- Rotate the depth control wheel located on the top of the tool to increase or decrease the firing depth.
- Test on a scrap piece of material to ensure the desired depth is achieved before working on your main project.

Figure 4: The depth control wheel allows for precise adjustment of fastener penetration. Examples show fasteners driven at different depths.
For a visual demonstration of depth adjustment, watch the official product video below:
Video 2: Official WORKPRO video demonstrating the depth adjustment feature and continuous firing mode of the pneumatic nailer.
2. Firing Operation
The tool features a continuously shot mode for efficient work. To fire a fastener:
- Connect the tool to the air compressor.
- Press the safety nose firmly against the workpiece. The safety nose must be depressed for the tool to fire.
- Squeeze the trigger catch to drive a fastener.
- For continuous firing, keep the safety nose pressed against the workpiece, slide the nailer to a new position, release the trigger, and squeeze it again.

Figure 5: The safety nose must be fully depressed against the workpiece for the tool to fire, ensuring safe operation.
Maintenance
Proper maintenance ensures the longevity and optimal performance of your WORKPRO pneumatic tool.
1. Regular Oiling
It is essential to add lubricant (included) regularly to all air tools. Apply a few drops of pneumatic tool oil into the air inlet before each use or after extended periods of operation. This lubricates internal components and prevents wear.
2. Jam Clearing
In the event of a fastener jam, follow these steps to clear it safely and efficiently:
- Disconnect Air Supply: Always disconnect the tool from the air compressor before attempting to clear a jam.
- Open Jam Clearing Latch: Locate the jam clearing latch at the front of the tool and open it.
- Remove Jammed Fastener: Carefully remove any jammed nails or staples from the firing mechanism.
- Close Latch: Close the jam clearing latch securely before reconnecting the air supply.

Figure 6: The jam clearing latch provides easy access to the firing mechanism for quick removal of jammed fasteners.
Refer to Video 1 for a demonstration of clearing jams.
Troubleshooting
If you encounter issues with your WORKPRO Pneumatic Brad Nailer and Crown Stapler, refer to the following common troubleshooting tips:
| Problem | Possible Cause | Solution |
|---|---|---|
| Tool does not fire |
|
|
| Fasteners not driven flush |
|
|
| Fasteners jam frequently |
|
|
Specifications
| Feature | Detail |
|---|---|
| Brand | WORKPRO |
| Model Number | W181004A |
| Item Weight | 4.29 pounds |
| Product Dimensions | 12.2 x 11 x 2.8 inches |
| Material Type | Metal |
| Fastener Gauge | 18 GA |
| Nail Length | 5/8" - 2" (15 mm - 50 mm) |
| Staple Length | 5/8" - 1-9/16" (16 mm - 40 mm) |
| Operation Pressure | 60 - 100 PSI (4.0 - 7 bar) |
| Air Inlet | 1/4 NPT |
| Nail Capacity | 100pcs |
| Included Accessories | 400pcs brad nails, 300pcs staples, 2pcs hex key, lubricant |
Warranty and Support
For warranty information, technical support, or to purchase replacement parts, please contact WORKPRO customer service or visit the official WORKPRO website. Keep your purchase receipt as proof of purchase for any warranty claims.
You can visit the WORKPRO Store on Amazon for more information: WORKPRO Store
Related Documents - W181004A
 |
WORKPRO 6-in-1 Heavy-Duty Staple Gun User Manual and Guide Comprehensive guide for the WORKPRO 6-in-1 Heavy-Duty Staple Gun (models W023035A, W023036A), covering operation, staple selection, applications, and safety instructions. |
 |
WORKPRO Cordless 2-in-1 Electric Staple and Nail Gun User Manual (W125177A, W125180A) This user manual provides comprehensive instructions for the WORKPRO Cordless 2-in-1 Electric Staple and Nail Gun (Models W125177A, W125180A). It covers essential safety warnings, proper usage guidelines, technical specifications, charging procedures, operation steps, maintenance, storage, and disposal information. |
 |
WORKPRO Cordless 2-in-1 Electric Staple and Nail Gun Operating Instructions This document provides comprehensive operating instructions, safety guidelines, technical specifications, and maintenance information for the WORKPRO Cordless 2-in-1 Electric Staple and Nail Gun (Models W125179A, W125182A). |
 |
WORKPRO 10W Corded Hot Glue Gun: Operating Instructions & Safety Guide Comprehensive guide for the WORKPRO 10W Corded Hot Glue Gun, covering safety instructions, operation, maintenance, and applications. Includes model numbers W099030AU, W099030AS, W099029AP. |
 |
WORKPRO W023028AE Cordless Electric Stapler: Original Operating Instructions Original operating instructions for the WORKPRO W023028AE Cordless Electric Stapler. This guide covers essential safety warnings, detailed operation procedures, battery charging, maintenance, storage, and disposal information. |
 |
WORKPRO W124696A Twin Pocket Hole Jig System Kit User Manual Comprehensive guide for the WORKPRO W124696A Twin Pocket Hole Jig System Kit, covering setup, drilling, assembly, and safety instructions for woodworking. |