
Roadstar HRA-1782ND+BT Retro Radio User Manual
Model: HRA-1782ND+BT
1. Introduction
Thank you for purchasing the Roadstar HRA-1782ND+BT Retro Radio. This device combines classic design with modern audio features, including DAB+, FM radio, CD/MP3 playback, Bluetooth connectivity, and USB functionality. This manual provides essential information for safe operation, setup, and maintenance of your new audio system. Please read it thoroughly before use and retain it for future reference.
2. Safety Information
- Power Source: Ensure the power supply voltage matches the rating label on the unit.
- Ventilation: Do not block ventilation openings. Allow adequate space around the unit for proper airflow.
- Water and Moisture: Do not expose the unit to rain, moisture, or dripping/splashing liquids. Do not place objects filled with liquids, such as vases, on the unit.
- Heat: Keep the unit away from heat sources such as radiators, heat registers, stoves, or other apparatus (including amplifiers) that produce heat.
- Cleaning: Unplug the unit from the wall outlet before cleaning. Use a soft, dry cloth only.
- Servicing: Do not attempt to service this product yourself. Refer all servicing to qualified service personnel.
- Laser Safety: This product contains a Class 1 laser. Do not open the CD compartment while a disc is playing.
3. Product Overview
Front Panel

This image displays the front of the Roadstar HRA-1782ND+BT radio, featuring the central display, control buttons for playback and menu navigation, USB port, CD tray, and rotary knobs for standby/source and volume. The speaker grille is visible on the front.
Rear Panel
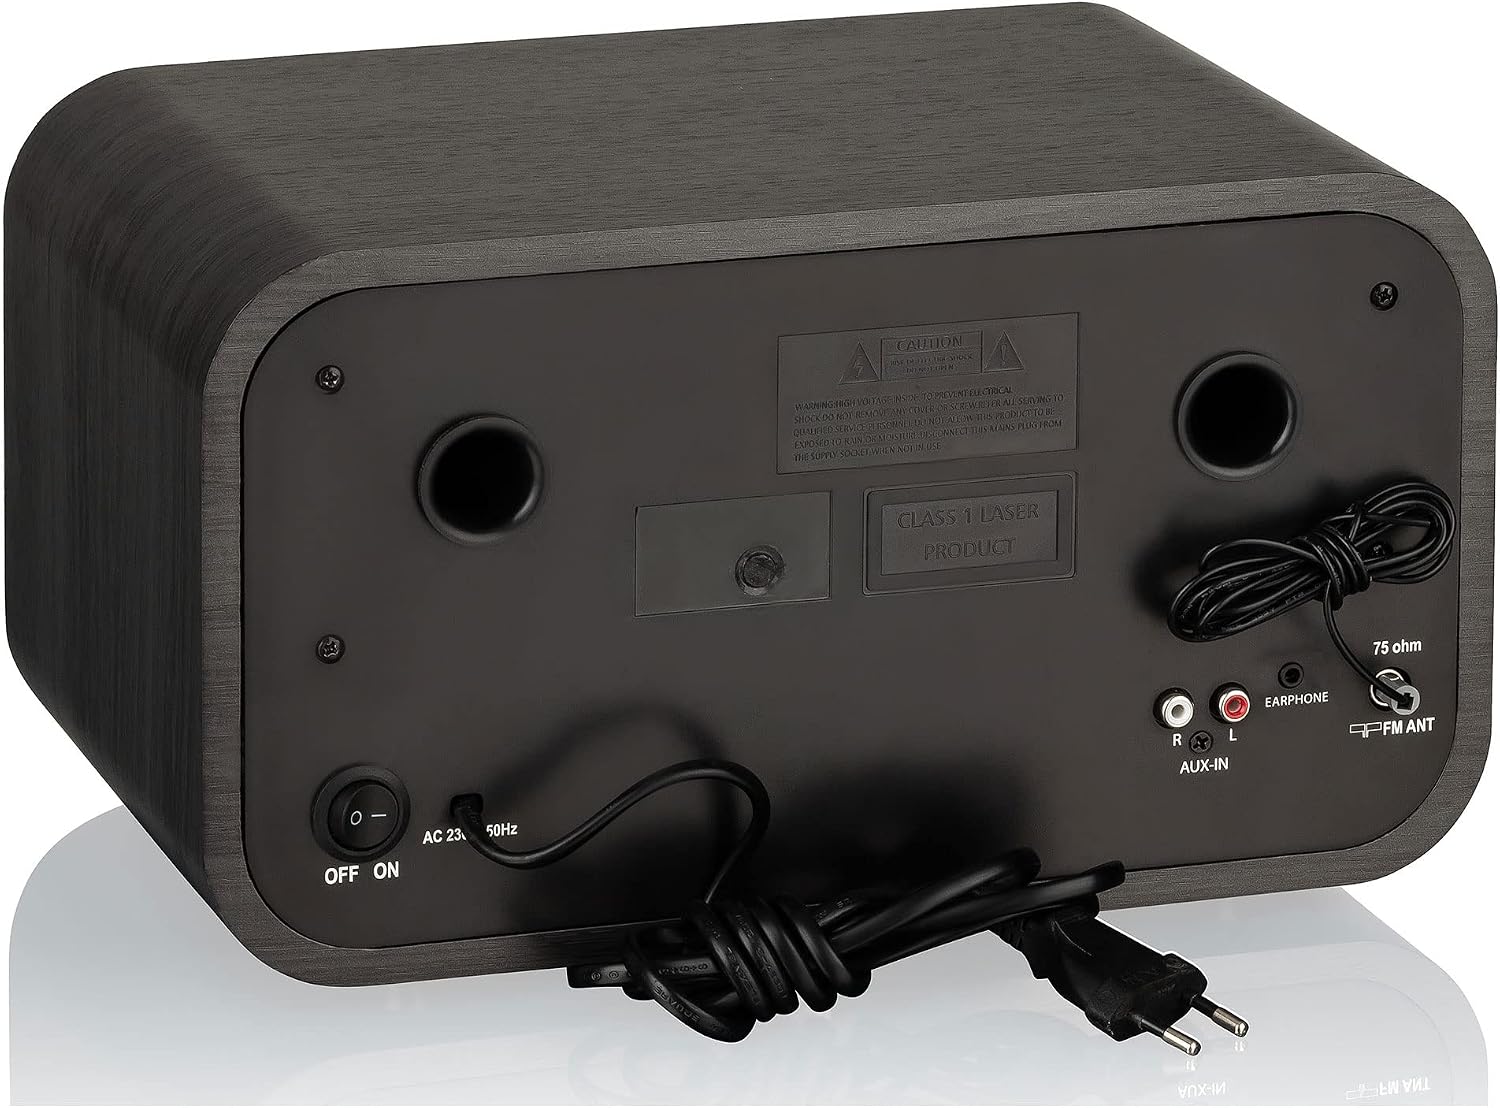
The rear view of the Roadstar HRA-1782ND+BT radio shows the power input, AUX-IN ports (RCA), earphone jack, and the FM antenna connection. A power switch is also located on the rear panel.
Remote Control

This image provides a detailed view of the remote control, illustrating its various buttons for power, mode selection, playback control, volume adjustment, menu navigation, and numerical input for radio presets.
4. Setup
4.1 Unpacking
- Carefully remove the unit from its packaging.
- Check that all accessories are present: main unit, remote control, antenna, and power adapter.
4.2 Power Connection
- Connect the supplied power adapter to the DC IN jack on the rear of the unit.
- Plug the power adapter into a standard wall outlet.
- Ensure the ON/OFF switch on the rear panel is in the 'ON' position.
4.3 Antenna Connection
- For optimal FM reception, connect the external FM antenna to the 'FM ANT' terminal on the rear panel. Extend the antenna fully.
- For DAB/DAB+ reception, the unit uses an internal antenna. Ensure the unit is placed in an area with good signal strength.
4.4 Initial Power On
- Press the 'STANDBY' button on the front panel or remote control to turn on the unit.
- The display will light up. The unit may perform an initial scan for DAB stations automatically.
5. Operating Instructions
5.1 General Controls
- STANDBY/SOURCE Knob: Rotate to select input source (DAB, FM, CD, Bluetooth, USB, AUX). Press to enter standby mode.
- VOLUME Knob: Rotate to adjust the volume level.
- MENU Button: Access menu options for the current mode.
- INFO Button: Display additional information (e.g., station details, track info).
- PRESET Buttons: Store and recall favorite radio stations.
5.2 DAB/DAB+ Radio
- Select 'DAB' mode using the SOURCE knob.
- The unit will automatically scan for available DAB/DAB+ stations upon first use. To perform a manual scan, press the 'MENU' button, navigate to 'Full Scan' and press 'ENTER'.
- Use the 'SEARCH +/-' buttons to browse through the list of available stations. Press 'ENTER' to select a station.
- To save a preset: Tune to the desired station, press and hold the 'PRESET' button until 'Preset Store' appears. Use 'SEARCH +/-' to select a preset number (1-20) and press 'ENTER'.
- To recall a preset: Press the 'PRESET' button, use 'SEARCH +/-' to select the desired preset number, and press 'ENTER'.
5.3 FM Radio
- Select 'FM' mode using the SOURCE knob.
- Auto Scan: Press and hold the 'SCAN' button to automatically scan and store available FM stations.
- Manual Tuning: Use the 'SEARCH +/-' buttons to manually tune to a frequency.
- RDS: If available, RDS (Radio Data System) information such as station name will be displayed.
- Saving and recalling presets works similarly to DAB mode.
5.4 CD/MP3 Player
- Select 'CD' mode using the SOURCE knob.
- Gently insert a CD (audio CD or MP3 CD) into the CD slot with the label side facing up. The disc will be loaded automatically.
- Playback will start automatically.
- PLAY/PAUSE: Press to pause or resume playback.
- STOP: Press to stop playback.
- SKIP (◀◀ / ▶▶): Press to skip to the previous or next track. Press and hold to fast forward or rewind.
- REP (Repeat): Press to repeat the current track or all tracks.
- PROG (Program): Allows you to program a sequence of tracks for playback.
5.5 Bluetooth Mode
- Select 'Bluetooth' mode using the SOURCE knob. The display will show 'Bluetooth' or 'Pairing'.
- Enable Bluetooth on your external device (smartphone, tablet, etc.).
- Search for available devices and select 'HRA-1782ND+BT' from the list.
- Once paired, you can play audio from your device through the radio.
- Use the playback controls on your external device or the radio's controls (PLAY/PAUSE, SKIP) to manage music.
5.6 USB Playback and Recording
- USB Playback: Insert a USB flash drive into the USB port. Select 'USB' mode. The unit will automatically detect and play compatible audio files (MP3). Use playback controls as with CD.
- USB Recording: The unit supports recording from CD, AUX, Bluetooth, DAB, or FM radio directly to a connected USB flash drive. Select the desired source, then press the 'REC' button on the unit or remote control to start recording. Press 'STOP' to end recording.
5.7 AUX-In
- Connect an external audio device (e.g., MP3 player) to the 'AUX-IN' RCA ports on the rear panel using an appropriate cable (not supplied).
- Select 'AUX' mode using the SOURCE knob.
- Control playback and volume from the external device.
5.8 Alarm Function
- To set the alarm, press the 'MENU' button and navigate to the 'Alarm' settings.
- Follow the on-screen prompts to set the alarm time, duration, and wake-up source (DAB, FM, CD, USB).
- Ensure the unit is in standby mode for the alarm to activate.
5.9 Headphone Output
- Connect headphones to the 'EARPHONE' jack on the rear panel for private listening.
- The main speakers will be muted when headphones are connected.
6. Maintenance
- Cleaning: Disconnect the power cord before cleaning. Use a soft, dry cloth to wipe the exterior of the unit. Do not use abrasive cleaners, waxes, or solvents.
- CD Lens Care: Avoid touching the CD lens. If the lens is dirty, use a commercially available CD lens cleaner.
- Storage: If the unit will not be used for an extended period, unplug it from the power outlet and store it in a cool, dry place.
7. Troubleshooting
| Problem | Possible Cause | Solution |
|---|---|---|
| No power | Power cord not connected; Rear power switch OFF; Unit in standby | Check power cord connection; Ensure rear power switch is ON; Press STANDBY button |
| No sound | Volume too low; Headphones connected; Incorrect source selected | Increase volume; Disconnect headphones; Select correct source |
| Poor radio reception | Antenna not extended/connected; Weak signal | Extend FM antenna; Reposition unit for better DAB signal; Try a different location |
| CD not playing | Disc inserted incorrectly; Disc dirty/scratched; Incompatible disc format | Re-insert disc correctly; Clean or replace disc; Ensure disc is audio CD or MP3 CD |
| Bluetooth pairing fails | Bluetooth not enabled on device; Device too far; Already paired with another device | Enable Bluetooth on your device; Move device closer; Disconnect from other devices and try again |
| USB not recognized | Incompatible USB format; USB drive corrupted; Incorrect file format | Ensure USB is FAT32 format; Try a different USB drive; Ensure files are MP3 |
8. Specifications

This image provides a visual representation of the product's technical specifications, including tuner details, CD player features, and connectivity options.
| Feature | Specification |
|---|---|
| Brand | Roadstar |
| Model Number | HRA-1782ND+BT/BK |
| Color | Black |
| Connectivity Technology | Bluetooth |
| Special Features | Bluetooth, CD Player, DAB Radio, DAB+ Radio, FM Radio |
| Tuner Technology | DAB, DAB+ |
| Supported Radio Bands | FM |
| Power Source | Corded Electric |
| Total USB Ports | 1 |
| Compatible Devices | MP3 Player |
| RMS Output Power | 15 W |
| Weight | 3.4 Kilograms |
| Components Included | Power Adapter, User Manual |
9. Warranty and Support
Roadstar products are designed and manufactured to the highest quality standards. For information regarding warranty coverage, please refer to the warranty card included with your product or contact your local Roadstar dealer or customer support. Please retain your proof of purchase for warranty claims.


