1. Introduction
This manual provides detailed instructions for the proper installation, operation, and maintenance of your SmallRig Adjustable Sling Handgrip (Model 3028-SR). This accessory is designed to enhance the usability of your DJI RS series gimbal by reducing arm fatigue and improving stability for low-angle shots. Please read this manual thoroughly before use to ensure optimal performance and longevity of the product.

Figure 1.1: SmallRig Adjustable Sling Handgrip attached to a DJI gimbal.
2. Product Overview
2.1 Key Features
- Ergonomic Design: Features a curved grip with increased length and finger stops for a comfortable and secure hold, constructed from a combination of silicone and aluminum alloy.
- Quick Release: Attaches securely to your gimbal via a NATO clamp with an anti-removal stud for safe and rapid operation.
- 180-Degree Adjustment: Allows for flexible shooting angles and reduced arm strain through its built-in rosette joint, which can also be detached for standalone use.
- Abundant Mounting Points: Includes multiple 1/4"-20 and 3/8"-16 threads (ARRI standard) and two cold shoe mounts for attaching accessories like magic arms, monitors, wireless microphones, or video transmitters.
- High Load Capacity: Supports up to 8 kg (17.6 lbs), suitable for various camera setups.
- Integrated QD Socket: Provides an option to mount a QD neck or shoulder strap for additional support.
2.2 Compatibility
The SmallRig Sling Handgrip (Model 3028-SR) is specifically designed for the following DJI RS series gimbals:
- DJI RS 4 Mini
- DJI RS 4
- DJI RS 4 Pro
- DJI RS 3 Mini
- DJI RS 3
- DJI RS 3 Pro
- DJI RS 2
- DJI RSC 2

Figure 2.1: Compatible DJI RS series gimbals.

Figure 2.2: Overview of key product features.
3. Package Contents
The package for the SmallRig Adjustable Sling Handgrip (Model 3028-SR) includes:
- Gimbal Sling Handle × 1

Figure 3.1: Contents of the package.
4. Setup and Installation
Follow these steps to properly attach the SmallRig Sling Handgrip to your DJI RS series gimbal:
- Identify Mounting Point: The sling handgrip is designed to mount exclusively on the left side of your DJI RS series gimbal. Attempting to mount it on the right side is not supported.
- Attach NATO Clamp: Locate the NATO rail on the left side of your gimbal. Align the NATO clamp on the sling handgrip with this rail.
- Secure the Clamp: Slide the handgrip onto the NATO rail until it is fully seated. Tighten the locking lever on the NATO clamp to secure the handgrip firmly in place. Ensure the anti-removal stud is engaged for added security.
- Verify Stability: Gently test the attachment to ensure there is no wobble or looseness before attaching your camera setup.
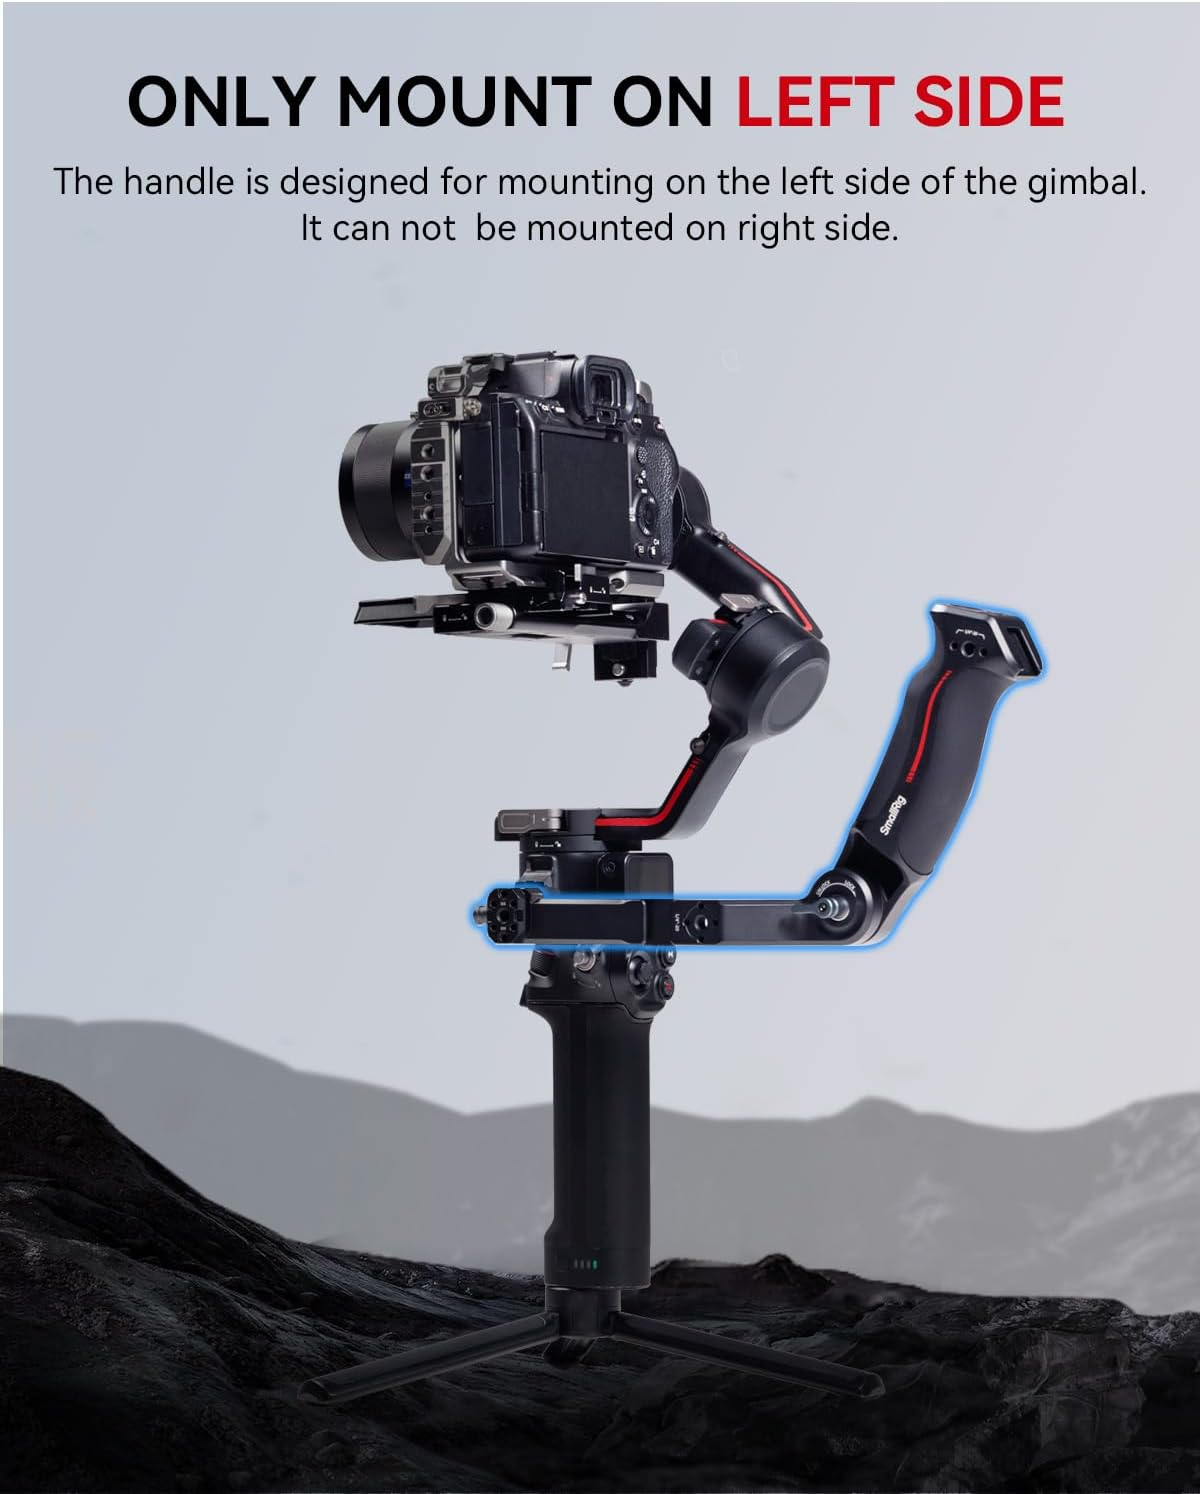
Figure 4.1: Proper left-side mounting of the sling handgrip.

Figure 4.2: Reinforced structure and installation location.
5. Operating Instructions
5.1 Ergonomic Grip and Low-Angle Shots
The ergonomic design of the sling handgrip provides a comfortable and secure hold, significantly reducing arm fatigue during extended shooting sessions. It is particularly effective for achieving stable low-angle shots, allowing you to position your gimbal closer to the ground or subject with greater control.

Figure 5.1: Ergonomic grip detail.
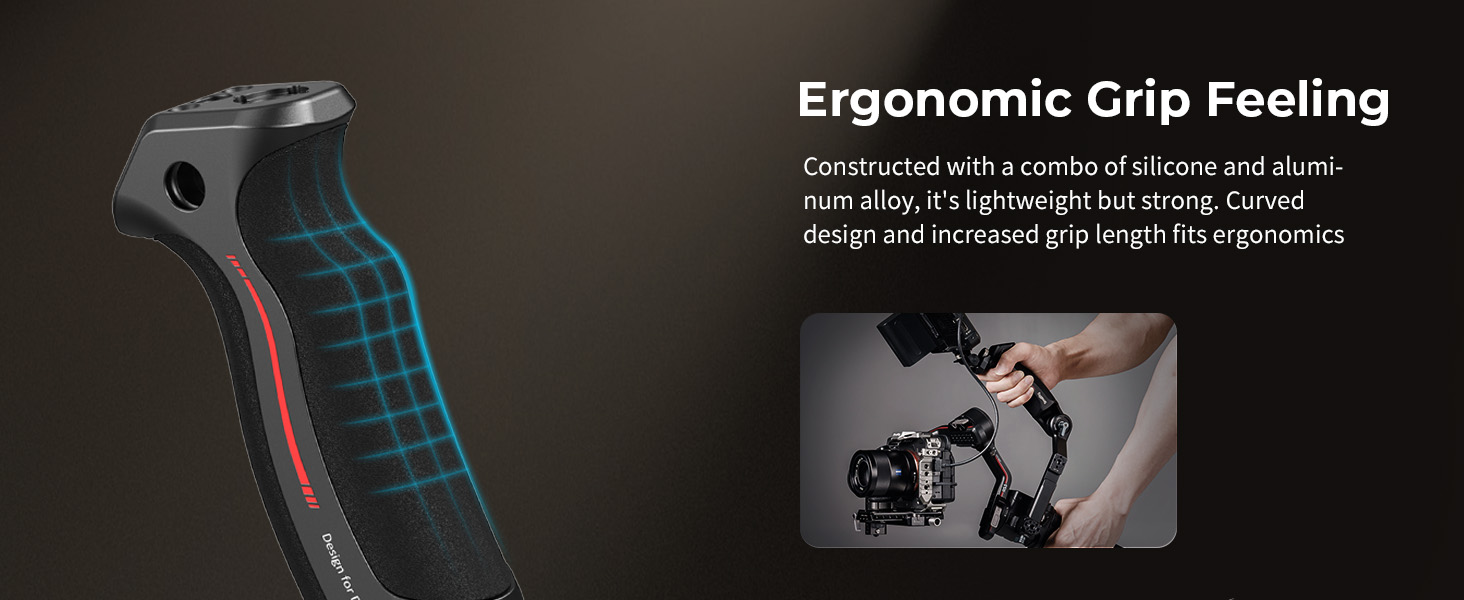
Figure 5.2: Comfortable grip for enhanced control.

Figure 5.3: Reduced arm fatigue and load capacity.
5.2 Angle Adjustment
The integrated rosette joint allows for 180-degree angle adjustment. To adjust the angle:
- Loosen the ratchet knob on the rosette joint.
- Adjust the handgrip to your desired angle.
- Tighten the ratchet knob to secure the angle.

Figure 5.4: 180-degree quick angle adjustment.
5.3 Attaching Accessories
The sling handgrip features multiple mounting points for various accessories:
- 1/4"-20 and 3/8"-16 ARRI Threads: Use these threads to attach magic arms (e.g., SmallRig 3874) or monitor mounts (e.g., SmallRig 2903B).
- Cold Shoe Mounts: Two cold shoe mounts (one on top, one on the side) allow for the attachment of wireless microphones, video transmitters, or other cold shoe compatible accessories.
- QD Socket: An integrated QD socket provides a quick-release point for attaching a QD neck strap or shoulder strap (not included) for additional support and carrying options.

Figure 5.5: Additional features and mounting points.

Figure 5.6: Expandable mounting options.

Figure 5.7: Multiple application scenarios.
6. Maintenance
To ensure the longevity and proper functioning of your SmallRig Sling Handgrip, follow these maintenance guidelines:
- Cleaning: Wipe the handgrip with a soft, dry cloth after each use to remove dust and debris. For stubborn dirt, use a slightly damp cloth and mild soap, then dry thoroughly. Avoid harsh chemicals or abrasive materials.
- Storage: Store the handgrip in a clean, dry environment away from extreme temperatures and direct sunlight.
- Inspection: Periodically check all screws and connections to ensure they are tight. Do not overtighten.
7. Troubleshooting
- Handgrip feels loose after attachment: Ensure the NATO clamp's locking lever is fully tightened. Verify that the handgrip is correctly seated on the gimbal's NATO rail and that the anti-removal stud is engaged.
- Cannot attach handgrip: Confirm you are attempting to mount the handgrip on the left side of the gimbal. The design is specific to the left side only.
- Difficulty adjusting angle: Loosen the ratchet knob on the rosette joint sufficiently before attempting to adjust the angle. If the joint is stiff, ensure it is clean and free of debris.
8. Specifications
| Feature | Detail |
|---|---|
| Product Dimensions | 5.28 x 1.65 x 2.09 inches (199.0 x 68.3 x 54.5 mm) |
| Item Weight | 11.8 ounces (335 Grams) |
| Material(s) | Aluminum Alloy, Silicone |
| Load Capacity | 8 kg / 17.6 lbs |
| Model Number | 3028-SR |
| Compatible Gimbals | DJI RS 4 Mini, RS 4, RS 4 Pro, RS 3 Mini, RS 3, RS 3 Pro, RS 2, RSC 2 |
9. Warranty and Support
SmallRig products are manufactured to high-quality standards. For warranty information, technical support, or service inquiries, please refer to the official SmallRig website or contact their customer service directly. Keep your purchase receipt as proof of purchase for any warranty claims.


