1. Product Overview
The Nilight 4 Inch 60W LED Pods with 2 Inch Tow Hitch Mounting Brackets are designed to provide powerful illumination for various vehicles, including pickups, ATVs, SUVs, trucks, trailers, and boats. These lights are ideal for backup reverse lighting and general rear illumination, enhancing visibility in dark conditions.
Key features include:
- Brightness: Powerful 60W LED light bar with high-quality LED chips and a clear PC lens, emitting 6000K pure white light.
- Beam Type: Appropriate combination of spot beam and flood beam for wide spread and further distance illumination.
- Durability: High-quality aluminum alloy material and advanced production process for impact resistance and anti-corrosion.
- Compatibility: Designed for most trucks, SUVs, trailers, or RVs with a 2-inch towing hitch, creating extra mounting points for easy installation of LED cubic pods.

Figure 1: Nilight 4 Inch 60W LED Pods with 2 Inch Tow Hitch Mounting Brackets.
2. Package Contents
Verify that all components are present in the package:
- 2 x 60W LED Pods
- 1 x 2-inch Tow Hitch Mounting Bracket
- Mounting Hardware (bolts, nuts, washers, Allen wrench)

Figure 2: Package contents and dimensions of the LED pods and mounting bracket.
3. Setup and Installation
This section provides instructions for installing the Nilight LED Pods with the tow hitch mounting bracket. Ensure your vehicle has a 2-inch towing hitch receiver.
3.1 Pre-Installation Check
- Ensure the tow hitch receiver has sufficient clearance (more than 0.8 inches) around the chain loops for the bracket to fit properly. Some vehicle models, particularly certain Ram 2500 (2024) or Class 4/5 hitches, may require modifications to the bracket due to chain loop interference.
- Gather necessary tools: Wrenches, wire strippers, electrical tape, and potentially additional wiring if the included wires are too short for your application.

Figure 3: Ensure adequate clearance around the tow hitch receiver for proper bracket fitment.
3.2 Mounting the Bracket and LED Pods
- Attach LED Pods to Bracket: Securely fasten each LED pod to the tow hitch mounting bracket using the provided bolts, nuts, and washers. Ensure the pods are oriented correctly for your desired light spread.
- Insert Bracket into Hitch Receiver: Slide the tow hitch mounting bracket into your vehicle's 2-inch tow hitch receiver.
- Secure Bracket: Use the hitch pin (not included, typically part of your vehicle's hitch system) to secure the bracket firmly in the receiver.

Figure 4: The bracket mounts directly to the tow hitch receiver without drilling.
3.3 Wiring the LED Pods
The LED pods require a 12V DC power source. For backup reverse lights, connect them to your vehicle's reverse light circuit. For auxiliary lighting, a separate switch and wiring harness (not included with this specific package, but available separately) may be used.
- Identify Wires: The LED pods typically have a red wire (positive) and a black wire (negative/ground).
- Connect to Power: Connect the red wire to the positive (+) terminal of your chosen power source (e.g., reverse light wire). Connect the black wire to a suitable ground point on the vehicle chassis.
- Secure Connections: Ensure all electrical connections are secure and insulated to prevent short circuits and corrosion.
Video 1: Demonstration of assembling the LED pods with the tow hitch bracket and a brief overview of the product features. This video shows the physical connection of the pods to the bracket and highlights the product's robust design.
4. Operating Instructions
Once installed and wired, the Nilight LED Pods will operate based on their connection. If wired to the reverse lights, they will activate automatically when the vehicle is put into reverse gear. If wired to a separate switch, they can be manually turned on and off.
- Beam Adjustment: The LED pods feature an adjustable bracket, allowing you to angle the lights up or down by approximately 45 degrees to optimize the light spread for your specific needs.
- Visibility: These lights provide significant illumination, greatly improving visibility when backing up or in low-light conditions.
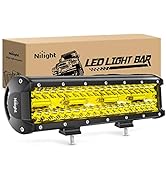

Figure 5: The adjustable bracket allows for precise beam direction. Figure 6: Examples of installed LED pods demonstrating their bright output.
5. Maintenance
The Nilight LED Pods are designed for durability and minimal maintenance. Regular checks can help ensure optimal performance.
- Cleaning: Periodically clean the PC lens with a soft cloth and mild soap to remove dirt and debris that may obstruct light output. Avoid abrasive cleaners.
- Connection Check: Inspect wiring connections for any signs of wear, corrosion, or looseness. Re-secure or re-insulate as needed.
- Bracket Inspection: Check the mounting bracket and hardware for tightness, especially after off-road use or heavy vibrations.
- Waterproof Design: The lights feature a waterproof design, but avoid prolonged submersion unless specifically rated for it. The product is designed to withstand various weather conditions.

Figure 7: The robust construction ensures durability against shock, water, and scratches.
6. Troubleshooting
If you encounter issues with your Nilight LED Pods, refer to the following common troubleshooting steps:
| Problem | Possible Cause | Solution |
|---|---|---|
| Lights do not turn on. | No power, loose connection, blown fuse, incorrect wiring. | Check power source, ensure all connections are secure, inspect vehicle's fuse box, verify correct positive/negative wiring. |
| Lights flicker. | Loose connection, insufficient power, faulty wiring. | Tighten all connections, ensure adequate voltage from power source, inspect wiring for damage. |
| Bracket does not fit tow hitch. | Interference with safety chain loops or hitch design. | Verify hitch type and clearance (refer to Section 3.1). Some hitches may require minor modifications to the bracket or alternative mounting solutions. |
| Wires are too short. | Vehicle wiring layout requires longer leads. | Extend wiring using appropriate gauge wire and secure, insulated connectors. |
7. Specifications
| Feature | Detail |
|---|---|
| Brand | Nilight |
| Model | ZH419 |
| Wattage | 60 watts (per pair) |
| Light Color Temperature | 6000K Pure White |
| Lens Material | Plastic (PC) |
| Housing Material | Aluminum Alloy |
| Special Features | Waterproof, Shockproof, Anti-scratch |
| Vehicle Service Type | ATV, Pickup, SUV, Truck, Trailer, Boat |
| Item Weight | 3.19 pounds |
| Dimensions (Package) | 12.32 x 5.16 x 4.37 inches |
| UPC | 781621093021 |
8. Warranty and Support
Nilight products are designed for reliability and performance. For specific warranty details and customer support, please refer to the official Nilight website or contact their customer service directly. Keep your purchase receipt for any warranty claims.
You can visit the official Nilight Store for more information: Nilight Store on Amazon


