1. Introduction
This manual provides comprehensive instructions for the installation, operation, and maintenance of your CGOLDENWALL 10.5KW Commercial Self-Draining Steam Generator. Please read this manual thoroughly before installation and use to ensure safe and efficient operation. Retain this manual for future reference.

Figure 1: CGOLDENWALL 10.5KW Steam Generator with included components.
2. Safety Information
Important Safety Instructions:
- Always ensure the power supply is disconnected before performing any installation, maintenance, or repair work.
- Installation must be performed by a qualified electrician and plumber in accordance with all local and national codes.
- Do not operate the steam generator if it is damaged or malfunctioning.
- Keep children and pets away from the steam generator and steam outlet during operation.
- The steam outlet produces hot steam. Avoid direct contact to prevent burns.
- Ensure adequate ventilation in the steam room.
- The control panel must be installed outside the steam room.
3. Package Contents
Verify that all components are present in the package:
- Steam generator unit
- Steam nozzle
- 10 m control cable
- 3 m temperature sensor
- Waterproof LED digital controller
- Drain valve
- Safety valve

Figure 2: Included accessories for the steam generator.
4. Specifications
| Specification | Value |
|---|---|
| Manufacturer | CGOLDENWALL |
| Part Number | CNA-1015 |
| Item Weight | 39.6 pounds |
| Product Dimensions | 19.7 x 8.7 x 15.4 inches |
| Item Model Number | AT |
| Size / Power | 10.5KW |
| Material | Stainless steel |
| Power Source | AC |
| Voltage | 220 Volts |
| Wattage | 10.5 KW |
| Breaker Required | 60A (for 10.5KW) |
| Suitable Room Volume | 10.5 m³ / 371 Cubic feet (for 10.5KW) |

Figure 3: Detailed product parameters for various models.
5. Setup & Installation
The steam generator should be installed in a dry, well-ventilated area near the shower, such as a vanity or closet. Ensure easy access for maintenance.
5.1 Water Connections
Connect the water inlet and steam outlet pipes. The drain valve should be installed according to the arrow indicating the correct direction. Always use two wrenches to avoid damaging the valve during installation.

Figure 4: Steam generator connection points.
5.2 Electrical Wiring
For 110V countries (e.g., USA, Canada, Mexico), connect the wires to 2 hot lines (L1 and L2). No neutral line is needed. For 220V countries, connect the wires to the hot (L) and neutral (N) lines. Ensure the voltage difference between L1(L) and L2(N) is 200-240V. Use 6AWG wire with a 60-amp GFCI breaker for the 10.5KW model.

Figure 5: Electrical wiring diagram.
5.3 Temperature Sensor Installation
One end of the temperature probe line connects to the control panel. The other end, with the sensor, should be placed in the steam room. The probe must be installed on a vertical surface, 4-5 feet above the floor, and exposed to the air. The steam nozzle should be approximately 30mm above the ground or 20mm from the edge of the bathtub. For comfort, install the nozzle away from the seating area.

Figure 6: Temperature sensor and steam nozzle installation.
5.4 Installation Video Guide
For a visual guide on the installation process, please refer to the video below:
Video 1: CGOLDENWALL Steam Shower Generator Installation. This video demonstrates the step-by-step process of installing the steam generator, including water and electrical connections.
6. Operation
The intelligent touch controller allows for easy adjustment of temperature and working time. The steam generator quickly produces a consistent flow of steam, typically starting in 3-5 minutes, with automatic segment heating.
6.1 Using the Intelligent Touch Controller
The controller features a time/temperature display, light key, turn on/off button, and time/temperature setting buttons.
- Temperature Setting: The adjustable temperature range is 95°F - 131°F (35°C - 55°C). Use the up/down arrows to set your desired temperature.
- Time Setting: The automatic shut-off time can be set from 30 minutes to 12 hours. Use the up/down arrows to adjust the duration.
- Power On/Off: Press the power button to start or stop the steam generator.

Figure 7: Intelligent Touch Controller interface and functions.
7. Maintenance
Regular maintenance ensures the longevity and optimal performance of your steam generator.
7.1 Automatic Drainage and Cleaning
The unit features an auto drainage function, eliminating the need for manual drainage. A quick cleaning port allows for easy removal of scale without disassembling pipes. The system automatically drains water and limescale 15 minutes after each use.
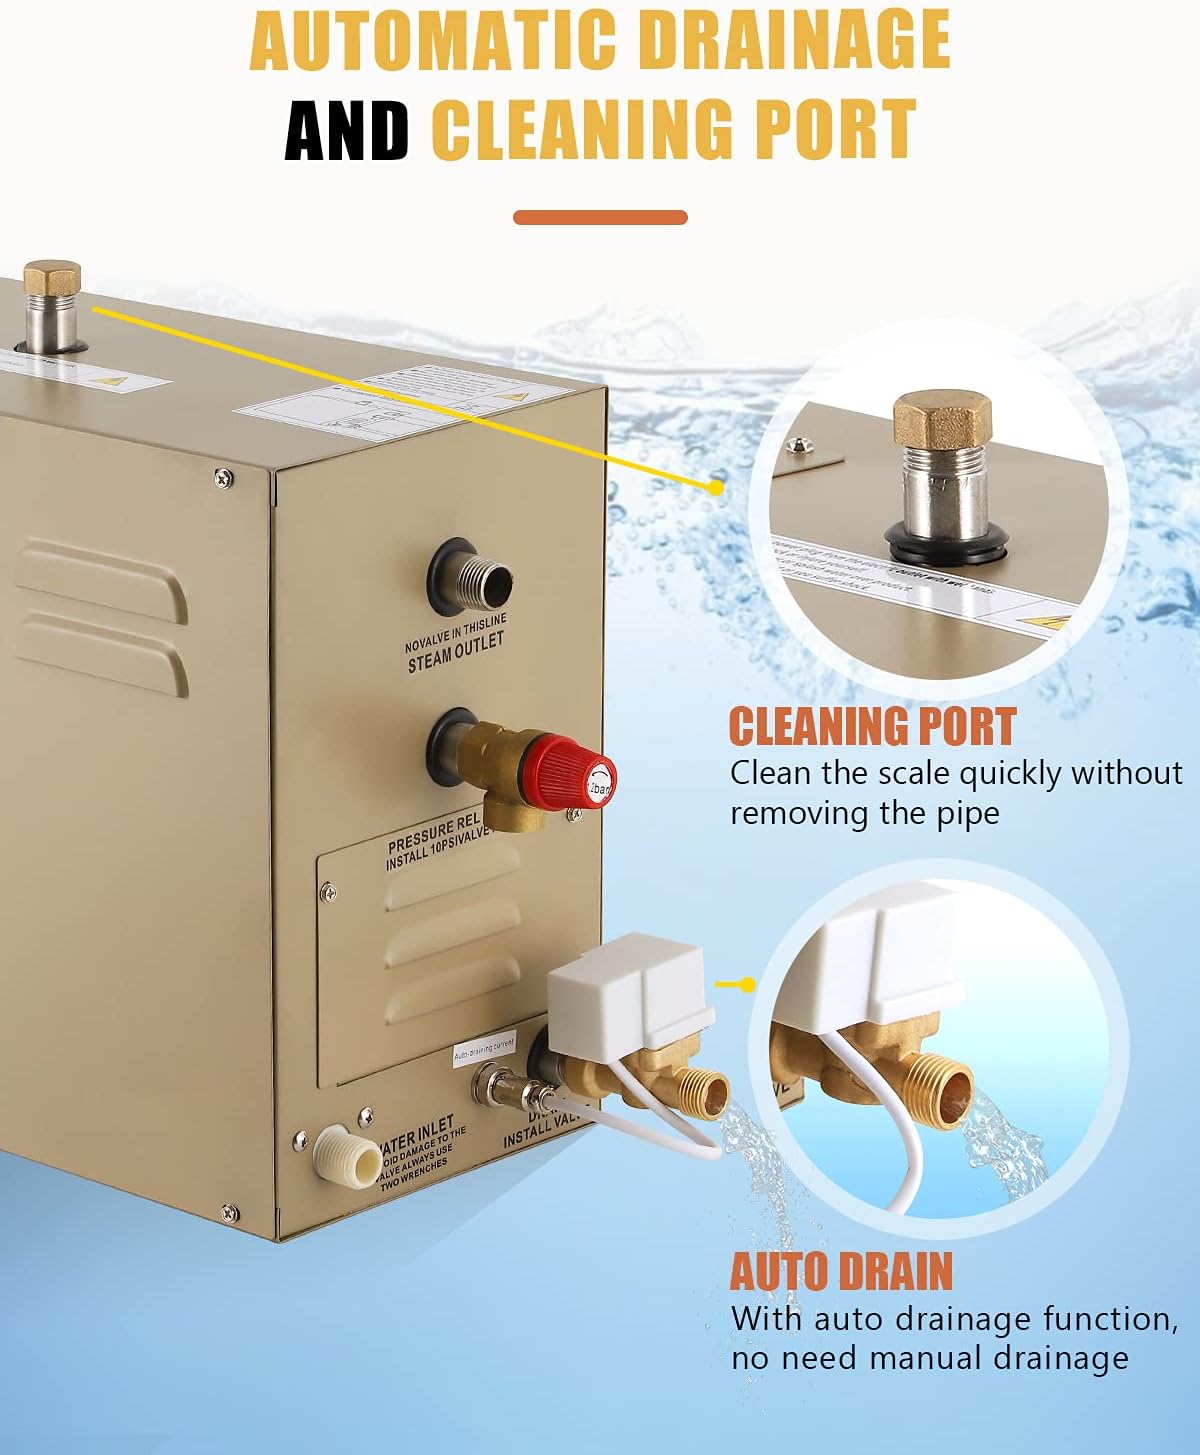
Figure 8: Automatic drainage and cleaning port details.
7.2 Heating Tube Replacement
In case of a heating tube malfunction, it can be replaced. Refer to the following video for detailed instructions:
Video 2: CGOLDENWALL Steam Generator - Replacement of the Heating Tube. This video demonstrates the procedure for safely removing and replacing the heating tube within the steam generator unit.
8. Troubleshooting
If you encounter issues with your steam generator, please review the following common problems and solutions:
- No Steam Production: Check power supply, water inlet connection, and ensure the controller is set correctly. Verify that the heating elements are functioning.
- Insufficient Steam: Ensure the steam room is properly sealed. Check for any blockages in the steam outlet. Verify the water level in the generator.
- Error Codes on Controller: Refer to the specific error code in your product's detailed manual (if provided separately) or contact customer support for assistance.
- Water Leakage: Inspect all pipe connections for tightness. Check the drain valve for proper installation and function.
For persistent issues or problems not listed here, please contact CGOLDENWALL customer support.
9. Warranty & Support
The CGOLDENWALL 10.5KW Commercial Self-Draining Steam Generator comes with a 1 Year Manufacturer Guarantee.
For warranty claims, technical support, or any questions regarding your product, please contact CGOLDENWALL customer service through their official channels. Ensure you have your product model number (AT-10.5KW) and purchase details available when contacting support.


