Introduction
This manual provides detailed instructions for the GuliKit Kingkong NS08 Wireless Gamepad. Please read this manual carefully before using the product to ensure proper operation and to prevent damage.
The GuliKit Kingkong NS08 is a versatile wireless controller designed for multiple platforms, including Nintendo Switch, Windows PC, and Android devices. It features advanced functionalities such as 6-axis motion sensing, adjustable vibration, and a customizable turbo function.
Product Overview

Figure 1: Front view of the GuliKit Kingkong NS08 Wireless Gamepad in Coral color, showing all face buttons and joysticks.
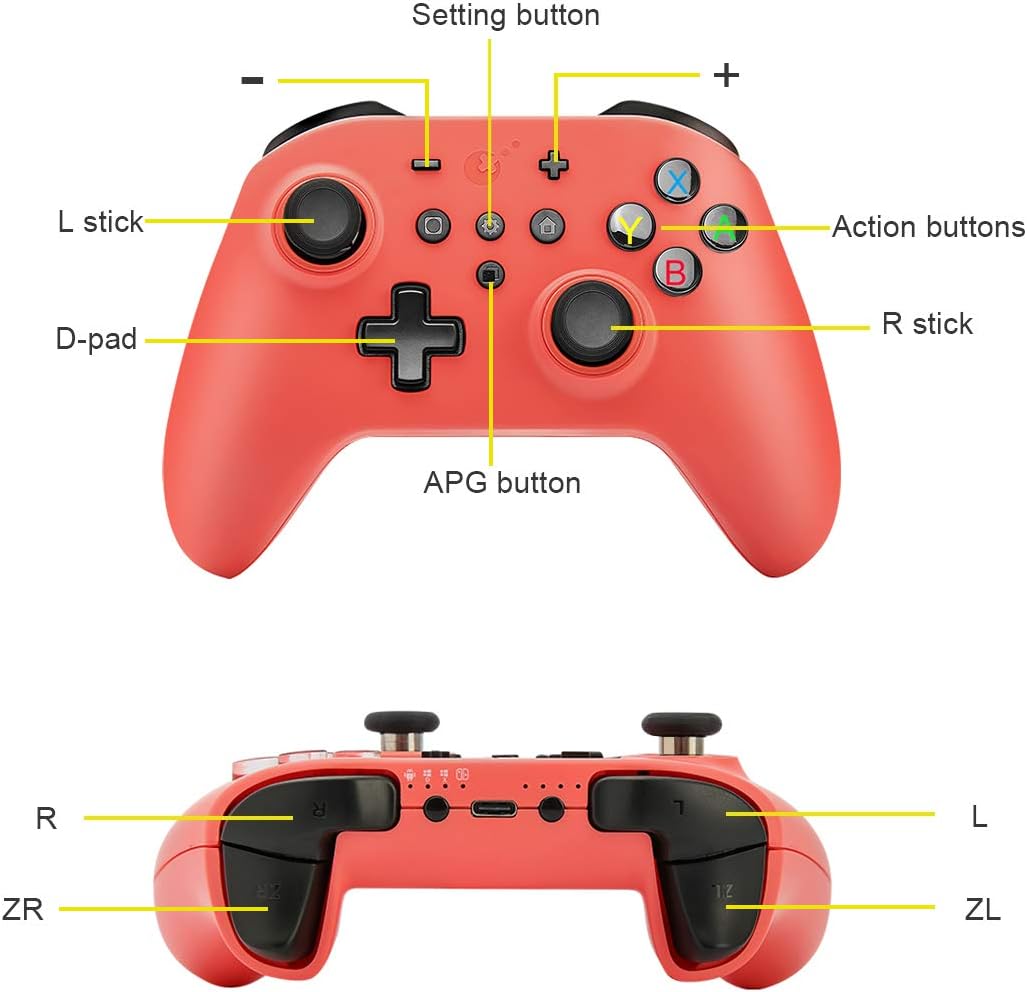
Figure 2: Top and bottom views of the GuliKit Kingkong NS08 Wireless Gamepad with key components labeled, including L/R sticks, D-pad, action buttons, setting button, APG button, L/R triggers, and ZL/ZR triggers.
Controller Components:
- L Stick: Left analog stick.
- R Stick: Right analog stick.
- D-pad: Directional pad for precise movement.
- Action Buttons (A, B, X, Y): Standard gaming action buttons.
- Setting Button: Used for various configuration options.
- APG Button: Auto Pilot Gaming button for recording and replaying operations.
- L/R Triggers: Left and Right shoulder buttons.
- ZL/ZR Triggers: Left and Right back triggers.
- +/- Buttons: Plus and Minus buttons, typically for system functions.
- Home Button: Returns to the system home screen.
- Screenshot Button: Captures screenshots.
Setup and Connection
Charging the Controller:
Before first use, fully charge the controller. Connect the provided USB-C cable to the controller's charging port and the other end to a USB power source (e.g., console, PC, or USB wall adapter). The indicator lights will show charging status.
Connecting to Nintendo Switch:
- From the HOME Menu, select Controllers, then Change Grip/Order.
- On the controller, press and hold the Home button until the indicator lights begin to flash.
- Once connected, the corresponding player LED(s) on the controller will remain lit.
Connecting to PC (Windows):
The controller supports both Bluetooth wireless and wired connections to a PC.
Bluetooth Connection:
- Ensure your PC has Bluetooth enabled.
- On the controller, press and hold the Home button until the indicator lights begin to flash.
- On your PC, go to Settings > Devices > Bluetooth & other devices.
- Select Add Bluetooth or other device, then Bluetooth.
- Select "GuliKit Kingkong NS08" from the list of available devices.
- Follow any on-screen prompts to complete pairing.
Wired Connection:
Connect the controller to your PC using a USB-C to USB-A cable. The PC should automatically detect and install the necessary drivers. If not, manual driver installation may be required.
Connecting to Android:
- Enable Bluetooth on your Android device.
- On the controller, press and hold the Home button until the indicator lights begin to flash.
- Go to your Android device's Bluetooth settings and scan for new devices.
- Select "GuliKit Kingkong NS08" from the list to pair.
Operating Instructions
Basic Controls:
The GuliKit Kingkong NS08 features standard gamepad controls. Refer to Figure 2 for button layout.
- Analog Sticks: Used for character movement and camera control.
- D-pad: For precise directional input, often used in menus or 2D games.
- Action Buttons (A, B, X, Y): Perform in-game actions such as jumping, attacking, or confirming selections.
- Shoulder/Trigger Buttons (L, R, ZL, ZR): Used for various in-game functions like aiming, shooting, or accessing menus.
Advanced Features:
Motion Sensing (6-Axis Gyro):
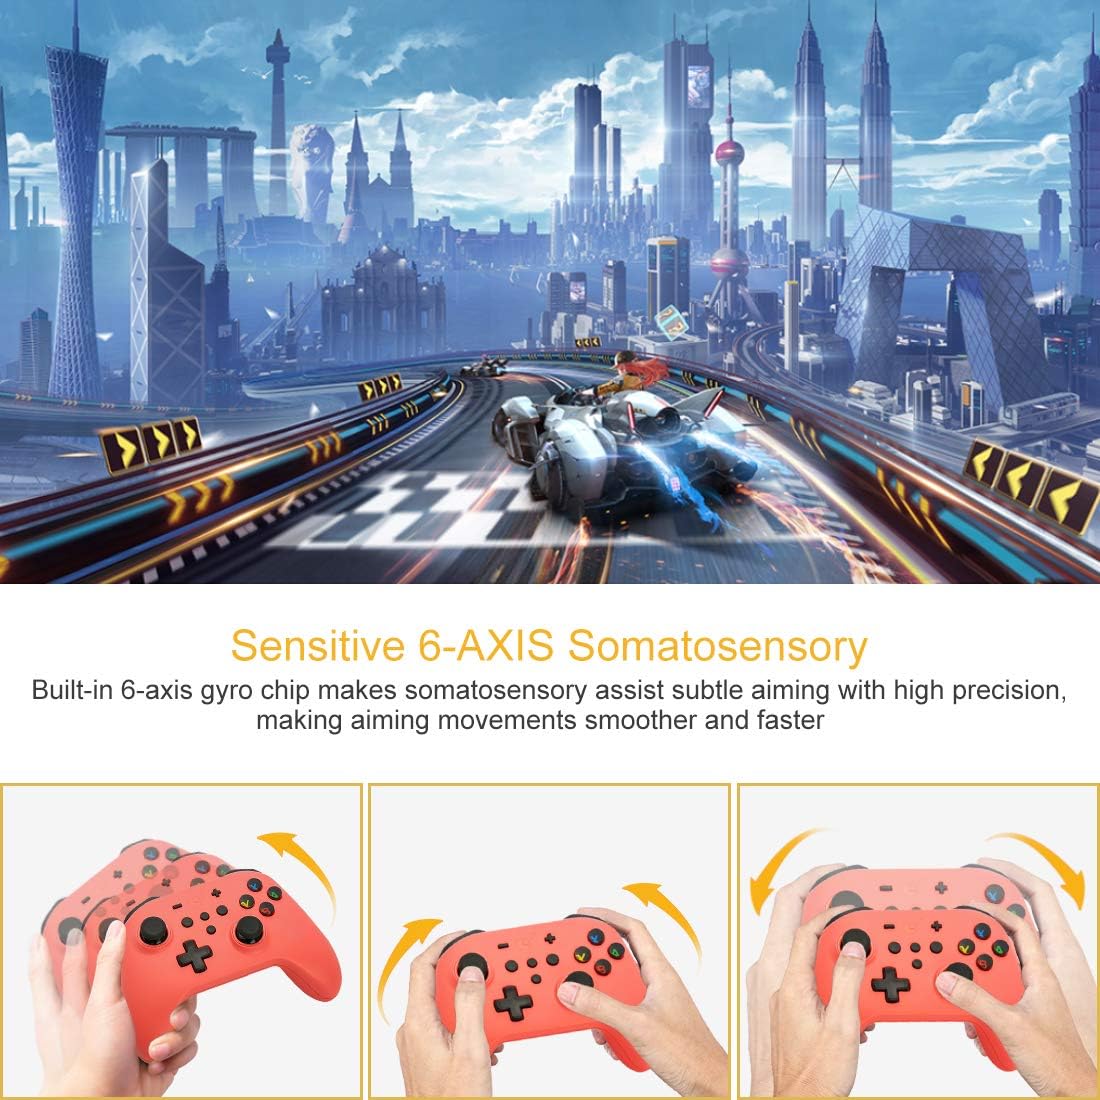
Figure 3: Illustration of the controller's 6-axis somatosensory capabilities, showing how tilting the controller can assist with precise aiming in games.
The built-in 6-axis gyro chip provides precise motion sensing, enhancing gameplay for titles that utilize motion controls, such as The Legend of Zelda: Breath of the Wild or Splatoon 2. Subtle movements of the controller translate into in-game actions, making aiming and navigation smoother.
Auto Pilot Gaming (APG):

Figure 4: Examples of Auto Pilot Gaming (APG) in action, showing automated tasks like harvesting in Animal Crossing or repeating combat sequences.
The APG function allows you to record a sequence of operations (up to 10 seconds) and then have the controller automatically replay them. This is useful for repetitive tasks or quick combos in games.
- To Record: Press and hold the APG button, then perform the desired actions. Release the APG button to stop recording.
- To Play: Briefly press the APG button. The recorded sequence will play once.
Customizable Turbo Function:

Figure 5: Visual representation of the Turbo function, indicating how it enables continuous shooting for action buttons like A, B, X, Y.
The turbo function allows for rapid, continuous input of specific buttons (A, B, X, Y, R, ZR). This can be set for both semi-automatic and automatic rapid fire, making certain actions easier in fast-paced games.
- To Set Turbo: Press and hold the desired action button (e.g., A), then press the Setting button. The button will now have turbo enabled. Repeat to cycle through semi-auto, auto, and off modes.
Vibration Adjustment:

Figure 6: The controller in use with a Nintendo Switch, illustrating the dual motor vibration feature and its adjustable intensity levels.
The controller features built-in dual motors with 4 adjustable vibration levels. This allows users to customize the haptic feedback intensity to their preference.
- To Adjust Vibration: Press and hold the Setting button and then press the + button or - button to increase or decrease vibration intensity.
Maintenance and Care
- Keep the controller clean by wiping it with a soft, dry cloth. Avoid using harsh chemicals or abrasive materials.
- Store the controller in a cool, dry place away from direct sunlight and extreme temperatures.
- Avoid dropping the controller or subjecting it to strong impacts.
- Do not attempt to disassemble or modify the controller, as this will void the warranty and may cause damage.
- When not in use for extended periods, ensure the controller is fully charged before storing to preserve battery life.
Troubleshooting
| Problem | Possible Cause | Solution |
|---|---|---|
| Controller does not turn on. | Battery is depleted. | Connect the controller to a power source using the USB-C cable and allow it to charge. |
| Controller does not connect to device. | Incorrect pairing procedure; Bluetooth interference; device's Bluetooth is off. | Ensure Bluetooth is enabled on your device. Follow the correct pairing steps for your specific device. Move closer to the device to reduce interference. |
| Buttons or joysticks are unresponsive. | Software glitch; physical damage; low battery. | Recharge the controller. Try resetting the controller (if a reset button is available, typically a small pinhole). If issues persist, contact customer support. |
| Vibration is too strong/weak or absent. | Vibration intensity setting is incorrect. | Adjust vibration intensity using the Setting button and +/- buttons as described in the Operating Instructions. |
Specifications
- Model: NS08
- Connectivity: Bluetooth, Wired (USB-C)
- Compatibility: Nintendo Switch, Windows PC, Android, Steam
- Features: 6-Axis Motion Sensing, Vibration (4 adjustable levels), Turbo Function, Auto Pilot Gaming (10s record)
- Power Source: Built-in Lithium Ion Battery
- Item Weight: 12.3 ounces (approx. 348 grams)
- Package Dimensions: 6.22 x 5.94 x 2.64 inches (approx. 15.8 x 15.1 x 6.7 cm)
- Color: Coral
Warranty and Support
For warranty information and technical support, please visit the official GuliKit website or contact their customer service directly. Keep your purchase receipt as proof of purchase for warranty claims.
GuliKit Official Store: GuliKit Store on Amazon


