
1. Product Overview
The Yottamaster M.2 NVMe Dual Bay Enclosure is a versatile device designed for both offline cloning of M.2 NVMe SSDs and functioning as a high-speed external docking station. It supports two M.2 NVMe SSDs simultaneously and offers data transfer rates up to 10Gbps via USB 3.1 Gen2 Type-C. Its robust aluminum construction aids in efficient heat dissipation.

2. Package Contents
- Yottamaster M.2 NVMe Dual Bay Enclosure
- USB-C to USB-C Cable
- USB-C to USB-A Cable
- 5V/4A Power Adapter with multiple international plug adapters (CN, US, EU, UK, JP)
- Thermal Silicone Pads (2x)
- SSD Fixing Screws/Rubber Plugs
- Small Screwdriver
- User Manual (this document)
3. Setup and Installation
3.1 Installing M.2 NVMe SSDs
- Gently slide open the enclosure cover to access the M.2 slots.
- Insert your M.2 NVMe SSDs into the designated slots (Source and Target). Ensure the SSDs are fully seated.
- Secure the SSDs using the provided rubber plugs or screws, depending on the SSD length (supports 2230, 2242, 2260, 2280 form factors).
- Apply the thermal silicone pads onto the SSDs for optimal heat dissipation.
- Close the enclosure cover securely.

3.2 Connecting Power
Connect the provided 5V/4A power adapter to the DC input port on the enclosure and then to a power outlet. The external power supply is crucial for stable operation, especially during cloning.

4. Operating Instructions
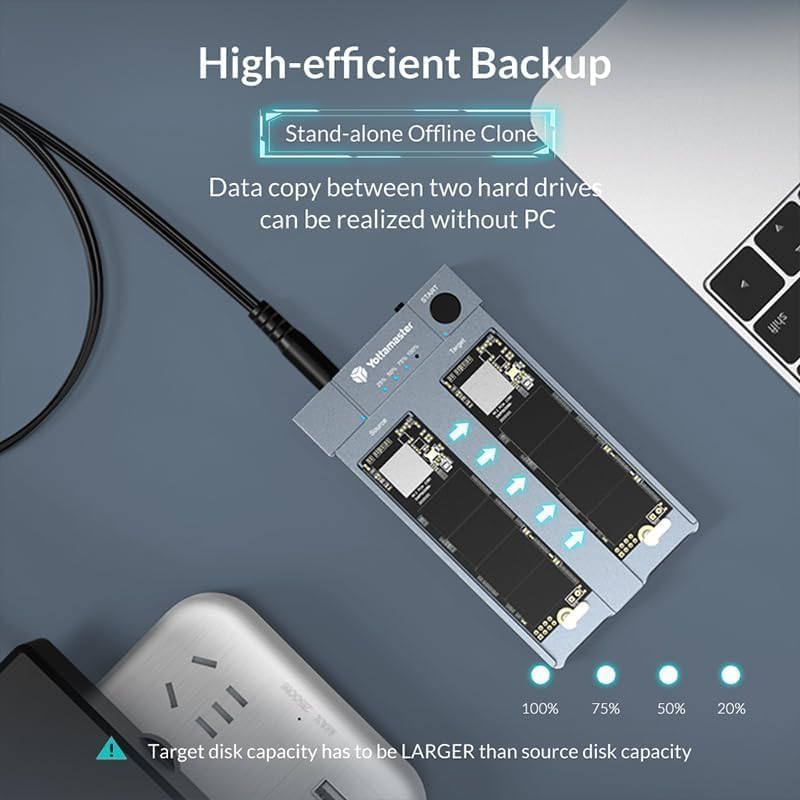
4.1 Offline Cloning (Stand-alone Duplication)
This feature allows you to clone an M.2 NVMe SSD without connecting the enclosure to a computer.
- Preparation:
- Ensure the enclosure is NOT connected to any computer.
- Insert the Source M.2 NVMe SSD into the 'Source' slot.
- Insert the Target M.2 NVMe SSD into the 'Target' slot.
- Important: The capacity of the Target SSD must be equal to or larger than the Source SSD. All data on the Target SSD will be overwritten during the cloning process.
- Connect the 5V/4A power adapter to the enclosure and a power outlet.
- Initiate Cloning:
- Press and hold the 'START' button on the enclosure.
- While holding the 'START' button, turn on the power switch.
- Continue to hold the 'START' button until the 25% progress indicator LED begins to blink. This typically takes 15-20 seconds after the initial power-on sequence where all four LEDs light up and then turn off.
- Once the 25% LED is blinking, you can release the 'START' button.
- Monitoring Progress:
- The progress indicator LEDs (25%, 50%, 75%, 100%) will illuminate sequentially to show the cloning status.
- When all four LEDs are solid (100%), the cloning process is complete.
- Completion:
- Once cloning is finished, turn off the power switch and safely remove the SSDs.
4.2 Online Enclosure Mode (Connecting to PC)
The enclosure can be used as an external dual-bay M.2 NVMe SSD docking station.
- Ensure SSDs are properly installed in the enclosure.
- Connect the 5V/4A power adapter to the enclosure and a power outlet.
- Connect the enclosure to your computer using either the USB-C to USB-C cable or the USB-C to USB-A cable. For optimal performance (up to 10Gbps), use the USB-C to USB-C cable with a USB 3.2 Gen 2 compatible port on your PC.
- The SSDs will appear as external drives on your computer. You may need to initialize and format new SSDs via your operating system's disk management utility before use.

5. Maintenance
5.1 Heat Dissipation
The enclosure features an all-aluminum design and includes thermal silicone pads to facilitate heat dissipation from the NVMe SSDs. While operating, especially during intensive tasks like cloning or large data transfers, the enclosure may become warm. This is normal and indicates effective heat transfer. Ensure adequate airflow around the device.

5.2 General Care
- Keep the device clean and free from dust. Use a soft, dry cloth for cleaning.
- Avoid exposing the device to extreme temperatures, humidity, or direct sunlight.
- Do not drop or subject the device to strong impacts.
6. Troubleshooting
6.1 Cloning Issues
- Cloning Fails or Stops:
- Target Disk Capacity: Ensure the target disk's actual capacity is equal to or greater than the source disk's actual capacity. Even a single byte less can cause failure.
- Holding START Button: Make sure you press and hold the 'START' button continuously until the 25% progress LED starts blinking, then release. Releasing too early will prevent cloning from starting.
- No PC Connection: The enclosure must not be connected to a computer during offline cloning.
- Bad Sectors: If the source SSD contains bad sectors, the cloning process may stop. Scan the SSD for errors before attempting to clone.
- SSD Initialization: For new target NVMe SSDs, it is recommended to initialize them and ensure they are 'online' in Disk Management before cloning, if using them in enclosure mode first.
6.2 Connection and Performance Issues
- Device Not Recognized:
- Ensure the power adapter is securely connected and providing power.
- Try a different USB cable or USB port on your computer.
- Verify that the SSDs are correctly seated in their slots.
- Slow Data Transfer:
- Ensure you are using a USB 3.1 Gen2 (10Gbps) compatible port on your computer. Older USB 2.0 or 3.0 ports will result in lower speeds.
- Use the provided USB-C to USB-C cable for best performance.
- Check the performance of your SSDs; slower SSDs will limit transfer speeds.
7. Specifications
| Feature | Specification |
|---|---|
| Model Number | Yottamaster-HC1-C3-GY-EU |
| Interface | USB 3.1 Gen2 Type-C |
| Data Transfer Rate | Up to 10 Gbps |
| Supported SSDs | M.2 NVMe PCIe SSDs (M Key / B&M Key) |
| Supported SSD Sizes | 2230, 2242, 2260, 2280 |
| Max Capacity per Slot | Up to 4TB (8TB total) |
| Material | Aluminum |
| Power Supply | External 5V/4A DC Power Adapter |
| Operating Systems | Windows, macOS, Linux |
8. Warranty and Support
8.1 Warranty Information
Yottamaster products typically come with a manufacturer's warranty. Please refer to the warranty card included with your product or visit the official Yottamaster website for detailed warranty terms and conditions specific to your region.
8.2 Customer Support
If you encounter any issues or have questions regarding your Yottamaster M.2 NVMe Dual Bay Enclosure, please contact Yottamaster customer support through their official website or the contact information provided in your product packaging. When contacting support, please have your model number (Yottamaster-HC1-C3-GY-EU) and purchase details ready.

