
Introduction
This manual provides detailed instructions for the installation, operation, and maintenance of your EASYGUARD EC206-A 2 Way Car Alarm System. This system is designed to enhance the security of your DC12V petrol vehicle with features such as a rechargeable LCD pager display, keyless entry, shock alarm warning, and remote trunk release. Please read this manual thoroughly before installation and use to ensure proper function and safety.
Safety Information
- Professional Installation Recommended: Due to the complexity of vehicle wiring and electronic systems, professional installation by a qualified car alarm installer is strongly recommended. Incorrect installation can damage your vehicle's electrical system or the alarm unit.
- Power Source: This system is designed for DC12V petrol vehicles only. Do not attempt to install it in vehicles with different voltage systems or fuel types.
- Battery Charging: Upon receiving the device, ensure the key fob is fully charged for approximately 4 hours if the battery power is low or the LCD display is unresponsive.
- Remote Control Range: The remote control working distance is approximately 800 meters (2600ft) in open areas. Actual range may vary due to environmental factors and signal interference.
- No Remote Engine Start: This specific model (EC206-A) does not include a remote engine start function.
Package Contents
Verify that all components listed below are included in your package:

Figure 1: All components included in the EASYGUARD EC206-A car alarm system package. This includes two remote controls, a central control module, an engine cut-off relay, a shock sensor, the main wiring harness, an LED indicator, an alarm antenna, a 6-tone siren, and a USB charging cable.
- Two (2) Rechargeable LCD Pager Remote Controls
- One (1) Main Control Module
- One (1) 6-Tone Siren
- One (1) Shock Sensor
- One (1) LED Indicator
- One (1) Main Wire Harness
- One (1) Alarm Antenna
- One (1) USB Charge Wire
- One (1) Engine Cut Off Relay
- User Manual and Wiring Diagram (available upon request)
Product Overview
Remote Control Functions

Figure 2: Remote control button functions. The side buttons are for Trunk Release and Mute Arm. The front buttons are for Arm, Disarm, and Car Locating/Panic Mode.
- Arm Button: Locks the vehicle and activates the alarm system.
- Disarm Button: Unlocks the vehicle and deactivates the alarm system.
- Trunk Release Button: Remotely opens the vehicle's trunk (requires additional solenoid kit for some vehicles).
- Mute Arm Button: Activates the alarm system silently.
- Car Locating/Panic Mode Button: Helps locate your vehicle or triggers a panic alarm.
Main Features Overview

Figure 3: Overview of the system's main features, including 2-way communication, rechargeable remote, shock alarm, and anti-hijacking capabilities.
Component Dimensions

Figure 4: Remote Control Dimensions (approx. 79mm H x 38mm W x 14mm T).
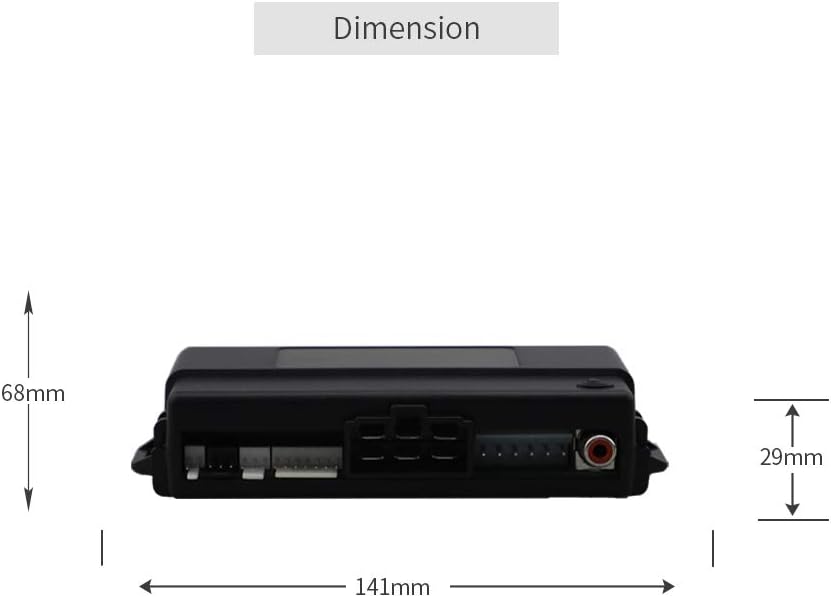
Figure 5: Control Module Dimensions (approx. 141mm L x 68mm W x 29mm H).
Siren and Charging Port

Figure 6: The 20W 6-tone siren, responsible for audible alarms.

Figure 7: USB charge port on the remote control for recharging the internal battery.
Setup and Installation
Installation of the EASYGUARD EC206-A system involves connecting various components to your vehicle's electrical system. It is crucial to follow the wiring diagram provided with the product (available upon request) and adhere to proper automotive electrical practices.
- Professional Installation: As stated previously, professional installation is highly recommended to ensure correct wiring and optimal system performance.
- Power Disconnection: Always disconnect the vehicle's battery before beginning any electrical installation work.
- Component Placement: Mount the main control module in a secure, hidden location within the vehicle's cabin, away from excessive heat or moisture. Position the shock sensor appropriately for effective detection.
- Wiring: Connect all wires according to the provided wiring diagram. Ensure all connections are secure and properly insulated to prevent short circuits.
- Siren Mounting: Mount the siren in a secure location under the hood, facing downwards to prevent water accumulation, and away from engine heat.
- Antenna Placement: Position the alarm antenna for optimal signal reception, typically on the windshield or a non-metallic surface.
Operating Instructions
Familiarize yourself with the remote control buttons and their corresponding functions.
Basic Operations
- Arming the System (Lock): Press the Arm button once. The vehicle doors will lock, and the alarm system will activate. The remote's LCD will display the armed status.
- Disarming the System (Unlock): Press the Disarm button once. The vehicle doors will unlock, and the alarm system will deactivate. The remote's LCD will display the disarmed status.
- Mute Arm: Press the Mute Arm button (side button) once. The system will arm silently without audible confirmation.
- Remote Trunk Release: Press and hold the Trunk Release button (side button) for approximately 3 seconds. The vehicle's trunk will open. (Note: An additional trunk release solenoid kit may be required for some vehicles, e.g., ASIN: B00N4RP8VM).
- Car Locating / Panic Mode: Press the Car Locating/Panic button (front button, often combined with Arm/Disarm or a separate icon) once to locate your vehicle by flashing lights and chirps. Press and hold for 3 seconds to activate the full panic alarm.
Advanced Features
- Shock Sensor Warning: The system will provide a warning if a light impact is detected. A stronger impact will trigger the full alarm. The remote pager will notify you of the event.
- Ignition, Door, Trunk, ACC, Foot Brake Trigger: The alarm will trigger if any of these points are activated while the system is armed.
- Window Roll-up Automation (Optional): If an additional window closer module is installed (e.g., 4-door window closer ASIN: B00N3RKA8E), the windows can automatically roll up when the system is armed.
- Central Door Locking Automation: The system can be configured to automatically lock doors when the ignition is turned on and unlock when the ignition is turned off.
- Re-arming Automatically: If the system is disarmed but no door is opened within a set time, it will automatically re-arm for added security.
- Siren Pause: During an alarm trigger, you can momentarily pause the siren by pressing a specific button (refer to the full wiring diagram for details).
- Valet Mode: This mode temporarily disables the alarm functions, allowing the vehicle to be serviced without triggering the alarm. To enter/exit Valet Mode, refer to the detailed wiring diagram and user guide.
- Anti-Hijacking: This feature can be activated in an emergency to secure the vehicle. Consult the full user manual for activation and deactivation procedures.
- Emergency Release: In case of remote control loss or malfunction, an emergency override procedure is available. Refer to the detailed user manual for instructions.
Maintenance
- Remote Control Battery: The LCD pager remote control is rechargeable. When the battery indicator on the LCD shows low power, connect the remote to the provided USB charge wire and charge it using a standard USB power source (e.g., car charger, computer USB port).
- Cleaning: Clean the remote control and main unit with a soft, dry cloth. Avoid using harsh chemicals or abrasive cleaners.
- Regular Checks: Periodically test the alarm system's functions (arming, disarming, shock sensor) to ensure it is operating correctly.
Troubleshooting
If you encounter issues with your EASYGUARD EC206-A system, refer to the following common problems and solutions:
| Problem | Possible Cause | Solution |
|---|---|---|
| Remote control LCD is blank or unresponsive. | Low battery in the remote control. | Recharge the remote control battery using the USB charge wire for approximately 4 hours. |
| Remote control range is shorter than expected. | Environmental interference, obstacles, or low remote battery. | Ensure the remote battery is charged. Move to an open area. Check for strong radio interference sources. Ensure the alarm antenna is properly installed and not obstructed. |
| Alarm triggers without apparent reason. | Shock sensor sensitivity too high, faulty sensor, or wiring issue. | Adjust the shock sensor sensitivity (refer to installation guide). Check sensor wiring. If the problem persists, consult a professional installer. |
| Keyless entry not working. | Wiring issue, faulty central locking module, or remote battery. | Check remote battery. Verify all wiring connections for the central locking system. Consult a professional installer. |
| Trunk release not functioning. | Missing or faulty trunk release solenoid kit, wiring issue. | Confirm if an additional trunk release solenoid kit is installed and functioning. Check wiring connections. |
For issues not covered here, please refer to the detailed wiring diagram and user manual provided with the product, or contact professional technical support.
Specifications
- Model Number: EC206-A
- Operating Voltage: DC12V
- Remote Frequency: 868Mhz
- Remote Control Type: 2-Way with Rechargeable LCD Pager Display
- Maximum Remote Range: Approximately 800 meters (2600ft) in wild space
- Item Weight: 2.38 pounds
- Package Dimensions: 10.28 x 7.09 x 3.98 inches
- Batteries: 2 Lithium Ion batteries required (included for remote controls)
- Main Features: Manual arm/disarm, keyless entry, remote trunk release, mute alarm, shock sensor warning, ignition/door/trunk/ACC/foot brake trigger, central door locking automation, re-arming automatically, siren pause, panic/car finding, two-stage shock, shock record, electric/pneumatic lock optional, emergency release, valet mode, anti-hijacking.
Warranty and Support
For warranty information, please refer to the documentation provided at the time of purchase or contact your retailer. An English user manual and wire diagram are available upon request from EASYGUARD customer support. For technical assistance or troubleshooting beyond this guide, it is recommended to consult a professional car alarm installer or contact EASYGUARD directly.


