
1. Introduction
This manual provides comprehensive instructions for the safe and efficient operation of your Domo DO266A Mobile Air Conditioner. Please read this manual thoroughly before installation, operation, or maintenance to ensure proper use and to prevent injury or damage. Keep this manual for future reference.
The Domo DO266A is a portable air conditioning unit designed to provide cooling, fan, and dehumidification functions for indoor spaces. With a capacity of 7000 BTU and 960 Watts of power, it offers effective climate control for various environments.
2. Safety Information
Always observe the following basic safety precautions when using this appliance:
- Read all instructions before using the appliance.
- This appliance is for indoor use only.
- Ensure the power supply matches the voltage specified on the rating label.
- Do not operate the unit with a damaged cord or plug. If the supply cord is damaged, it must be replaced by the manufacturer, its service agent, or similarly qualified persons to avoid a hazard.
- Always unplug the appliance from the power outlet before cleaning, servicing, or moving it.
- Do not insert fingers or foreign objects into the air inlet or outlet.
- Keep the appliance away from heat sources, direct sunlight, and flammable materials.
- Ensure the unit is placed on a flat, stable surface to prevent tipping.
- Do not block the air outlets or inlets. Maintain at least 30 cm clearance around the unit.
- This appliance can be used by children aged 8 years and above and persons with reduced physical, sensory or mental capabilities or lack of experience and knowledge if they have been given supervision or instruction concerning use of the appliance in a safe way and understand the hazards involved.
- Children shall not play with the appliance. Cleaning and user maintenance shall not be made by children without supervision.
3. Product Overview and Components
Familiarize yourself with the main parts of your mobile air conditioner.

Figure 3.1: The Domo DO266A Mobile Air Conditioner positioned in a living room, showcasing its compact design and white finish. It is designed to blend into various home environments.

Figure 3.2: Front view of the Domo DO266A, highlighting the adjustable louvers and the air outlet from which cool air is expelled. Blue lines indicate the direction of airflow.
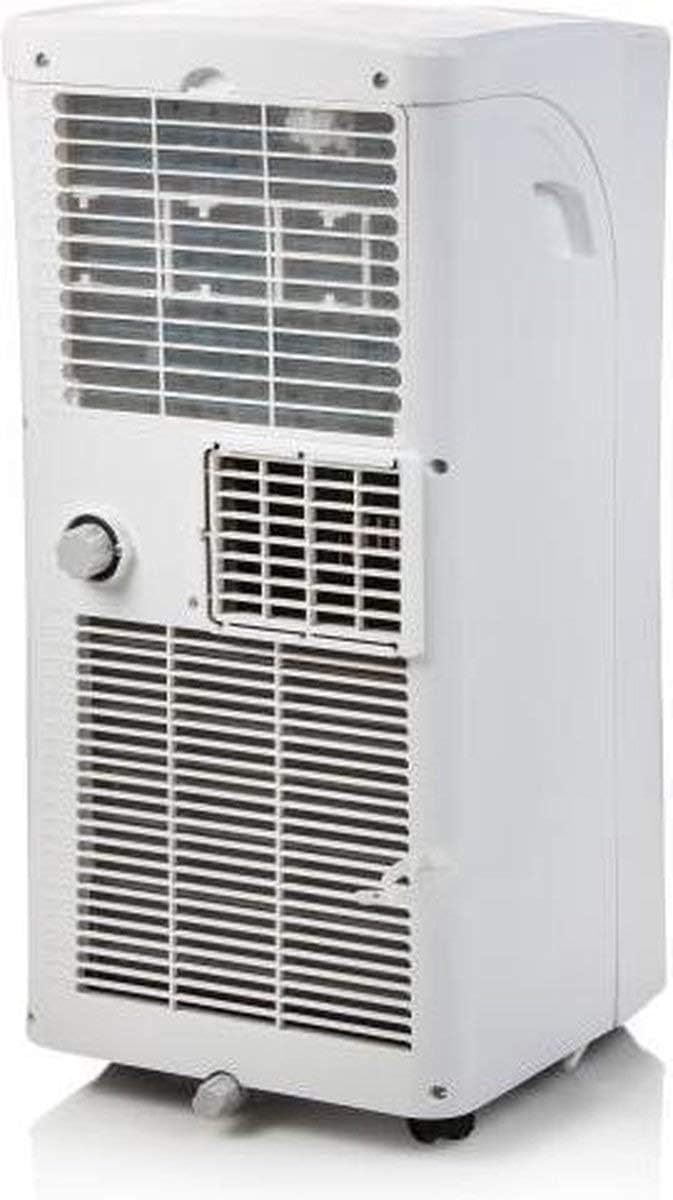
Figure 3.3: Rear view of the Domo DO266A, displaying the exhaust air outlet for the hot air hose, the air intake grilles, and the drain plug for condensate water removal.

Figure 3.4: The remote control for the Domo DO266A, featuring buttons for power, mode selection, fan speed, temperature adjustment, timer, and sleep functions, along with an LCD display.
Key Components:
- Control Panel: Located on the top of the unit for manual operation.
- Air Outlet: Adjustable louvers for directing airflow.
- Casters: Wheels at the base for easy mobility.
- Air Intake Grilles: Located on the rear and sides, where air is drawn into the unit.
- Exhaust Air Outlet: Connection point for the exhaust hose to vent hot air.
- Drain Plug: For manual drainage of condensed water.
- Remote Control: For convenient operation from a distance.
4. Setup and Installation
4.1 Unpacking
- Carefully remove the air conditioner from its packaging.
- Check for any shipping damage. If the unit is damaged, do not operate it and contact your retailer.
- Retain the original packaging for future storage or transport.
4.2 Placement
- Place the unit on a firm, level surface in a location that allows for proper ventilation.
- Ensure there is at least 30 cm (12 inches) of space around the unit for adequate air circulation.
- Avoid placing the unit near heat sources, direct sunlight, or in areas with high humidity.
4.3 Exhaust Hose Installation
The mobile air conditioner requires an exhaust hose to vent hot air outside the room.
- Attach the exhaust hose connector to the exhaust air outlet on the back of the unit.
- Extend the exhaust hose and attach the window kit adapter to the other end.
- Install the window kit in a suitable window opening. The kit is designed for vertical or horizontal sliding windows.
- Insert the window kit adapter into the opening of the window kit, ensuring a tight seal to prevent hot air from re-entering the room.
- Minimize bends in the exhaust hose to ensure efficient airflow.
4.4 Power Connection
- Plug the power cord into a grounded electrical outlet that meets the specifications of the unit.
- Do not use extension cords or multi-sockets unless absolutely necessary and ensure they are rated for the appliance's power consumption.
5. Operating Instructions
The Domo DO266A can be operated using the control panel on the unit or the supplied remote control.
5.1 Control Panel and Remote Control Functions
The control panel features various buttons and an LED display. The remote control duplicates most of these functions for convenience.
- ON/OFF Button: Powers the unit on or off.
- MODE Button: Cycles through operating modes: Cool, Fan, Dry (Dehumidify).
- TEMP Buttons (Up/Down Arrows): Adjusts the desired temperature in Cool mode.
- FAN Button: Selects fan speed: Low, Medium, High.
- TIMER Button: Sets the auto-on or auto-off timer.
- SLEEP Button: Activates sleep mode for quieter operation and gradual temperature adjustment.
- LED Button: Controls the display light.
5.2 Operating Modes
Cooling Mode
- Press the MODE button until the Cool indicator lights up.
- Use the TEMP buttons to set your desired temperature (typically between 16°C and 30°C).
- Adjust the FAN speed as desired.
Fan Mode
- Press the MODE button until the Fan indicator lights up.
- The unit will circulate air without cooling. Adjust FAN speed as needed.
Dry (Dehumidify) Mode
- Press the MODE button until the Dry indicator lights up.
- The unit will remove moisture from the air. Fan speed is typically fixed in this mode.
- Ensure continuous drainage is set up or monitor the water tank for manual drainage.
5.3 Timer Function
The timer allows you to set a specific time for the unit to turn on or off.
- To set Auto-Off: With the unit running, press the TIMER button. Use TEMP buttons to set the desired delay (1-24 hours). The unit will turn off after the set time.
- To set Auto-On: With the unit off, press the TIMER button. Use TEMP buttons to set the desired delay (1-24 hours). The unit will turn on after the set time in its last operating mode.
6. Maintenance
Regular maintenance ensures optimal performance and extends the lifespan of your air conditioner.
6.1 Cleaning the Air Filter
The air filter should be cleaned every two weeks or more frequently depending on usage and air quality.
- Turn off the unit and unplug it from the power outlet.
- Locate the air filter(s) (usually on the rear or side panels).
- Remove the filter(s) carefully.
- Clean the filter(s) with a vacuum cleaner to remove dust. For heavy dirt, wash with lukewarm water (below 40°C) and a mild detergent.
- Rinse thoroughly and allow the filter(s) to air dry completely before re-installing. Do not expose to direct sunlight.
- Re-install the dry filter(s) into the unit.
6.2 Draining Water
The unit collects condensate water during cooling and dehumidifying operations. It has an internal self-evaporation system, but in high humidity conditions, the internal tank may fill up.
- When the internal water tank is full, the unit will stop operating and display an error code (e.g., 'FL' or 'E4').
- Turn off the unit and unplug it.
- Place a shallow pan or tray under the drain plug at the bottom rear of the unit.
- Remove the drain plug and allow the water to drain completely.
- Replace the drain plug firmly.
- For continuous drainage in Dry mode, connect a drain hose (not supplied) to the continuous drain outlet.
6.3 Cleaning the Unit Exterior
- Turn off and unplug the unit.
- Wipe the surface with a soft, damp cloth. Do not use harsh chemicals, abrasives, or solvents.
- Ensure no water enters the control panel or other electrical parts.
6.4 Storage
If the unit will not be used for an extended period:
- Drain all accumulated water from the unit.
- Clean the air filter.
- Run the unit in Fan mode for a few hours to dry the internal components.
- Unplug the power cord and coil it neatly.
- Store the unit in a dry, cool place, preferably in its original packaging.
7. Troubleshooting
Before contacting customer support, please refer to the following troubleshooting guide for common issues.
| Problem | Possible Cause | Solution |
|---|---|---|
| Unit does not turn on | No power supply Power cord not plugged in Internal water tank full | Check power outlet and circuit breaker Ensure power cord is securely plugged in Drain the water tank |
| Unit does not cool effectively | Air filter clogged Room too large Doors/windows open Exhaust hose not properly installed or blocked Temperature setting too high | Clean the air filter Ensure unit is suitable for room size Close all doors and windows Check exhaust hose for kinks or blockages and ensure proper sealing Lower the set temperature |
| Unit is noisy | Unit not on a level surface Air filter clogged Foreign object in fan | Place unit on a flat, stable surface Clean the air filter Turn off and unplug, then check for obstructions (if safe to do so) |
| Water leakage | Drain plug loose or missing Unit tilted Continuous drain hose blocked (if used) | Ensure drain plug is securely in place Place unit on a level surface Check and clear any blockages in the drain hose |
| Remote control not working | Batteries dead or incorrectly inserted Obstruction between remote and unit | Replace batteries and check polarity Remove any obstructions and ensure remote is pointed at the unit's receiver |
8. Specifications
Technical specifications for the Domo DO266A Mobile Air Conditioner.
| Feature | Specification |
|---|---|
| Brand | Domo |
| Model Name | DO266A |
| Reference Number | DO266A / 5411397137616 |
| Product Dimensions (L x W x H) | 1 x 1 x 1 cm |
| Item Weight | 1 Kilogram |
| Installation Type | Window (Portable) |
| Special Feature | Inverter Compressor |
| Wattage | 960 Watts |
| Power Source | Corded Electric |
| Control Method | Push Button |
| Controller Type | Remote Control |
| Batteries Included? | No |
| Batteries Required? | No |
| ASIN | B08DRJJ14S |
| First Available Date | March 9, 2020 |
| Spare Parts Availability | Information unavailable |
9. Warranty and Support
For warranty information, please refer to the warranty card included with your product or contact your retailer. Keep your proof of purchase for any warranty claims.
For technical support, troubleshooting beyond this manual, or spare parts inquiries, please contact Domo customer service or your authorized dealer. Information regarding spare parts availability is currently unavailable.


