1. Introduction
This manual provides detailed instructions for the installation, operation, and maintenance of your myTouchSmart 41381 In-Wall Motion Activated Timer. This device is designed to automatically control lighting based on detected motion, offering convenience and energy efficiency. It is compatible with LED, CFL, incandescent, and halogen bulbs.

Image 1.1: The myTouchSmart 41381 In-Wall Motion Activated Timer, showing its sleek white design and the hidden control panel.
2. Important Safety Information
Read all instructions before installation and use. Failure to follow these instructions may result in electric shock, fire, or serious injury.
- WARNING: Risk of Electric Shock. Disconnect power at the circuit breaker or fuse box before installation.
- Install in accordance with all national and local electrical codes.
- This device is for indoor use only.
- Do not use with dimmers or 3-way switches. This is a single-pole device.
- A neutral wire is required for installation. If you are unsure, consult a qualified electrician.
- Ensure all wire connections are secure.
3. Package Contents
- myTouchSmart 41381 In-Wall Motion Activated Timer
- White faceplate door
- Light almond faceplate door
- Installation screws
- Neutral jumper wire
Note: A wall plate is not included and must be purchased separately.
4. Installation
4.1 Wiring Diagram
The myTouchSmart 41381 is designed for single-pole installation and requires a neutral wire. Follow these steps carefully:
- Turn off power: Locate the circuit breaker or fuse that supplies power to the switch you are replacing and turn it OFF. Verify power is off using a voltage tester.
- Remove existing switch: Carefully remove the existing wall plate and switch from the wall box. Disconnect the wires from the old switch.
- Identify wires: Identify the LINE (hot), LOAD, NEUTRAL, and GROUND wires in your wall box. A neutral wire is typically white.
- Connect wires:
- Connect the LINE wire from the wall box to the "Line" terminal on the motion sensor.
- Connect the LOAD wire from the wall box to the "Load" terminal on the motion sensor.
- Connect the NEUTRAL wire from the wall box to the "Neutral" terminal on the motion sensor. Use the included neutral jumper wire if necessary.
- Connect the GROUND wire from the wall box to the "Ground" terminal on the motion sensor.
- Mount the switch: Carefully place the wired motion sensor into the wall box and secure it with the provided screws.
- Install faceplate: Attach the desired white or light almond faceplate door. Note that a standard wall plate is not included.
- Restore power: Turn the power back ON at the circuit breaker.

Image 4.1: Detailed wiring diagram showing connections for Line, Load, Neutral, and Ground terminals.
4.2 Dimensions
Ensure adequate space in your wall box for installation. The dimensions of the device are provided below.

Image 4.2: Product dimensions: 4.13 inches (104.90mm) height, 1.75 inches (44.45mm) width.
5. Operation
The myTouchSmart 41381 features a hidden control panel for easy adjustment of settings. Open the small door on the front of the switch to access the buttons.
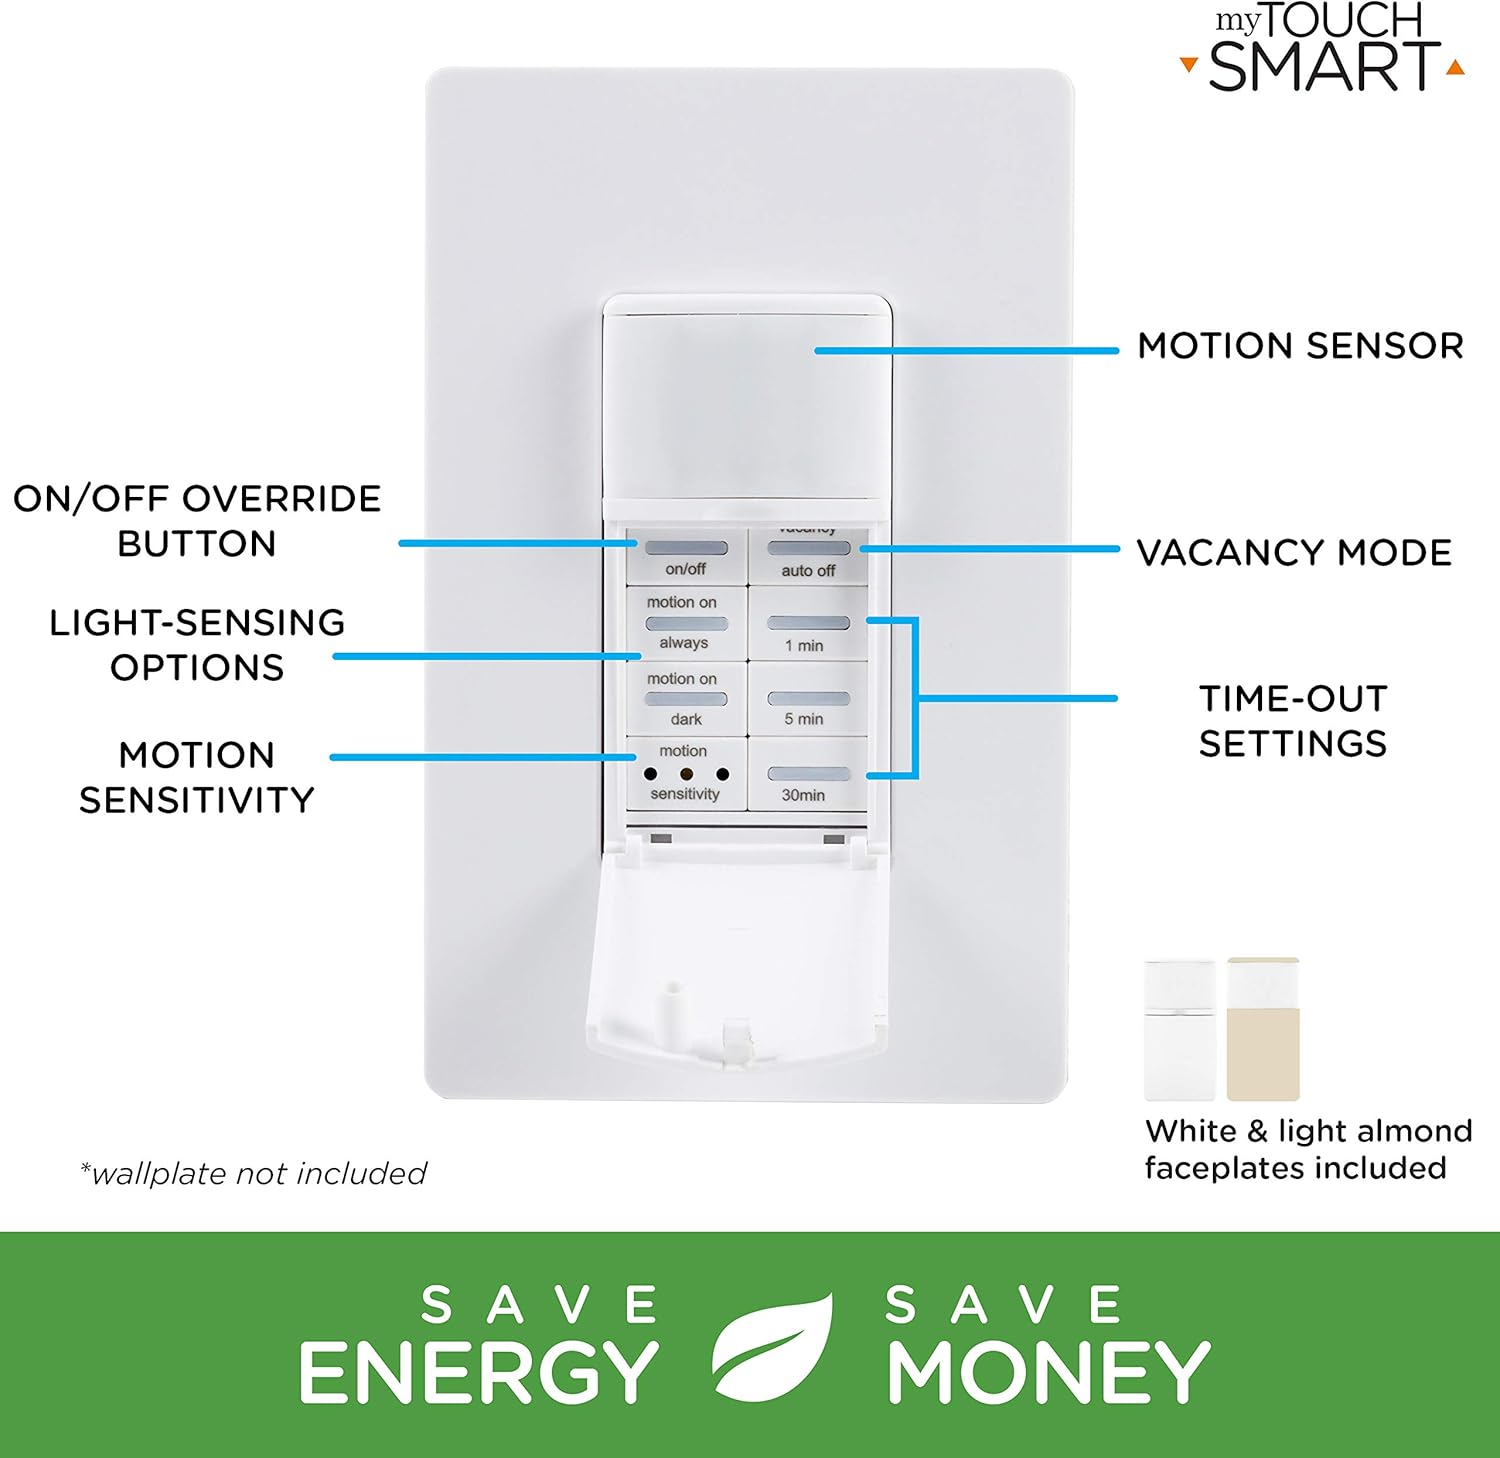
Image 5.1: The control panel with buttons for ON/OFF override, Vacancy Mode, Light-Sensing Options, Motion Sensitivity, and Time-Out Settings.
5.1 Simple Setup
Adjusting the settings is straightforward:
- Push buttons: Open the door and press the buttons to select your desired preferences for operation mode, time-out duration, and motion sensitivity.
- Shut door: Close the door to conceal the settings.
- Manual control: You can push the door itself or the ON/OFF button (if exposed) to manually control the lights.

Image 5.2: Visual guide for simple setup: 1. Push buttons, 2. Shut door, 3. Push door/ON/OFF button for manual control.
5.2 Operating Modes
- Occupancy Mode (Automatic ON/OFF): When motion is detected, the lights turn ON automatically. They will turn OFF after the selected time-out duration if no motion is detected.
- Vacancy Mode (Manual ON, Automatic OFF): The lights must be turned ON manually. They will turn OFF automatically after the selected time-out duration if no motion is detected.
5.3 Time-Out Settings
Select how long the lights remain ON after the last detected motion:
- 1 minute
- 5 minutes
- 30 minutes
5.4 Motion Sensitivity
Adjust the sensor's responsiveness to movement:
- Low
- Medium
- High
The sensor detects movement up to 30ft. away within a 150-degree coverage area.

Image 5.3: Detection zone illustration showing a 150-degree range and up to 30ft. detection distance.
5.5 Light-Sensing Options
Control when the motion sensor activates based on ambient light levels:
- Always: Motion detection is active regardless of ambient light.
- Motion On: Lights turn on with motion only if the ambient light is below a certain level.
- Dark: Lights turn on with motion only when it is dark.
6. Maintenance
The myTouchSmart 41381 motion sensor requires minimal maintenance. To ensure optimal performance:
- Clean the sensor lens periodically with a soft, dry cloth to remove dust or debris that may obstruct detection.
- Do not use abrasive cleaners or solvents, as these may damage the device.
- Ensure the area around the sensor is clear of obstructions that could block its field of view.
7. Troubleshooting
| Problem | Possible Cause | Solution |
|---|---|---|
| Lights do not turn ON with motion. |
|
|
| Lights turn OFF too quickly or too slowly. |
|
|
| Lights flicker or behave erratically. |
|
|
| Sensor does not detect motion effectively in certain areas. |
|
|
8. Specifications
| Feature | Detail |
|---|---|
| Model Number | 41381 |
| Operating Voltage | 120VAC, 50/60Hz |
| Current Rating | 15 Amps resistive |
| Tungsten Load | 1200W |
| Electronic Ballast/LED Load | 5A/600W |
| Motor Load | 1/2 HP |
| Motion Detection Range | Up to 30ft. |
| Coverage Area | Up to 150 degrees |
| Compatible Bulbs | LED, CFL, incandescent, halogen |
| Installation Type | Single-pole (neutral wire required) |
| Dimensions (L x W x H) | 2.15 x 4.3 x 6.45 inches |
| Item Weight | 6.1 ounces |
| IP Rating | IP54 |
| Manufacturer | Jasco Products Company, LLC |
9. Warranty and Support
myTouchSmart products are backed by a limited warranty. For specific warranty details, product support, or to register your product, please visit the manufacturer's website or contact their customer service department.
Manufacturer: Jasco Products Company, LLC
Please retain your proof of purchase for warranty claims.


