
EVERSECU B08BJ5FMRK
EVERSECU 9-inch Quad Display Wireless Car Backup Camera System User Manual
Model: B08BJ5FMRK
1. Introduction
This user manual provides detailed instructions for the installation, operation, and maintenance of your EVERSECU 9-inch Quad Display Wireless Car Backup Camera System. This system is designed to enhance vehicle safety by providing clear, real-time video feeds from multiple cameras, suitable for RVs, SUVs, vans, pickups, trucks, and trailers.
Please read this manual thoroughly before using the product to ensure proper functionality and to avoid damage.
2. Product Overview
The EVERSECU Wireless Car Backup Camera System includes a 9-inch quad display monitor and four 1080P HD wireless cameras. Key features include strong digital wireless signal transmission, quad display capability, and enhanced night vision.

Figure 2.1: Overview of the EVERSECU 9-inch Quad Display Wireless Car Backup Camera System, showing the monitor and four wireless cameras.
2.1 Package Contents
- 1 x 9-inch Quad Display Monitor
- 1-4 x Wireless Car Cameras (depending on kit purchased)
- 1 x Car Charger
- 1 x User Manual (this document)
- 1 x Power Cable
- 1 x Monitor Bracket
2.2 Key Features
- Strong Wireless Digital Video Signal Transmission: 100% No interference, effective 100m signal range.
- Quad Display HD 9-inch Monitor: Supports max 4 wireless cameras, 128GB SD Card for recording and playback, IPS Technology for fast response.
- HD 1080P Car Backup Cameras: 18 Infrared Lights, HD 960P CMOS Sensor for superior night vision, IP69 Waterproof Standard, 149° Wide View.
- Easy Installation: Plug-and-play monitor, two wiring methods (auto-on with reverse or always-on).
- Wide Application: Voltage Range 12-24V DC, suitable for RV/Semi-Trailer/Box Truck/5th Wheel/Trailer/Bus.
3. Setup and Installation
Proper installation is crucial for optimal performance. Follow these steps carefully.
3.1 Monitor Installation
- Attach the monitor to the included bracket.
- Mount the monitor securely on your dashboard or desired location using the bracket. Ensure it does not obstruct your view or interfere with vehicle controls.
- Connect the monitor's power cable to the car charger and plug it into your vehicle's cigarette lighter socket.
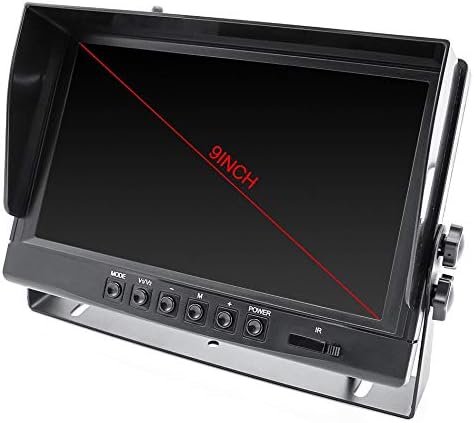
Figure 3.1: Dimensions of the 9-inch monitor, showing its compact size suitable for dashboard mounting.
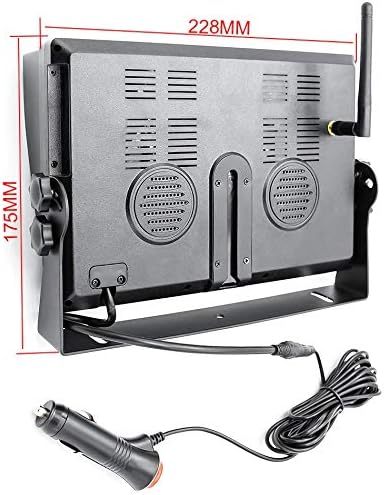
Figure 3.2: Rear view of the 9-inch monitor, illustrating the power cable connection and antenna for wireless signal reception.
3.2 Camera Installation and Wiring
The cameras require a wired power connection. There are two primary wiring methods:
- Method 1: Always On (for continuous monitoring)
Connect the camera's power cable to a constant 12V-24V DC power source in your vehicle (e.g., fuse box, accessory power). Ensure the connection is secure and properly insulated.
- Method 2: Auto-On with Reverse Gear (for backup assistance)
Connect the camera's power cable to your vehicle's reverse light circuit. This will power on the camera automatically when the vehicle is shifted into reverse.
Important: The cameras are wireless for video transmission only; they still require a wired power supply.

Figure 3.3: Simplified wiring diagram for the monitor and a single camera, showing power supply from the car charger and the pairing button on the camera.

Figure 3.4: Illustration of a truck with multiple wireless cameras strategically placed for comprehensive rear, side, and front views, demonstrating the system's versatility.
3.3 Camera Pairing
If cameras are not automatically paired, follow these steps:
- On the monitor, select the desired camera channel (e.g., "CAM4").
- Navigate to the "Pairing" option in the monitor's settings menu and select it. The screen will display "Pairing Start 20".
- While the monitor is in pairing mode, connect the camera to its power supply. The camera and monitor should pair automatically within 20 seconds.
Note: Cameras purchased separately must be paired with an EVERSECU monitor to function.
4. Operating Instructions
This section details how to operate your EVERSECU camera system.
4.1 Monitor Controls and Interface
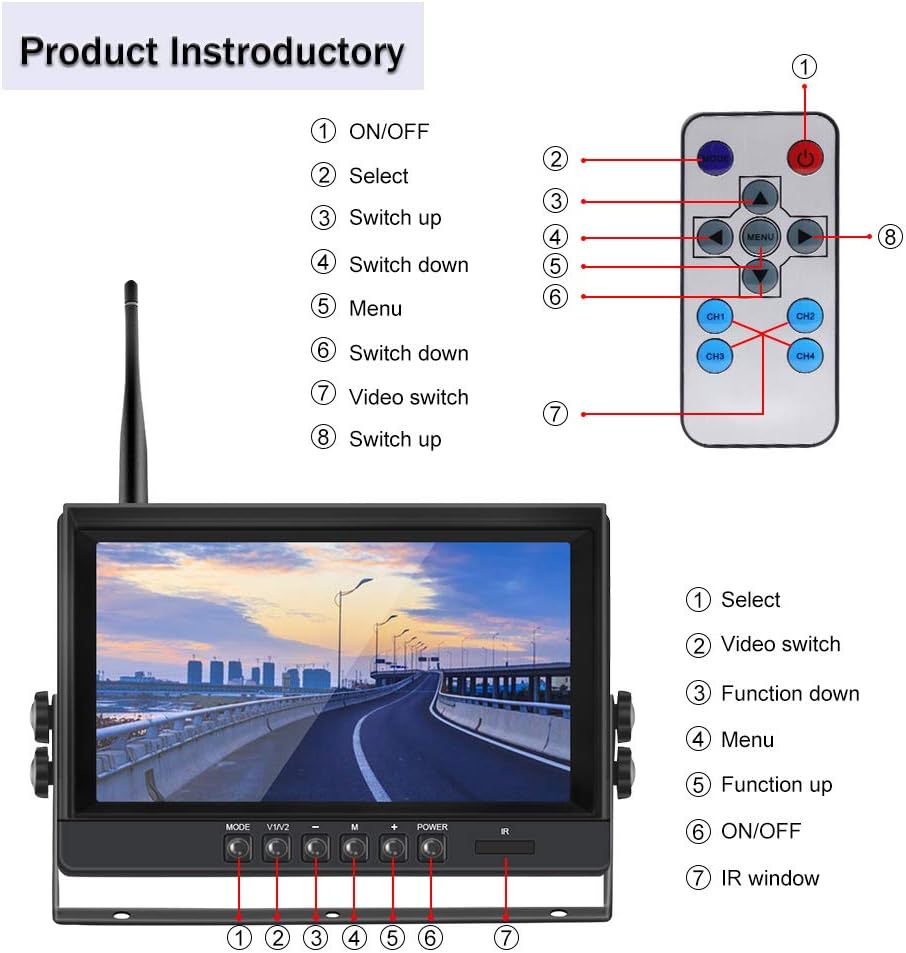
Figure 4.1: Diagram illustrating the functions of the buttons on the monitor and the corresponding remote control, including ON/OFF, Select, Switch Up/Down, Menu, and Video Switch.
The monitor features several buttons for navigation and control, as well as an infrared (IR) window for remote control operation.
- ON/OFF: Powers the monitor on or off.
- Select: Confirms a selection in the menu.
- Switch Up/Down: Navigates through menu options or adjusts settings.
- Menu: Accesses the main settings menu.
- Video Switch (CH1-CH4): Switches between individual camera views or quad view.
4.2 Display Modes
The monitor supports various display configurations:
- Quad Display: Shows live feeds from all four connected cameras simultaneously.
- Single Camera View: Displays a full-screen view from a selected camera.
- Split Screen: Displays two or three cameras simultaneously in various layouts.

Figure 4.2: The monitor displaying a four-split screen view, allowing simultaneous observation of multiple angles from inside a vehicle.
4.3 Video Recording (DVR Function)
The monitor supports video recording to an SD card (up to 128GB). Insert a compatible SD card into the designated slot on the monitor.
- Recording Activation: Recording can be set to continuous, motion-detection, or triggered by reverse gear engagement (if wired accordingly).
- Playback: Access recorded footage through the "Play" option in the monitor's menu.
Video 4.1: Demonstration of the 9-inch Digital Wireless Backup Cameras DVR System, showcasing menu navigation, display mode switching (single camera, quad view), and night vision capabilities. This video highlights the user interface and key operational features.
4.4 Night Vision
The cameras are equipped with 18 infrared lights and a HD 960P CMOS Sensor, providing superior night vision for clear images in low-light conditions.

Figure 4.3: Close-up of a waterproof camera with water splashing, demonstrating its IP69 waterproof rating, ensuring durability in various weather conditions.
5. Maintenance
Regular maintenance ensures the longevity and optimal performance of your system.
- Cleaning: Use a soft, damp cloth to clean the monitor screen and camera lenses. Avoid abrasive cleaners or solvents.
- Cable Inspection: Periodically check all power cables and connections for signs of wear, damage, or loose connections.
- SD Card Management: If using the DVR function, regularly back up important footage and format the SD card to maintain performance and prevent data corruption.
- Camera Lens Clarity: Ensure camera lenses are free from dirt, mud, snow, or ice, which can obstruct the view.
6. Troubleshooting
Refer to this section for common issues and their solutions.
| Problem | Possible Cause | Solution |
|---|---|---|
| No image on monitor |
|
|
| Poor image quality / blurry image |
|
|
| Monitor screen goes blank intermittently |
|
|
| Cannot record video |
|
|
7. Specifications
| Component | Specification |
|---|---|
| Monitor | |
| Screen Size | 9 Inches |
| Display Technology | LED, IPS HD Full View Digital Screen |
| Video Resolution | 1920*1080p |
| Video Recording | Supports Max 128GB SD Card |
| Power Supply Voltage | 12V-30V DC |
| Screen Brightness | 500CD / M2 |
| Wireless Car Camera | |
| Chips Components | HD HM1246 |
| Effective Pixels | 1280*960p |
| Image Resolution | 1.3 megapixel pixels |
| Video Output | AHD Video Signal |
| Night Vision Distance | More Than 10 meters |
| Lens | 16mm F1.6 6 Glass Lens |
| Working Temperature | -30 °C ~ +60 °C |
| Waterproof Standard | IP69 |
| Wide View Angle | 149° |
8. Warranty and Support
For warranty information and technical support, please refer to the official EVERSECU website or contact their customer service directly. Keep your purchase receipt as proof of purchase for warranty claims.
Contact Information:
- Brand: EVERSECU
- Website: Visit the EVERSECU Store on Amazon
- Additional Support: Refer to the contact details provided in your product packaging or on the official EVERSECU website.
Ask a question about this manual
Ask about setup, troubleshooting, compatibility, parts, safety, or missing instructions. Manuals+ will review the question and use this page’s manual context to help answer it.