
Behringer EURORACK GO
Behringer EURORACK GO Mobile Eurorack Case User Manual
Model: EURORACK GO
1. Introduction
This manual provides essential information for the safe and efficient operation of your Behringer EURORACK GO Mobile Eurorack Case. Please read this manual thoroughly before using the product to ensure proper setup, operation, and maintenance.
The Behringer EURORACK GO is a compact 280 HP Eurorack case designed for synthesizers and other Eurorack-style equipment. It features a rugged and mobile chassis, making it suitable for transport. The case offers 280 HP of mounting space, arranged in two rows of 140 HP, with varying module depth capabilities. It includes an over-specified, ultra-low noise power supply providing +12 V @ 3 A, -12 V @ 1 A, and +5 V @ 1 A, along with 32 keyed power connectors for module protection.
2. Important Safety Instructions
- Read these instructions.
- Keep these instructions.
- Heed all warnings.
- Follow all instructions.
- Do not use this apparatus near water.
- Clean only with dry cloth.
- Do not block any ventilation openings. Install in accordance with the manufacturer’s instructions.
- Do not install near any heat sources such as radiators, heat registers, stoves, or other apparatus (including amplifiers) that produce heat.
- Do not defeat the safety purpose of the polarized or grounding-type plug. A polarized plug has two blades with one wider than the other. A grounding type plug has two blades and a third grounding prong. The wide blade or the third prong are provided for your safety. If the provided plug does not fit into your outlet, consult an electrician for replacement of the obsolete outlet.
- Protect the power cord from being walked on or pinched particularly at plugs, convenience receptacles, and the point where they exit from the apparatus.
- Only use attachments/accessories specified by the manufacturer.
- Use only with the cart, stand, tripod, bracket, or table specified by the manufacturer, or sold with the apparatus. When a cart is used, use caution when moving the cart/apparatus combination to avoid injury from tip-over.
- Unplug this apparatus during lightning storms or when unused for long periods of time.
- Refer all servicing to qualified service personnel. Servicing is required when the apparatus has been damaged in any way, such as power-supply cord or plug is damaged, liquid has been spilled or objects have fallen into the apparatus, the apparatus has been exposed to rain or moisture, does not operate normally, or has been dropped.
3. Setup
3.1 Unpacking
Carefully unpack your EURORACK GO case and inspect it for any signs of damage during transit. Retain the original packaging for future transport or storage.
3.2 Power Supply Connection
Connect the provided power adapter to the DC input on the rear of the EURORACK GO case. Ensure the power switch is in the OFF position before connecting to a power outlet. The power supply provides +12 V @ 3 A, -12 V @ 1 A, and +5 V @ 1 A across its three zones.

Figure 3.1: Rear panel of the EURORACK GO case, highlighting the power input and switch. Ensure the power adapter is securely connected to the DC input and the power switch is in the off position before plugging into a wall outlet.
3.3 Module Installation
The EURORACK GO case offers 280 HP of mounting space, divided into two rows of 140 HP each. Modules are secured using sliding nuts within the rails. When installing modules, ensure proper alignment and avoid overtightening screws.
- Module Depth: The maximum module depth varies from 40 mm (1.57'') in the rear row to 62 mm (2.44'') in 60% of the front row. Always check your module's depth requirements against the available space.
- Power Connection: Each module requires connection to the internal power bus board using a ribbon cable. The case features 32 keyed power connectors to prevent incorrect polarity connections. Always double-check the orientation of the ribbon cable before connecting it to the module and the bus board. The red stripe on the ribbon cable typically indicates -12V and should align with the corresponding pin on both the module and the bus board.

Figure 3.2: The EURORACK GO case with an example of module installation. Note the two rows of 140 HP mounting space and the internal power distribution system. Modules are secured to the rails using screws and sliding nuts.
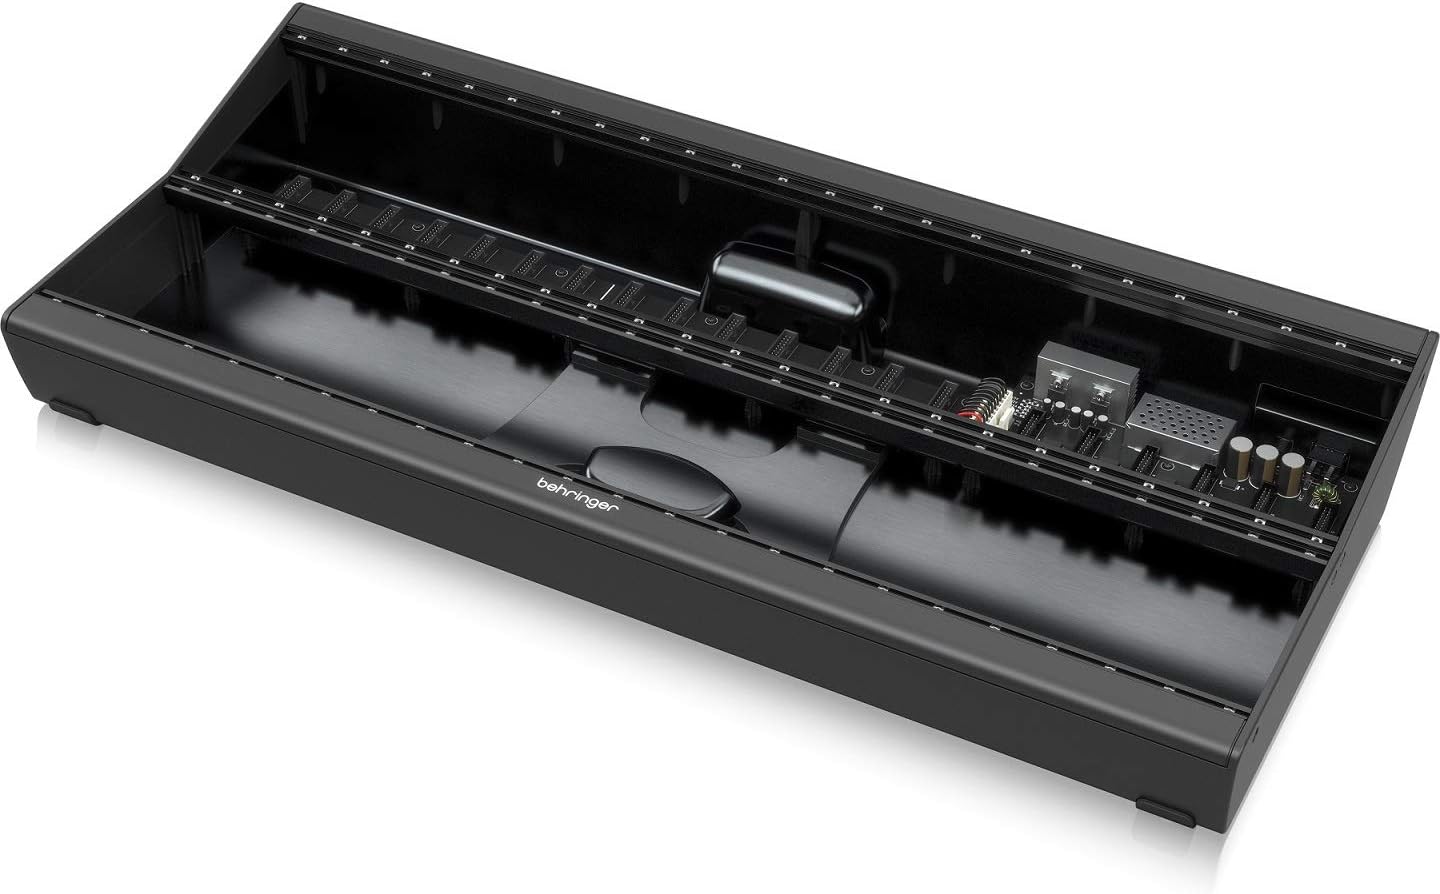
Figure 3.3: An empty EURORACK GO case, providing a clear view of the internal structure, including the mounting rails with sliding nuts and the power distribution board at the rear. This perspective helps in understanding the available space and connection points for Eurorack modules.
4. Operating the EURORACK GO
4.1 Powering On/Off
Once all modules are securely installed and correctly powered, connect the power adapter to a wall outlet. Flip the power switch on the rear of the EURORACK GO case to the ON position. The power indicator (if present on your modules) should illuminate, indicating power is supplied to your Eurorack system. To power off, flip the switch to the OFF position and then disconnect from the wall outlet.
4.2 Module Compatibility and Power Consumption
The EURORACK GO's power supply is designed to handle a wide range of modules. However, it is crucial to monitor the total power consumption of your installed modules to avoid overloading the power supply. The power supply provides +12 V @ 3 A, -12 V @ 1 A, and +5 V @ 1 A. Exceeding these limits can lead to unstable operation or damage to your modules and the case's power supply.
- Always check the power requirements of each module before installation.
- Calculate the total current draw for +12V, -12V, and +5V across all your modules.
- Ensure your total current draw remains below the specified limits of the EURORACK GO power supply.
5. Maintenance
5.1 Cleaning
Clean the exterior of the EURORACK GO case with a soft, dry cloth. Do not use abrasive cleaners, solvents, or waxes, as these can damage the finish. Ensure no liquids enter the case, especially near the power supply or module connections.
5.2 Storage
When not in use for extended periods, store the EURORACK GO case in a cool, dry environment, away from direct sunlight and extreme temperatures. If possible, use the original packaging for protection.
6. Troubleshooting
| Problem | Possible Cause | Solution |
|---|---|---|
| No power to modules |
|
|
| Modules not functioning correctly (e.g., erratic behavior, no sound) |
|
|
| Difficulty installing modules |
|
|
7. Specifications
- Model Name: EURORACK GO Mobile
- Mounting Space: 280 HP (2 rows x 140 HP)
- Max Module Depth: 40 mm (1.57'') rear row, 62 mm (2.44'') in 60% of front row
- Power Supply Output:
- +12 V @ 3 A
- -12 V @ 1 A
- +5 V @ 1 A
- Power Connectors: 32 keyed connectors
- Dimensions (L x W x H): 28.46 x 12.24 x 4.41 inches (72.29 x 31.09 x 11.20 cm)
- Item Weight: 12 pounds (5.44 kg)
- Material: Metall (Chassis)
- Color: Schwarz (Black)
- Included Components: Case
- Manufacturer: Music Tribe US
- ASIN: B08B7D9DYT
- Date First Available: June 16, 2020
8. Warranty and Support
For detailed warranty information and technical support, please refer to the official Behringer website or contact their customer service directly. Specific warranty terms may vary by region and purchase date.
Behringer Official Website: www.behringer.com
Related documentsEURORACK GO


Ask a question about this manual
Ask about setup, troubleshooting, compatibility, parts, safety, or missing instructions. Manuals+ will review the question and use this page’s manual context to help answer it.