
Ipega PG-9069
Ipega PG-9069 Bluetooth Gamepad
User Instruction Manual
1. Introduction
Thank you for purchasing the Ipega PG-9069 Bluetooth Gamepad. This controller is designed to enhance your gaming experience across various platforms, including Android, iOS, and PC. It features a built-in touchpad, dual motor vibration, and a stretchable phone bracket for versatile use. Please read this manual carefully before using the product to ensure proper operation and to maximize its potential.

Figure 1: Ipega PG-9069 Bluetooth Gamepad
This image displays the Ipega PG-9069 Bluetooth Gamepad from an angled perspective, showcasing its ergonomic design, dual joysticks, D-pad, action buttons, and the central touchpad. The Ipega logo is visible on the left handle.
2. Package Contents
Please check the package contents upon unboxing:
- 1 x Ipega PG-9069 Bluetooth Gamepad
- 1 x Micro USB Charging Cable (90cm)
- 1 x Stretchable Phone Bracket
- 1 x User Manual (this document)
3. Product Features
- Wide Compatibility: Supports Bluetooth-enabled Android tablets, phones, TV boxes, smart TVs, VR devices, iOS phones/tablets, Mac OSX PCs, and Windows 7/8/10/XP.
- Precise Control: Built-in Hall sensors in L2 and R2 keys for more accurate and responsive control.
- Vibration Feedback: Dual motor vibration function provides immersive feedback (available when wired to PC in X-INPUT mode only).
- Enhanced Gameplay: Features Turbo and Macro modes for customized and exciting game experiences.
- Integrated Touchpad: Mouse touch function for convenient navigation on Android and PC platforms.
- Ergonomic Design: Designed for comfortable and extended gaming sessions.
- Mobile Gaming Ready: Includes a stretchable phone bracket for attaching smartphones.
4. Controls and Functions
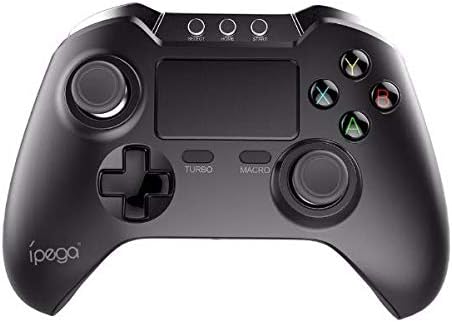
Figure 2: Top view of the Ipega PG-9069 Gamepad
This image provides a clear top-down view of the Ipega PG-9069 Gamepad, highlighting the layout of its buttons and controls. Visible elements include the dual analog sticks, D-pad, action buttons (A, B, X, Y), central touchpad, and the Turbo and Macro buttons.
- Left Analog Stick: Used for movement and camera control.
- Right Analog Stick: Used for camera control or aiming.
- D-Pad (Directional Pad): For precise directional input.
- Action Buttons (A, B, X, Y): For in-game actions.
- L1/R1 Buttons: Shoulder buttons.
- L2/R2 Triggers: Analog triggers with Hall sensors for precise input.
- HOME Button: Power on/off, mode switching.
- SELECT/BACK Button: Varies by game/platform.
- START Button: Varies by game/platform.
- TURBO Button: Activates/deactivates turbo function for rapid firing.
- MACRO Button: Used to program and execute macro sequences.
- Touchpad: Functions as a mouse on compatible systems (Android/PC).
- Charging Port (Micro USB): Located on the front edge.
5. Setup and Connection
5.1. Charging the Controller
Before first use, fully charge the controller. Connect the supplied Micro USB cable to the controller's charging port and the other end to a USB power source (e.g., computer USB port, USB wall adapter). The charging indicator light will illuminate during charging and turn off when fully charged. Charging time is approximately 2 hours.
5.2. Bluetooth Pairing
The PG-9069 supports various Bluetooth pairing modes:
- Android Standard Mode: Press and hold the X + HOME buttons simultaneously until the indicator light flashes rapidly. Search for "PG-9069" on your Android device's Bluetooth settings and connect.
- iOS Mode: Press and hold the Y + HOME buttons simultaneously until the indicator light flashes rapidly. Search for "PG-9069" on your iOS device's Bluetooth settings and connect.
- PC (Bluetooth Dongle Required): For PC, it is recommended to use a wired connection for optimal performance, especially for vibration. If using Bluetooth, ensure your PC has Bluetooth capability or use a Bluetooth dongle. Pair as per Android Standard Mode.
Once successfully paired, the indicator light will remain solid.
5.3. Wired Connection (PC Only)
For PC gaming, you can connect the controller directly via the Micro USB cable. This mode supports dual motor vibration. Simply connect the controller to your PC using the provided USB cable. The controller will be recognized as a standard gamepad (X-INPUT mode).
6. Operating Instructions
6.1. Power On/Off
To power on, press the HOME button. To power off, press and hold the HOME button for 3 seconds until the indicator light turns off.
6.2. Turbo Function
The Turbo function allows for rapid, continuous input of a button press. To activate: Press and hold the desired action button (e.g., A) and then press the TURBO button. To deactivate: Repeat the process.
6.3. Macro Function
The Macro function allows you to record a sequence of button presses and execute them with a single button. Refer to the specific game or application for macro programming details, as implementation may vary.
6.4. Touchpad Function
The central touchpad functions as a mouse on Android and PC platforms. Use your finger to navigate the cursor. Tapping the touchpad acts as a left-click.
6.5. Using the Phone Bracket

Figure 3: Ipega PG-9069 Gamepad with phone mounted
This image shows the Ipega PG-9069 Gamepad with a smartphone securely mounted on its integrated stretchable bracket, demonstrating its use for mobile gaming. The phone displays a game, indicating readiness for play.
Attach the stretchable phone bracket to the designated slot on the controller. Gently extend the bracket to secure your smartphone. Ensure the phone is firmly seated before use.
7. Troubleshooting
- Controller not connecting: Ensure the controller is charged. Verify you are in the correct pairing mode (Android/iOS). Delete previous pairings on your device and try pairing again.
- Input lag or disconnection: Ensure there are no strong electromagnetic interferences nearby. Move closer to the device. Recharge the controller if the battery is low.
- Buttons not responding: Try resetting the controller (if a reset button is available, usually a small pinhole on the back). Re-pair the controller.
- Vibration not working: Ensure you are connected via wired mode to a PC and the game supports vibration feedback.
- Touchpad not working: Ensure you are in a compatible mode (Android/PC) and the application supports mouse input.
8. Specifications
| Parameter | Value |
|---|---|
| Model | PG-9069 |
| Brand | Ipega |
| Connection Type | Bluetooth V3.0, Wired (Micro USB) |
| Compatibility | Android, iOS, PC (Windows 7/8/10/XP, Mac OSX) |
| Battery Type | Built-in Li-polymer Battery |
| Battery Capacity | 380mAh |
| Battery Voltage | 3.7V |
| Charging Time | Approx. 2 hours |
| Working Time | Approx. 12 hours |
| Material | ABS |
| Product Dimensions | 15.40 x 11.50 x 5.50 cm (6.06 x 4.53 x 2.17 inches) |
9. Maintenance
- Clean the controller regularly with a soft, dry cloth. Do not use harsh chemicals or abrasive cleaners.
- Store the controller in a cool, dry place away from direct sunlight and extreme temperatures.
- Avoid dropping the controller or subjecting it to strong impacts.
- Do not attempt to disassemble or modify the controller, as this will void the warranty and may cause damage.
10. Safety Information
- Keep the device away from water and other liquids.
- Do not expose the device to open flames or extreme heat.
- Keep out of reach of children.
- Dispose of the battery according to local regulations. Do not dispose of with household waste.
11. Warranty and Support
This product comes with a standard manufacturer's warranty. Please refer to the warranty card included in your package or contact your retailer for specific warranty terms and conditions. For technical support or inquiries, please contact the Ipega customer service department through their official website or the contact information provided with your purchase.
Related documentsPG-9069


Ask a question about this manual
Ask about setup, troubleshooting, compatibility, parts, safety, or missing instructions. Manuals+ will review the question and use this page’s manual context to help answer it.