
Introduction

Figure 1: ELIVED Single Monitor Arm (Model EV004).
This manual provides detailed instructions for the installation, operation, and maintenance of your ELIVED Single Monitor Arm, Model EV004. Please read this manual thoroughly before installation and use to ensure proper function and safety.
The ELIVED EV004 monitor arm is designed for most flat and curved screens from 13 to 32 inches, supporting monitors up to 9 kg (19.8 lbs) with VESA mounting patterns of 75x75mm or 100x100mm.
Safety Information
- Weight Capacity: Do not exceed the maximum weight capacity of 9 kg (19.8 lbs). Overloading can cause instability, leading to potential injury or equipment damage.
- VESA Compatibility: Ensure your monitor has a VESA mounting pattern of 75x75mm or 100x100mm.
- Desk Thickness: For C-clamp mounting, the desk thickness must be between 10mm and 70mm. For grommet mounting, the desk thickness must be between 10mm and 70mm, and the hole diameter between 10mm and 60mm.
- Gas Spring Tension: Adjust the gas spring tension carefully according to your monitor's weight. Incorrect tension can cause the monitor to drop or spring up unexpectedly. Always hold the arm horizontally during adjustment.
- Assembly: Follow all assembly steps precisely. If any parts are missing or damaged, contact customer support immediately.
- Children: Keep small parts away from children to prevent choking hazards.
Package Contents
Verify that all components are present before beginning installation.
- Monitor Arm Assembly
- C-Clamp Mounting Kit
- Grommet Mounting Kit
- VESA Plate
- Hardware Pack (screws, washers, Allen keys)
- Instruction Manual
Setup and Installation
1. Choose Your Mounting Option
The monitor arm offers two installation methods: C-clamp or Grommet mount. Select the method suitable for your desk.

Figure 2: C-Clamp and Grommet Mounting Options. C-clamp for desk edges, grommet for desks with existing holes.
- C-Clamp Mounting:
- Attach the C-clamp base to the monitor arm pole.
- Secure the C-clamp to the edge of your desk. Ensure the desk thickness is between 10mm and 70mm. Tighten the clamp firmly.
- Grommet Mounting:
- If your desk has a pre-drilled hole (diameter 10mm to 60mm), use the grommet base.
- Assemble the grommet base components and pass the bolt through the desk hole.
- Secure the base from underneath the desk, ensuring the desk thickness is between 10mm and 70mm.

Figure 3: Simplified Installation Steps. 1. Secure the stand to the desktop. 2. Attach the VESA plate to your monitor. 3. Slide the monitor onto the arm. 4. Adjust gas spring tension.
2. Attach VESA Plate to Monitor
Attach the VESA plate to the back of your monitor using the provided screws. Ensure the screws are tightened securely but do not overtighten.

Figure 4: Detachable VESA Plate. The VESA plate easily attaches to the monitor and then slides onto the arm.
3. Mount Monitor to Arm
Carefully slide the monitor (with the attached VESA plate) onto the monitor arm's VESA head. Ensure it clicks into place or is secured with any locking mechanism.
4. Adjust Gas Spring Tension
The gas spring tension needs to be adjusted to match your monitor's weight. This ensures the monitor stays in position and can be moved smoothly.

Figure 5: Gas Spring Tension Adjustment. Use an Allen key to adjust the tension screw. Turn clockwise for lighter monitors (decrease tension), counter-clockwise for heavier monitors (increase tension).
- If the monitor drops after mounting, the tension is too low. Turn the adjustment screw counter-clockwise ("+") to increase tension.
- If the monitor springs up or is difficult to push down, the tension is too high. Turn the adjustment screw clockwise ("-") to decrease tension.
- Always hold the arm in a horizontal position during adjustment to prevent sudden movement.
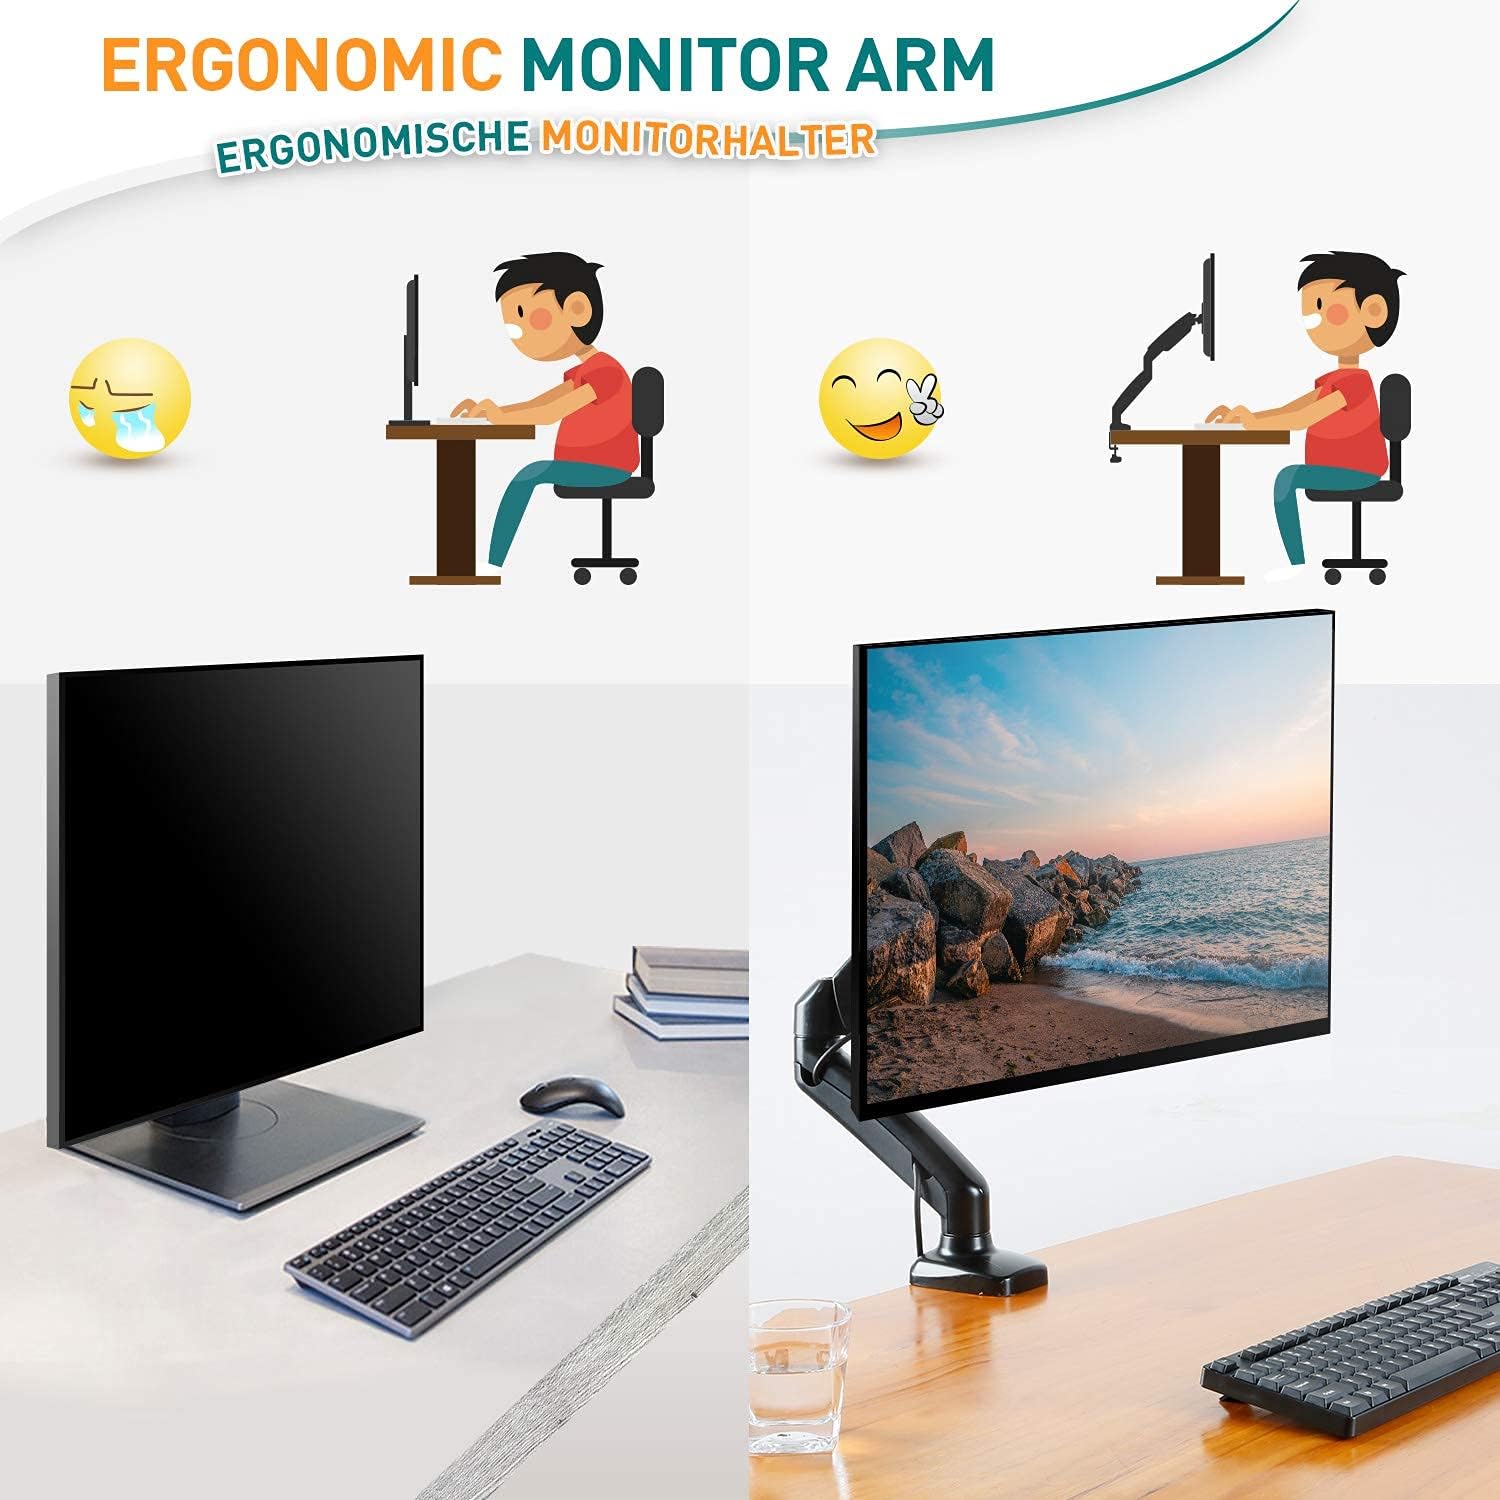
Figure 6: Gas Spring Tension Guide. Refer to this diagram for approximate turns based on monitor weight.
Operating the Monitor Arm
The ELIVED EV004 monitor arm offers extensive adjustability for an ergonomic viewing experience.
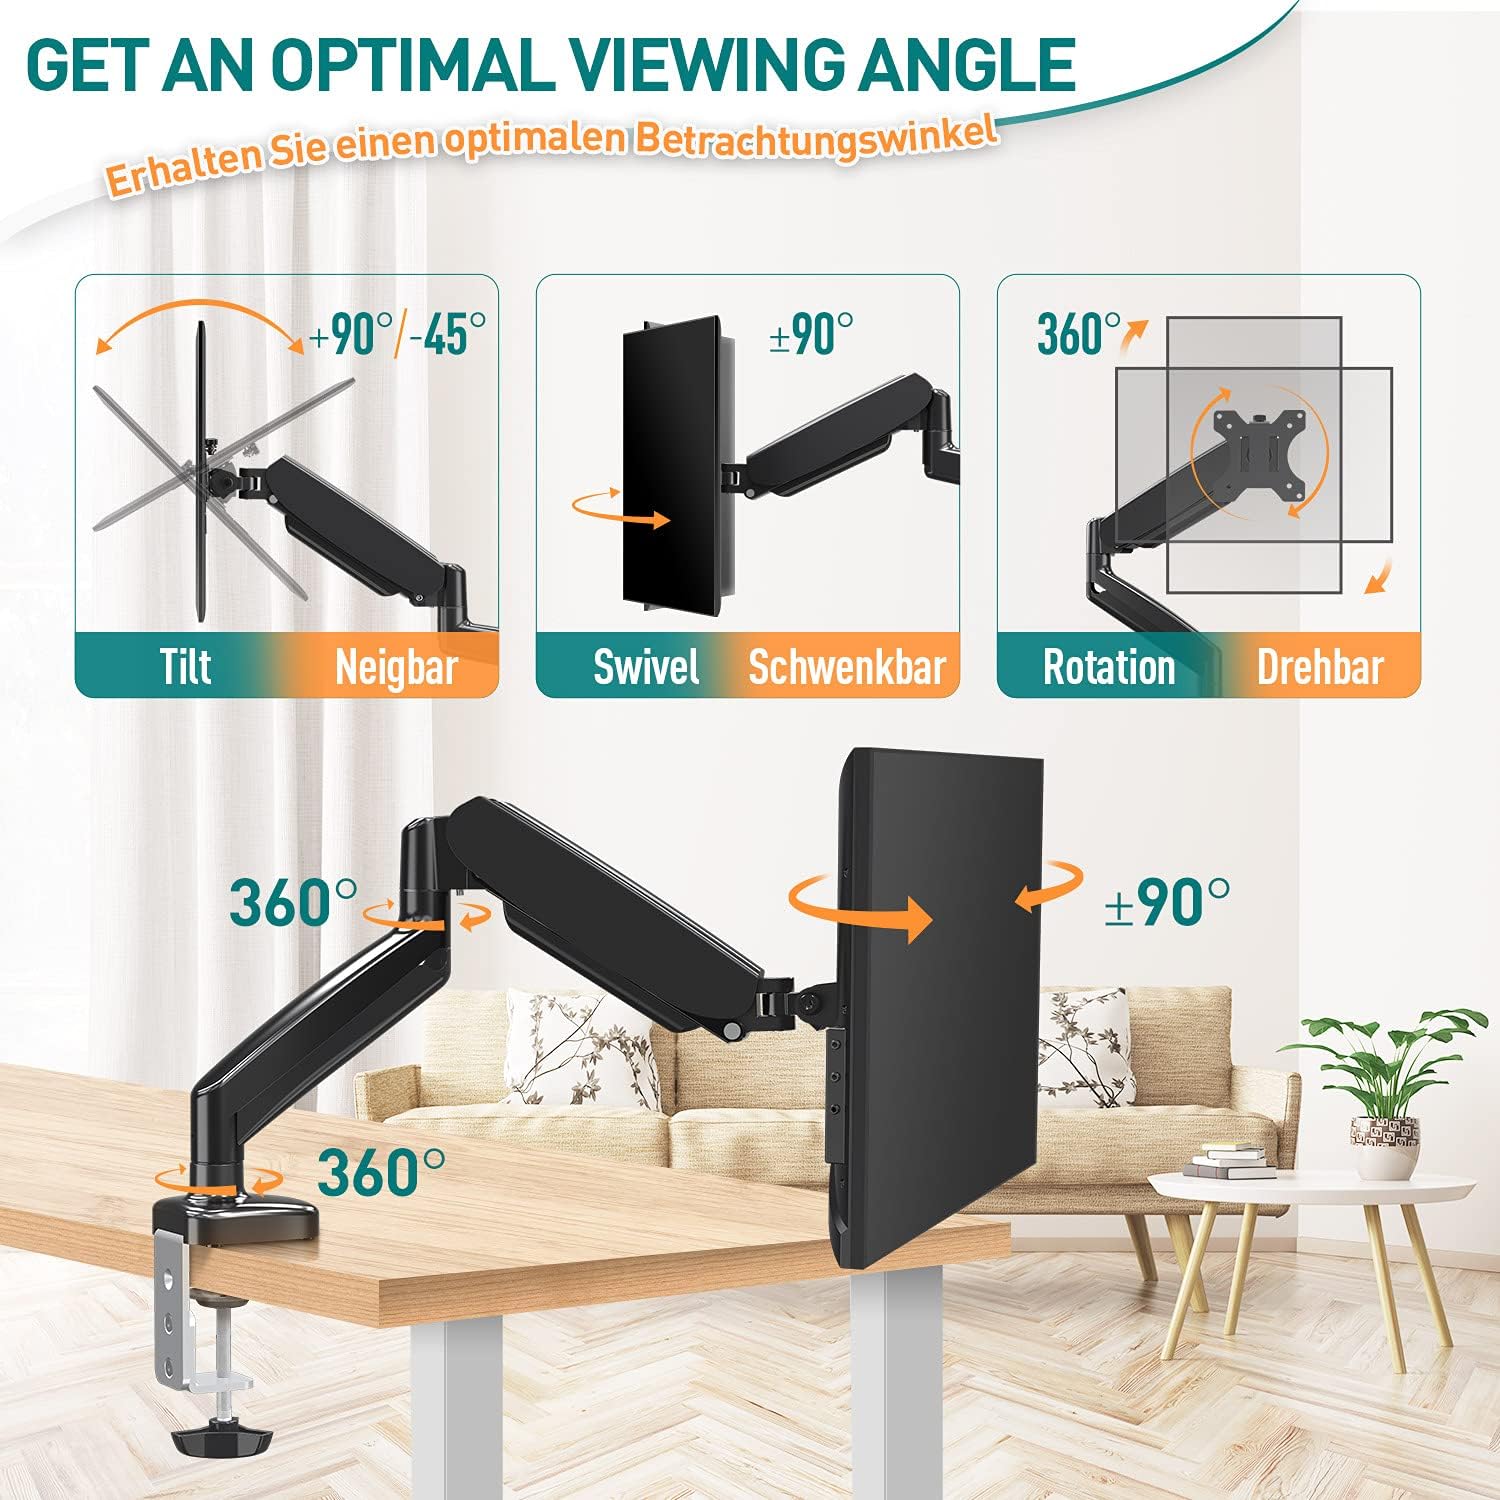
Figure 7: Ergonomic Setup. Achieve an optimal viewing position with the adjustable monitor arm.
Adjustments

Figure 8: Optimal Viewing Angle. The arm allows for tilt, swivel, and rotation adjustments.
- Height Adjustment: The gas spring allows for smooth vertical movement of the monitor. Gently push or pull the monitor to your desired height (up to 440mm adjustment range).
- Arm Extension: The arm can extend up to 490mm, allowing you to position your monitor closer or further away from you.
- Tilt: Adjust the monitor's vertical angle from +70° to -45° to reduce glare and find your preferred viewing angle.
- Swivel: Rotate the monitor horizontally up to 180° (±90°) at the arm joint to share your screen or adjust your viewing direction.
- Rotation: Rotate the monitor 360° at the VESA plate to switch between landscape and portrait orientations.

Tilt (+70°/-45°)

Swivel (180°)

Rotation (360°)
Cable Management
The monitor arm includes integrated cable clips to help organize and conceal monitor cables, maintaining a clean and tidy workspace.

Figure 9: Cable Management. Route cables through the arm clips for a tidy setup.
Maintenance
- Cleaning: Wipe the monitor arm with a soft, damp cloth. Avoid abrasive cleaners or solvents.
- Periodic Checks: Regularly check all screws and connections to ensure they remain tight and secure. Re-tighten if necessary.
- Gas Spring: The gas spring is designed for long-term use and generally requires no maintenance. If adjustments become difficult, re-check the tension setting.
Troubleshooting
| Problem | Possible Cause | Solution |
|---|---|---|
| Monitor drops or sags | Gas spring tension is too low. | Increase gas spring tension by turning the adjustment screw counter-clockwise ("+"). Refer to "Adjust Gas Spring Tension" section. |
| Monitor springs up or is hard to push down | Gas spring tension is too high. | Decrease gas spring tension by turning the adjustment screw clockwise ("-"). Refer to "Adjust Gas Spring Tension" section. |
| Monitor is unstable or wobbles | Mounting clamp/grommet is not tight; VESA screws are loose. | Ensure the desk clamp/grommet is securely tightened. Check and tighten all VESA mounting screws. |
| Monitor cannot be tilted | Tilt mechanism is too tight. | Loosen the tilt adjustment screw slightly (usually located near the VESA plate). |
If you encounter any issues not covered here, please contact ELIVED customer support.
Specifications
| Feature | Detail |
|---|---|
| Model Number | EV004 |
| Brand | ELIVED |
| Screen Size Compatibility | 13 - 32 inches |
| Weight Capacity | Up to 9 kg (19.8 lbs) |
| VESA Compatibility | 75x75mm, 100x100mm |
| Tilt Angle | +70° / -45° |
| Swivel Angle | 180° (±90°) |
| Rotation | 360° |
| Height Adjustment Range | 440 mm |
| Arm Extension Length | 490 mm |
| Mounting Options | C-Clamp, Grommet |
| C-Clamp Desk Thickness | 10 - 70 mm |
| Grommet Desk Thickness | 10 - 70 mm |
| Grommet Hole Diameter | 10 - 60 mm |
| Material | Metal |
Warranty and Support
Warranty: This ELIVED monitor arm comes with a 10-year warranty from the date of purchase, covering manufacturing defects and material flaws under normal use.
Customer Support: For any product or installation issues, please contact ELIVED customer support. Our team is available to assist you with troubleshooting and provide further guidance.
Please retain your proof of purchase for warranty claims.
