
FLAMA 250G000093223
User Manual for FLAMA 1848FL 23L Grill Microwave Oven
Model: 1848FL (Model Number: 250G000093223)
1. Introduction
Thank you for purchasing the FLAMA 1848FL 23L Grill Microwave Oven. This manual provides important information regarding the safe operation, installation, maintenance, and troubleshooting of your new appliance. Please read this manual thoroughly before using the microwave oven and keep it for future reference.
This microwave oven is designed for domestic use and combines microwave cooking with a grill function, offering versatile cooking options for your kitchen.
2. Important Safety Instructions
When using electrical appliances, basic safety precautions should be followed, including the following:
- Read all instructions before using the appliance.
- Do not attempt to operate this oven with the door open as this can result in harmful exposure to microwave energy. It is important not to tamper with the safety interlocks.
- Do not place any object between the oven front face and the door or allow soil or cleaner residue to accumulate on sealing surfaces.
- Do not operate the oven if it is damaged. It is particularly important that the oven door closes properly and that there is no damage to the: (1) door (bent), (2) hinges and latches (broken or loosened), (3) door seals and sealing surfaces.
- The oven should not be adjusted or repaired by anyone except properly qualified service personnel.
- Liquids or other foods must not be heated in sealed containers since they are liable to explode.
- Only use utensils that are suitable for use in microwave ovens.
- When heating food in plastic or paper containers, keep a close watch on the oven due to the possibility of ignition.
- If smoke is observed, switch off or unplug the appliance and keep the door closed in order to stifle any flames.
- This appliance is intended to be used in household and similar applications.
- The contents of feeding bottles and baby food jars shall be stirred or shaken and the temperature checked before consumption, in order to avoid burns.
- Eggs in their shell and whole hard-boiled eggs should not be heated in microwave ovens since they may explode, even after microwave heating has ended.
- The oven should be cleaned regularly and any food deposits removed.
- Failure to maintain the oven in a clean condition could lead to deterioration of the surface that could adversely affect the life of the appliance and possibly result in a hazardous situation.
3. Product Overview
Familiarize yourself with the components of your FLAMA microwave oven.

Figure 3.1: Front view of the FLAMA 1848FL microwave oven, showcasing its black finish, silver handle, and digital control panel.

Figure 3.2: Angled view of the microwave, highlighting the sleek design and the integrated control panel with a digital display and rotary knob.

Figure 3.3: Interior view of the microwave with the door open, showing the spacious 23-liter cavity.

Figure 3.4: Top-down interior view, clearly showing the grill heating element at the top of the cavity.
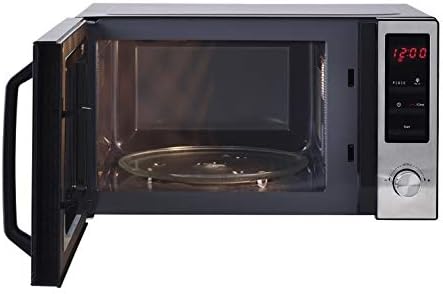
Figure 3.5: Interior view with the glass turntable and its support ring correctly positioned on the cavity floor.
Control Panel Layout:
The control panel features a digital display, function buttons, and a rotary knob for setting time and menu options.
- Digital Display: Shows time, power level, and cooking indicators.
- Function Buttons: Include options for power level, grill, defrost, and start/clear.
- Rotary Knob: Used to adjust cooking time, weight, or select menu programs.
4. Installation and Setup
Unpacking:
- Remove all packaging materials from inside and outside the oven.
- Check the oven for any damage, such as a misaligned or bent door, damaged door seals and sealing surface, broken or loose door hinges and latches, or dents inside the cavity or on the door. If there is any damage, do not operate the oven and contact qualified service personnel.
Placement:
- Place the oven on a flat, stable surface that can support its weight and the heaviest food likely to be cooked in the oven.
- Ensure adequate ventilation. Leave a minimum of 20 cm (8 inches) of space above the oven, 10 cm (4 inches) at the rear, and 5 cm (2 inches) on both sides for proper airflow.
- Do not block or cover any openings on the appliance.
- Do not place the oven near heat sources such as radiators, stoves, or other heat-producing appliances.
- Keep the oven away from strong magnetic fields.
Electrical Connection:
- Ensure the voltage and frequency of your power outlet match the specifications on the oven's rating label.
- Plug the oven into a properly grounded electrical outlet. Do not use extension cords or adapters.
Initial Setup:
- Place the glass turntable and turntable ring inside the oven cavity. Ensure they are correctly seated.
5. Operation Guide
Setting the Clock:
After plugging in the oven, the display will show "0:00" or similar. To set the clock:
- Press the "Clock" button (or similar icon).
- Rotate the rotary knob to set the hour. Press "Clock" again to confirm.
- Rotate the rotary knob to set the minutes. Press "Clock" again to confirm.
Microwave Cooking:
- Place food in a microwave-safe container on the glass turntable. Close the door.
- Press the "Power Level" button repeatedly to select the desired power level (e.g., P100 for full power, P80 for 80% power, etc.).
- Rotate the rotary knob to set the cooking time.
- Press the "Start" button to begin cooking.
Grill Cooking:
The grill function is ideal for browning and crisping food.
- Place food on the grill rack (if provided) or a heat-resistant dish.
- Press the "Grill" button (often labeled 'G' or with a grill icon).
- Rotate the rotary knob to set the grilling time.
- Press the "Start" button to begin grilling.
Combination Cooking:
This oven offers combined microwave and grill cooking for faster and more evenly cooked results with a crispy finish.
- Place food in a suitable container.
- Press the "Combi" button (or similar, often labeled 'C' or with a combi icon) to cycle through combination modes (e.g., C-1, C-2). Refer to the display for specific mode details.
- Rotate the rotary knob to set the cooking time.
- Press the "Start" button to begin combination cooking.
Defrosting:
The oven offers defrost by weight or by time.
- Defrost by Weight: Press the "Defrost" button (often labeled 'Defrost' or with a snowflake icon). Rotate the rotary knob to select the food weight. Press "Start".
- Defrost by Time: Press the "Defrost" button multiple times to select defrost by time. Rotate the rotary knob to set the defrosting time. Press "Start".
Using the Timer:
The timer can be used independently of cooking functions.
- Press the "Timer" button (or similar).
- Rotate the rotary knob to set the desired time.
- Press "Start". The timer will count down without activating the microwave.
6. Cleaning and Maintenance
Regular cleaning and proper maintenance will ensure the longevity and optimal performance of your microwave oven.
Cleaning the Oven Interior:
- Always unplug the oven before cleaning.
- Wipe the interior cavity with a damp cloth after each use. For stubborn stains, use a mild detergent or a microwave-safe cleaner.
- Clean the door, door seals, and sealing surfaces frequently with a soft, damp cloth to remove any spills or spatters.
- The glass turntable and turntable ring can be washed in warm soapy water or in a dishwasher.
- Do not use abrasive cleaners or sharp objects, as they can scratch or damage the oven surfaces.
Cleaning the Oven Exterior:
- Wipe the exterior surface with a soft, damp cloth.
- Avoid getting water into the ventilation openings.
Odor Removal:
To remove odors from the oven, combine a cup of water with the juice of one lemon in a microwave-safe bowl. Microwave on high power for 5-7 minutes. Let it stand in the oven for a few minutes before removing and wiping the interior.
7. Troubleshooting
If you encounter any issues with your microwave oven, refer to the following table for common problems and solutions.
| Problem | Possible Cause | Solution |
|---|---|---|
| Oven will not start | Power cord not plugged in; Fuse blown or circuit breaker tripped; Door not closed properly. | Plug into outlet; Replace fuse or reset circuit breaker; Close door securely. |
| Microwave output low | Incorrect power level selected. | Ensure correct power level is selected for desired cooking. |
| Food not cooking evenly | Food not stirred or rotated; Incorrect cooking time/power. | Stir or rotate food during cooking; Adjust time/power as needed. |
| Light not working | Bulb burned out. | Contact qualified service personnel for replacement. |
| Turntable not rotating | Turntable not properly seated; Obstruction under turntable. | Ensure turntable and ring are correctly placed; Remove any obstructions. |
| Excessive steam from door | Normal during cooking, especially high-moisture foods. | This is normal and not a fault. |
If the problem persists after trying these solutions, please contact customer support.
8. Technical Specifications
- Model: 1848FL
- Model Number: 250G000093223
- Brand: FLAMA
- Capacity: 23 Liters
- Microwave Power Output: 800 W
- Grill Power Output: (Typically 1000W, specific value not provided in data)
- Power Supply: 230V~50Hz (Standard for EU)
- Control Type: Buttons, Rotary Knob
- Color: Black
- Installation Type: Countertop
9. Warranty and Customer Support
Your FLAMA microwave oven is covered by a manufacturer's warranty. Please refer to the warranty card included with your purchase for specific terms and conditions, including the warranty period and coverage details.
For technical assistance, service, or to inquire about replacement parts, please contact FLAMA customer support. Contact information can typically be found on the FLAMA official website or on the product packaging.
For more information about FLAMA products, visit the official FLAMA store on Amazon: FLAMA Store
Related documents250G000093223


Ask a question about this manual
Ask about setup, troubleshooting, compatibility, parts, safety, or missing instructions. Manuals+ will review the question and use this page’s manual context to help answer it.