
Alctron MX-6
Alctron MX-6 Compact 2-Channel Audio Mixer & Headphone Amplifier User Manual
1. Introduction
Thank you for purchasing the Alctron MX-6 Compact 2-Channel Audio Mixer and Headphone Amplifier. This device is designed for versatile audio mixing and monitoring in various applications, including stage performance, studio recording, and personal audio setups. Its compact size and robust construction make it an ideal tool for musicians, producers, and audio enthusiasts.
Please read this manual thoroughly before operating the unit to ensure proper use, optimal performance, and to prevent damage.
2. Safety Information
- Power Supply: Use only the specified DC 12V power adapter. Using an incorrect power supply may damage the unit and void the warranty.
- Water and Moisture: Do not expose the unit to rain, moisture, or any liquids. This can cause electric shock or fire.
- Heat Sources: Keep the unit away from heat sources such as radiators, heat registers, stoves, or other heat-producing appliances.
- Ventilation: Ensure proper ventilation. Do not block any ventilation openings.
- Cleaning: Clean only with a dry cloth. Do not use liquid cleaners or aerosol cleaners.
- Servicing: Do not attempt to service this product yourself. Refer all servicing to qualified service personnel.
3. Key Features
- Compact 2-channel audio mixer
- Integrated headphone amplifier
- TRS (1/4") and RCA stereo input connectors for versatile connectivity
- Independent level adjustable knob for each channel
- Durable heavy-duty metal casing with four EVA pads for stability and longevity
- DC 12V power adapter operation
4. Package Contents
- Alctron MX-6 Mixer/Headphone Amplifier Unit
- DC 12V Power Adapter
- User Manual (this document)
5. Product Overview
Familiarize yourself with the various inputs, outputs, and controls of the Alctron MX-6.
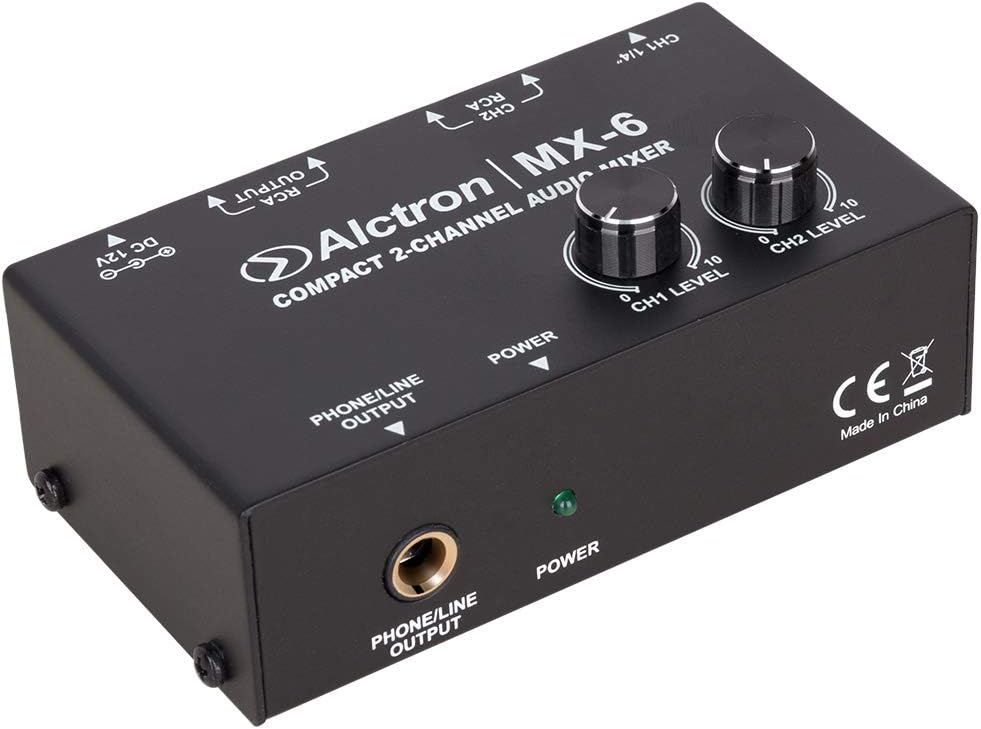
Figure 5.1: Front Panel View. This image displays the top and front of the Alctron MX-6 mixer. Visible controls include the CH1 LEVEL and CH2 LEVEL knobs for adjusting input volumes, and the POWER indicator LED. The front panel features the PHONE/LINE OUTPUT jack for headphones or line-level monitoring.

Figure 5.2: Rear Panel View. This image shows the rear panel of the Alctron MX-6. From left to right, it features the CH1 1/4" (TRS) input, CH2 RCA inputs (left and right), RCA OUTPUTs (left and right), and the DC 12V power input jack.

Figure 5.3: Angled Rear View. This image provides an angled view of the rear panel, highlighting the CH1 1/4" input, CH2 RCA inputs, RCA outputs, and the DC 12V power input. This perspective helps in understanding the layout of the various connection points.
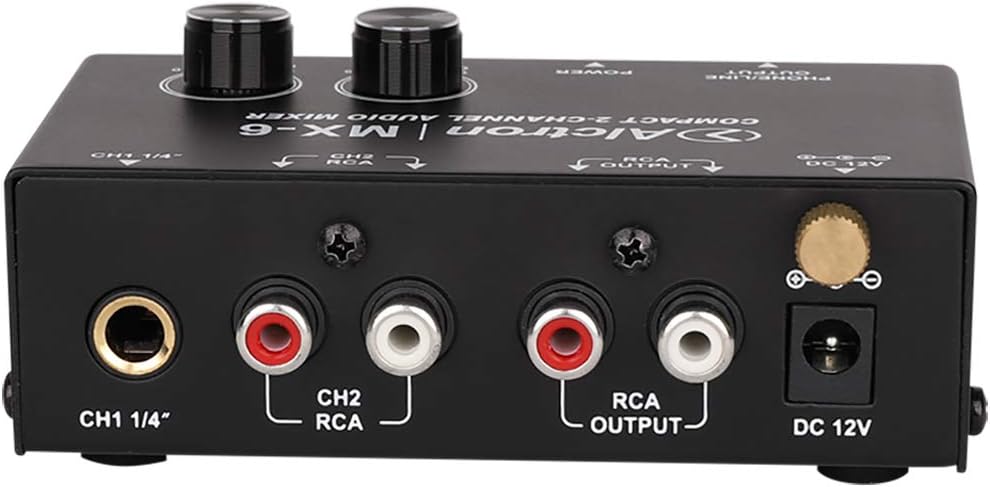
Figure 5.4: Close-up of Rear Connections. A detailed view of the rear panel connections, clearly showing the labels for CH1 1/4" input, CH2 RCA inputs, RCA OUTPUT, and DC 12V power input. This image is useful for identifying specific ports.

Figure 5.5: Front Panel Output and Power. This image focuses on the front panel, showing the PHONE/LINE OUTPUT jack and the green POWER indicator LED. The CE mark and "Made in China" label are also visible on the side.
6. Setup Instructions
- Connect Power: Insert the DC 12V power adapter into the "DC 12V" jack on the rear panel of the MX-6. Plug the adapter into a suitable power outlet. The green POWER LED on the front panel will illuminate.
- Connect Audio Sources:
- Channel 1 (CH1): Connect your audio source (e.g., instrument, microphone preamplifier, line-level device) to the "CH1 1/4"" TRS input jack.
- Channel 2 (CH2): Connect your stereo audio source (e.g., media player, audio interface) to the "CH2 RCA" input jacks (red for right, white for left).
- Connect Audio Outputs:
- RCA Output: Connect the "RCA OUTPUT" jacks to your amplifier, powered speakers, or recording device using RCA cables.
- Headphone/Line Output: Connect your headphones or another line-level monitoring device to the "PHONE/LINE OUTPUT" 1/4" jack on the front panel.
- Initial Level Setting: Before playing audio, ensure both "CH1 LEVEL" and "CH2 LEVEL" knobs are set to their minimum (fully counter-clockwise) position to prevent sudden loud sounds.
7. Operating Instructions
- Power On: Once all connections are made, ensure the power adapter is securely plugged in. The green POWER LED will indicate the unit is on.
- Adjust Channel Levels:
- Start playing audio from your connected sources.
- Slowly turn the "CH1 LEVEL" knob clockwise to increase the volume of the Channel 1 input.
- Slowly turn the "CH2 LEVEL" knob clockwise to increase the volume of the Channel 2 input.
- Adjust both knobs to achieve the desired mix and overall output level.
- Monitoring: Use the headphones connected to the "PHONE/LINE OUTPUT" to monitor the mixed audio. The level of this output is controlled by the individual channel level knobs.
- Power Off: To turn off the unit, simply unplug the DC 12V power adapter from the wall outlet.
8. Maintenance
- Cleaning: Use a soft, dry cloth to clean the exterior of the unit. Do not use abrasive cleaners, solvents, or waxes.
- Storage: When not in use for extended periods, store the MX-6 in a cool, dry place, away from direct sunlight and extreme temperatures.
- Cable Management: Ensure all cables are neatly organized and not under strain to prevent damage to connectors and the unit.
9. Troubleshooting
| Problem | Possible Cause | Solution |
|---|---|---|
| No power (POWER LED off) | Power adapter not connected or faulty; power outlet not working. | Check power adapter connection. Try a different power outlet. Ensure the correct DC 12V adapter is used. |
| No sound from outputs | Input/output cables incorrectly connected; channel level knobs too low; connected device volume too low. | Verify all audio cable connections. Increase "CH1 LEVEL" and "CH2 LEVEL" knobs. Check volume on connected amplifier/speakers/headphones. |
| Distorted sound | Input signal too high; output level too high; faulty cables. | Reduce the input level from the source device. Lower the "CH1 LEVEL" or "CH2 LEVEL" knobs. Try different audio cables. |
10. Specifications
- Model: Alctron MX-6
- Type: Compact 2-Channel Audio Mixer / Headphone Amplifier
- Power Supply: DC 12V Adapter
- Input Connectors: 1x 1/4" TRS (Channel 1), 2x RCA (L/R for Channel 2)
- Output Connectors: 2x RCA (L/R Main Output), 1x 1/4" TRS (Phone/Line Output)
- Controls: CH1 Level Knob, CH2 Level Knob
- Construction: Heavy-duty metal chassis with EVA pads
11. Warranty and Support
Alctron products are designed for reliability and performance. For warranty information and technical support, please refer to the warranty card included with your purchase or visit the official Alctron website. Keep your proof of purchase for any warranty claims.
For further assistance, please contact Alctron customer support through their official channels.
Ask a question about this manual
Ask about setup, troubleshooting, compatibility, parts, safety, or missing instructions. Manuals+ will review the question and use this page’s manual context to help answer it.