
Behringer 140 DUAL ENVELOPE/LFO
Behringer 140 Dual Envelope/LFO Eurorack Module User Manual
Model: 140 DUAL ENVELOPE/LFO
Brand: Behringer
1. Introduction
The Behringer 140 Dual Envelope/LFO is a versatile Eurorack module designed to provide two independent ADSR (Attack, Decay, Sustain, Release) envelope generators and a powerful Low Frequency Oscillator (LFO). This module is an essential tool for shaping the dynamics of your sounds and creating complex modulations within your modular synthesis system. Its intuitive controls and robust design make it suitable for both beginners and experienced modular enthusiasts.
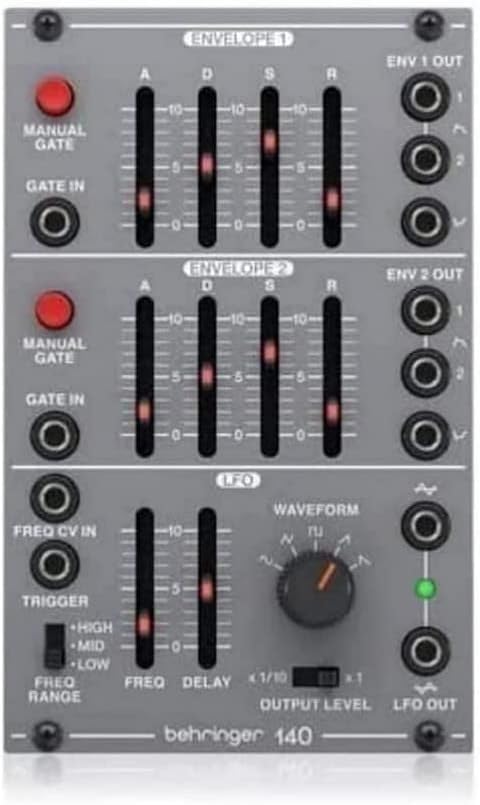
Figure 1: Front panel of the Behringer 140 Dual Envelope/LFO module. This image shows the layout of the two envelope sections at the top and middle, and the LFO section at the bottom, with all controls and jacks clearly visible.
2. Important Safety Instructions
Please read and follow these safety instructions carefully to ensure safe operation and to prevent damage to the module or your Eurorack system.
- Power Supply: Only connect the module to a Eurorack power supply that meets the required specifications (+12V, -12V, +5V if applicable) and provides sufficient current. Incorrect power can damage the module.
- Installation: Ensure your Eurorack case is powered off before installing or removing any modules. Always connect the ribbon cable correctly, paying attention to the red stripe indicating -12V.
- Environment: Do not expose the module to water, moisture, excessive heat, or direct sunlight. Operate in a dry, temperate environment.
- Servicing: Do not attempt to service this module yourself. Refer all servicing to qualified service personnel.
- Connections: Use high-quality patch cables for all connections. Avoid excessive force when inserting or removing cables.
3. Setup
3.1 Unpacking
Carefully remove the Behringer 140 module from its packaging. Verify that all components are present:
- Behringer 140 Dual Envelope/LFO module
- Ribbon power cable
- Mounting screws
3.2 Module Installation
To install the 140 module into your Eurorack case:
- Ensure your Eurorack case's power supply is turned OFF.
- Locate an available space in your Eurorack case that matches the module's width.
- Connect the ribbon power cable to the module's power header. The red stripe on the ribbon cable indicates the -12V line and should align with the corresponding pin on the module's power header (usually marked with a white stripe or 'RED STRIPE -12V').
- Connect the other end of the ribbon cable to your Eurorack power bus board, again ensuring the red stripe aligns with the -12V pin.
- Carefully place the module into the desired position in your Eurorack case.
- Secure the module using the provided mounting screws. Do not overtighten.
- Once installed, you can power on your Eurorack system.

Figure 2: Angled view of the Behringer 140 module, showcasing its compact design and the rear power connector. This perspective helps visualize how the module fits into a Eurorack system.
4. Operating Instructions
4.1 Overview of Controls
The Behringer 140 module is divided into three main sections: two identical ADSR Envelope Generators (ENV 1 and ENV 2) and one Low Frequency Oscillator (LFO).

Figure 3: Top-down view of the Behringer 140 module, highlighting the clear labeling of each control and input/output jack for easy identification during operation.
4.2 Envelope Generators (ENV 1 & ENV 2)
Each envelope generator is an ADSR type, meaning it has four stages: Attack, Decay, Sustain, and Release. These stages control how a sound evolves over time.
- MANUAL GATE Button: Pressing this button manually triggers the envelope, allowing you to test the envelope shape without an external gate signal.
- GATE IN Jack: Connect a gate or trigger signal from another module (e.g., a sequencer or keyboard) to initiate the envelope cycle.
- A (Attack) Slider: Controls the time it takes for the envelope to reach its peak level after being triggered.
- D (Decay) Slider: Controls the time it takes for the envelope to fall from its peak level to the Sustain level.
- S (Sustain) Slider: Controls the level at which the envelope holds as long as the gate signal is high. Unlike Attack and Decay, Sustain is a level, not a time.
- R (Release) Slider: Controls the time it takes for the envelope to fall from the Sustain level (or current level if the gate is released during Attack/Decay) to zero after the gate signal goes low.
- ENV OUT Jack: Outputs the generated envelope voltage, which can be patched to control parameters like VCA amplitude, filter cutoff, or pitch.
4.3 Low Frequency Oscillator (LFO)
The LFO section generates periodic control voltages at sub-audio frequencies, ideal for creating rhythmic or evolving modulations.
- FREQ CV IN Jack: Accepts an external control voltage to modulate the LFO's frequency.
- TRIGGER Switch: This switch can be used to reset the LFO cycle.
- FREQ RANGE Switch (HIGH/MID/LOW): Selects the overall frequency range of the LFO. Use HIGH for faster modulations, LOW for very slow, evolving changes.
- FREQ Slider: Adjusts the LFO's frequency within the selected range.
- DELAY Slider: Controls the time it takes for the LFO to reach its full amplitude after being triggered.
- WAVEFORM Knob: Selects one of five available LFO waveforms: Sine, Triangle, Square, Ramp, and Sawtooth. Each waveform has a distinct characteristic for modulation.
- OUTPUT LEVEL Slider: Adjusts the amplitude (strength) of the LFO output voltage.
- LFO OUT Jack: Outputs the generated LFO voltage, which can be patched to modulate various parameters in your modular system.
4.4 Basic Operation Examples
Here are some basic patching ideas to get started:
- Amplitude Modulation: Patch an ENV OUT to the CV input of a VCA (Voltage Controlled Amplifier) and the VCA's output to your mixer. This will shape the volume of your sound.
- Filter Sweeps: Patch an ENV OUT or LFO OUT to the CV input of a VCF (Voltage Controlled Filter) to create dynamic filter sweeps.
- Pitch Modulation (Vibrato/Glide): Patch an LFO OUT (especially Sine or Triangle waveform) to the 1V/Oct input of a VCO (Voltage Controlled Oscillator) for vibrato effects. For glide, use an envelope.
- Rhythmic Effects: Use a Square wave LFO to trigger another module, or to create rhythmic on/off patterns with a VCA.
5. Maintenance
The Behringer 140 module is designed for durability and requires minimal maintenance. Follow these guidelines to keep your module in optimal condition:
- Cleaning: Use a soft, dry cloth to wipe down the module's front panel. For stubborn dirt, a slightly damp cloth with a mild cleaning solution can be used, but ensure no liquid enters the module. Avoid abrasive cleaners.
- Dust: Regularly remove dust from the module and your Eurorack case using a soft brush or compressed air. Dust accumulation can affect performance and longevity.
- Storage: If storing the module outside of a Eurorack case, keep it in an anti-static bag or a protective container to prevent dust and static damage.
- Jacks and Sliders: Keep all jacks and sliders free from dust and debris. Avoid spraying contact cleaner directly into the module unless specifically instructed by a qualified technician.
6. Troubleshooting
If you encounter issues with your Behringer 140 module, consult the table below for common problems and their solutions.
| Problem | Possible Cause | Solution |
|---|---|---|
| No output from Envelope Generator | No gate signal received or ADSR settings are too short. | Ensure a gate signal is connected to the GATE IN jack or press the MANUAL GATE button. Adjust Attack, Decay, and Release sliders to longer times. |
| LFO not oscillating or very slow | FREQ slider is too low or FREQ RANGE switch is set to LOW. | Increase the FREQ slider. Try setting the FREQ RANGE switch to MID or HIGH. |
| Module not powering on | Incorrect power cable connection or insufficient power from the Eurorack case. | Turn off case power. Verify the ribbon cable is connected correctly (red stripe to -12V) on both the module and the bus board. Check your case's power supply capacity. |
| Unexpected behavior or erratic output | Loose connections, static discharge, or module conflict. | Ensure all patch cables are securely connected. Power cycle your Eurorack system. If the issue persists, try the module in a different slot or with fewer modules connected. |
7. Specifications
Detailed technical specifications for the Behringer 140 Dual Envelope/LFO module:
| Feature | Detail |
|---|---|
| Model | 140 DUAL ENVELOPE/LFO |
| Module Type | Dual Envelope Generator / LFO |
| Envelope Types | ADSR (Attack, Decay, Sustain, Release) |
| LFO Waveforms | Sine, Triangle, Square, Ramp, Sawtooth |
| Dimensions (L x W x H) | 6.15 x 3.85 x 2.05 inches (156 x 98 x 52 mm) |
| Item Weight | 8.2 ounces (0.23 kg) |
| Color | Grey |
| Connector Type | Auxiliary (for patch cables) |
| Manufacturer | Music Tribe |
8. Warranty and Support
Behringer products are built to high standards and come with a limited warranty. For specific warranty terms and conditions, please refer to the warranty information provided with your purchase or visit the official Behringer website.
For technical support, service, or to find authorized service centers, please visit the Behringer support page on their official website. You can also find FAQs, drivers, and software updates there.
Online Support: www.behringer.com
Related documents140 DUAL ENVELOPE/LFO


Ask a question about this manual
Ask about setup, troubleshooting, compatibility, parts, safety, or missing instructions. Manuals+ will review the question and use this page’s manual context to help answer it.