1. Introduction
This manual provides essential information for the proper installation, operation, and maintenance of your Gamdias Kratos E1-500 ARGB 500W Power Supply. Please read this manual thoroughly before using the product to ensure safe and efficient operation. The Kratos E1-500 is designed to provide stable power to your computer system with 80% energy efficiency and integrated Addressable RGB lighting.
2. Safety Information
- Always disconnect the power supply from the AC outlet before installation or maintenance.
- Do not open the power supply unit. High voltages are present inside, and opening the casing will void the warranty.
- Ensure proper grounding for the power supply and your computer system.
- Install the power supply in a well-ventilated area, away from heat sources and moisture.
- Use only the cables provided with the power supply.
- Do not overload the power supply. Ensure your system's power requirements do not exceed the PSU's rated wattage.
3. Package Contents
- Gamdias Kratos E1-500 ARGB 500W Power Supply Unit
- AC Power Cord
- Mounting Screws
- User Manual
4. Product Overview
The Gamdias Kratos E1-500 is a 500W power supply featuring 80% efficiency, a non-modular cabling system, and integrated Addressable RGB lighting. It includes a pre-installed RGB fan hub with 30 built-in effects and supports motherboard synchronization for customizable lighting.
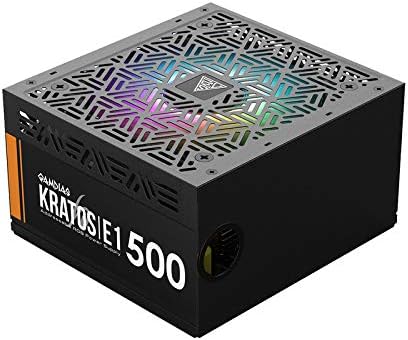
Figure 4.1: Angled view of the Gamdias Kratos E1-500 ARGB 500W Power Supply, showcasing its black casing and RGB fan.

Figure 4.2: Front view of the Kratos E1-500, highlighting key features such as Addressable RGB, Silent Mode operation, Built-in RGB Lighting Effects, and Circuit Protections.

Figure 4.3: Front view of the Kratos E1-500, illustrating its compatibility with various motherboard RGB synchronization technologies including ASUS Aura Sync, RGB Fusion 2.0, Biostar Vivid LED DJ, MSI Mystic Light Sync, and ASRock Polychrome Sync.

Figure 4.4: Rear panel of the Kratos E1-500, showing the AC power input, a 230V voltage selector switch, the main power ON/OFF switch, and a dedicated RGB Lighting button for controlling built-in effects.

Figure 4.5: Internal view of the Kratos E1-500, highlighting its DC to DC design and robust power components for stable voltage delivery.
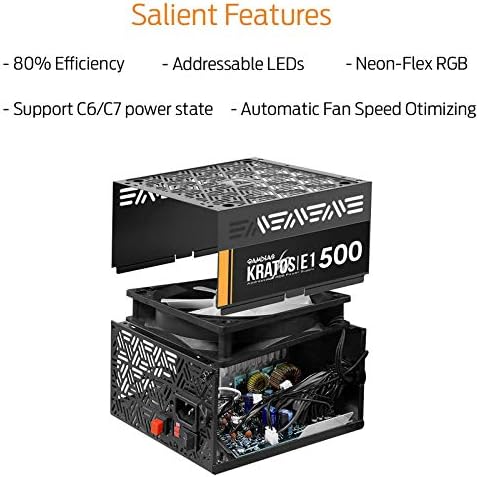
Figure 4.6: Exploded diagram of the Kratos E1-500, illustrating its internal structure and key features such as 80% Efficiency, Addressable LEDs, Neon-Flex RGB, support for C6/C7 power states, and Automatic Fan Speed Optimization.
5. Setup and Installation
5.1 Mounting the Power Supply
- Ensure your computer case has a designated power supply mounting area.
- Orient the power supply so its fan faces the intended direction (usually downwards for bottom-mounted PSUs, or inwards for top-mounted, depending on case design for optimal airflow).
- Secure the power supply to the case using the provided mounting screws.
5.2 Connecting Cables
The Kratos E1-500 features a non-modular cabling system. Connect the following cables to your motherboard and components:
- 1 x ATX Connector (20+4 pin): Connect to the main power socket on your motherboard.
- 1 x EPS12V Connector (4+4 pin): Connect to the CPU power socket on your motherboard.
- 2 x PCIe Connector (6+2 pin): Connect to your graphics card(s) if required.
- 5 x SATA Connector: Connect to SATA devices such as SSDs, HDDs, and optical drives.
- 2 x Molex Connector: Connect to older peripherals or case fans.
- 1 x Floppy Connector: For legacy devices, if applicable.
- ARGB Sync Cable (5V 3-pin): If your motherboard supports Addressable RGB synchronization, connect this cable to the appropriate 5V 3-pin header on your motherboard. This allows software control of the PSU's RGB lighting.
5.3 Initial Power Up
- Double-check all cable connections to ensure they are secure.
- Connect the AC power cord to the power supply and then to a wall outlet.
- Ensure the 230V switch on the rear panel is set correctly for your region's voltage.
- Flip the main power switch on the rear of the PSU to the 'ON' (I) position.
- Power on your computer system.
6. Operating Instructions
6.1 RGB Lighting Control
The Kratos E1-500 features integrated Addressable RGB lighting. You can control the lighting in two ways:
- Built-in Effects: Press the 'RGB Lighting' button on the rear panel of the power supply to cycle through 30 pre-programmed RGB effects, including various colors, rainbow, and multi-color modes. You can also turn the lighting off using this button.
- Motherboard Sync: If you have connected the 5V 3-pin ARGB sync cable to a compatible motherboard header, you can control the PSU's RGB lighting using your motherboard's RGB software (e.g., ASUS Aura Sync, MSI Mystic Light Sync, GIGABYTE RGB Fusion, ASRock Polychrome Sync, Biostar Vivid LED DJ). Ensure the motherboard software is installed and configured correctly.
6.2 Fan Speed Optimization
The power supply features automatic fan speed optimization. The fan speed adjusts based on the internal temperature and load, ensuring efficient cooling while minimizing noise during lighter loads.
7. Maintenance
- Cleaning: Periodically clean the exterior of the power supply and its fan grille to prevent dust buildup. Use a soft, dry cloth or compressed air. Ensure the power supply is disconnected from the AC outlet before cleaning.
- Airflow: Ensure that the power supply's intake and exhaust vents are not obstructed to maintain proper airflow and cooling.
- Do not use liquid cleaners or solvents on the power supply.
8. Troubleshooting
8.1 No Power
- Check if the AC power cord is securely connected to both the power supply and the wall outlet.
- Ensure the main power switch on the PSU is in the 'ON' (I) position.
- Verify the 230V switch is set correctly for your region.
- Confirm that the motherboard's 20+4 pin and 4+4 pin CPU power connectors are properly seated.
- Test the wall outlet with another device to ensure it is functional.
8.2 RGB Lighting Not Working
- If using the built-in effects, press the 'RGB Lighting' button on the rear panel to cycle through modes.
- If using motherboard sync, ensure the 5V 3-pin ARGB sync cable is correctly connected to the motherboard.
- Verify that your motherboard's RGB software is installed and configured to control the external ARGB header.
- Check for any loose connections in the ARGB cable.
8.3 System Instability / Random Shutdowns
- Ensure all power connectors to components (motherboard, CPU, GPU, drives) are firmly connected.
- Verify that the total power draw of your components does not exceed the 500W capacity of the power supply.
- Check for proper ventilation within your computer case to prevent overheating.
9. Specifications
| Feature | Specification |
|---|---|
| Model | KRATOS E1-500 |
| Brand | GAMDIAS |
| Wattage | 500 Watts |
| Efficiency | 80% |
| Form Factor | ATX |
| Cooling Method | Air |
| Power Supply Design | Non-Modular |
| RGB Lighting | Addressable RGB (Neon-Flex RGB) |
| Motherboard Sync | 5V 3-pin ARGB Header |
| ATX Connector | 1 (20+4 pin) |
| EPS12V Connector | 1 (4+4 pin) |
| PCIe Connector | 2 (6+2 pin) |
| SATA Connector | 5 |
| Molex Connector | 2 |
| Floppy Connector | 1 |
| Product Dimensions | 28 x 29 x 13 cm |
| Item Weight | 1.64 Kilograms |
10. Warranty and Support
GAMDIAS products are designed and manufactured to the highest quality standards. For warranty information and technical support, please refer to the official GAMDIAS website or contact your local retailer. Keep your proof of purchase for warranty claims.


