Product Overview
The Progress Lighting Eclipse LED Wall Sconce, model P710090-009-30, is a contemporary lighting fixture designed for both residential and commercial applications. It features a satin white glass shade in a half-moon silhouette, complemented by a beveled brushed nickel metal frame.

Image: Front view of the Progress Lighting Eclipse LED Wall Sconce, showcasing its brushed nickel finish and satin white glass shade.

Image: Side profile of the wall sconce, highlighting its half-moon design and depth.
Setup and Installation
Important Safety Information: Read all instructions carefully before beginning installation. Turn off electrical power at the main circuit breaker panel before installing or servicing this fixture. Consult a qualified electrician to ensure correct branch circuit connections and compliance with all local electrical codes.
This fixture is suitable for damp locations.
Components Checklist:
- Fixture Assembly (A)
- Mounting Plate (B)
- Outlet Box Screws (C)
- Mounting Screws (D)
- Wire Nuts (E)
- Ground Screw (F)
- Glass Shade (G)
- Shade Screws (H)
Installation Steps:
- Prepare for Installation: Ensure power is off at the circuit breaker. Carefully unpack all components and inspect for any damage.
- Attach Mounting Plate: Secure the mounting plate (B) to the electrical outlet box using the provided outlet box screws (C).
- Wiring Connections:
- Connect the white wire from the fixture to the white (marked or ribbed) supply wire using a wire nut (E).
- Connect the black wire from the fixture to the black (or smooth) supply wire using a wire nut (E).
- Connect the bare copper or green ground wire from the fixture to the green ground screw (F) on the mounting plate, then to the bare copper or green supply ground wire.
- Mount Fixture: Carefully align the fixture assembly (A) with the mounting plate and secure it using the mounting screws (D).
- Install Glass Shade: Place the glass shade (G) onto the fixture and secure it with the shade screws (H).
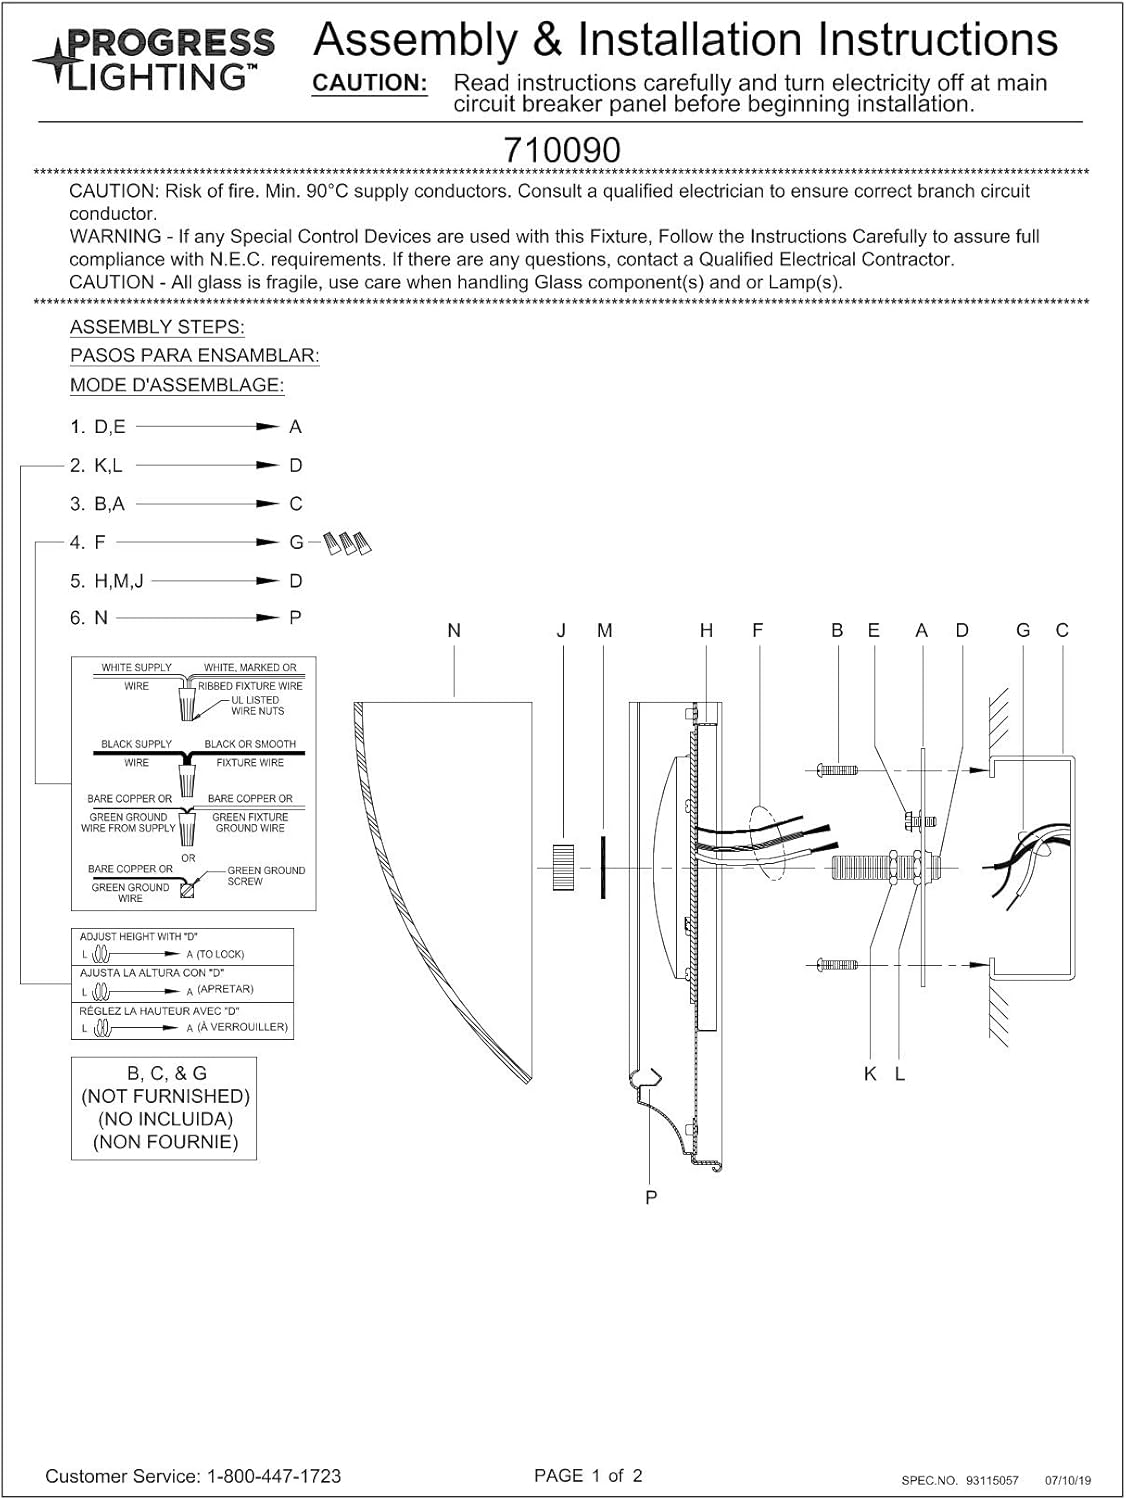
Image: Detailed diagram illustrating the assembly steps and wiring connections for the wall sconce. Refer to this diagram for visual guidance during installation.

Image: Rear view of the sconce, showing the integrated LED module and mounting points before installation.

Image: Close-up of the integrated LED light source, which is designed for long-term performance and energy efficiency.
Operating Instructions
This LED wall sconce is designed for simple operation. Once properly installed and wired to a standard wall switch, the fixture can be turned on and off using that switch. The integrated LED light source provides consistent illumination without the need for bulb replacement.
Maintenance
To maintain the appearance and performance of your Progress Lighting Eclipse LED Wall Sconce, follow these guidelines:
- Cleaning: Turn off power to the fixture before cleaning. Wipe the metal frame with a soft, dry cloth. For the glass shade, use a soft cloth dampened with a mild, non-abrasive glass cleaner. Avoid harsh chemicals or abrasive materials that could damage the finish or glass.
- LED Module: The LED module is integrated and does not require user maintenance or replacement. Do not attempt to disassemble the LED component.
- Inspection: Periodically check all connections and mounting hardware to ensure they remain secure.
Troubleshooting
If your wall sconce is not functioning as expected, consider the following common issues and solutions:
- Light does not turn on:
- Ensure the wall switch is in the 'ON' position.
- Check the circuit breaker to confirm power is supplied to the fixture.
- Verify all wiring connections are secure and correctly made according to the installation instructions. If unsure, consult a qualified electrician.
- Light flickers or dims:
- Ensure the fixture is not connected to an incompatible dimmer switch. This fixture is designed for 120V operation and may not be compatible with all dimmer types.
- Check for loose wiring connections.
If these steps do not resolve the issue, contact customer service for further assistance.
Specifications
| Feature | Detail |
|---|---|
| Brand | Progress Lighting |
| Model Number | P710090-009-30 |
| Color | Brushed Nickel (Frame), Satin White (Shade) |
| Material | Alloy Steel (Frame), Glass (Shade) |
| Light Fixture Form | Sconce |
| Room Type | Living Room, Residential, Commercial |
| Indoor/Outdoor Usage | Outdoor (Suitable for damp locations) |
| Power Source | AC |
| Light Source Type | Integrated LED |
| Finish Type | Finished |
| Number of Light Sources | 1 |
| Voltage | 120 Volts |
| Wattage | 17 watts |
| Color Temperature | 3000 Kelvin |
| Lumen Output | 1211 Lumens |
| Life (Hours) | 50,000 (L70/TM-21) |
| Switch Type | Touch (Refers to general control, not integrated into fixture) |
| Mounting Type | Protruding |
| Assembly Required | Yes |
| Item Weight | 2.79 pounds |
| Dimensions (W x H x D) | 15.5 inches x 7.5 inches x 4 inches |
| Certifications | ADA, Energy Star, cCSAus Damp location listed, Meets California Title 24 JA8-2016 |

Image: Technical line drawing displaying the width (15.5 inches), height (7.5 inches), and depth (4 inches) of the wall sconce.

Image: Official product specification sheet providing detailed technical data and dimensions for the P710090-009-30 model.
Warranty Information
This Progress Lighting product is covered by a 5-year Limited Warranty. This warranty guarantees your satisfaction with the purchase and includes professional after-sales customer service support. For specific terms and conditions, please refer to the warranty documentation included with your product or contact customer service.
Customer Support
For any questions, technical assistance, or warranty claims, please contact Progress Lighting customer service:
- Phone: 1-800-447-1723
- Website: Visit the official Progress Lighting website for additional resources and contact options.


