1. Introduction
This manual provides detailed instructions for the safe and effective use of the BSIDE ADMS7 Smart Digital Multimeter and the accompanying AVD06 Voltage Detector. The ADMS7 is a compact, auto-identifying digital multimeter designed for various electrical measurements, featuring a large 3-line LCD display and an analog bargraph. The AVD06 is a non-contact voltage detector for identifying live and neutral wires.
2. Safety Information
WARNING: To avoid possible electric shock, fire, or personal injury, please read all safety information before using the product.
- Always adhere to local and national safety codes.
- Do not use the device if it appears damaged or if the test leads are damaged.
- Do not apply more than the rated voltage, as marked on the meter, between terminals or between any terminal and earth ground.
- Use caution when working with voltages above 30V AC RMS, 42V peak, or 60V DC. These voltages pose a shock hazard.
- Keep fingers behind the finger guards on the test probes during use.
- Replace the battery immediately when the low battery indicator appears to ensure accurate readings.
- Do not operate the meter in explosive gas, vapor, or dust environments.
3. Product Features

This image displays the BSIDE ADMS7 Smart Digital Multimeter on the right, featuring its large LCD screen, function buttons, and test lead inputs. To the left is the AVD06 Voltage Detector, showing its sensitivity dial and LED indicators. Both devices are presented alongside their respective test leads, highlighting the complete kit.
- Phone Size Design: Super-thin body and pocket-size design for portability and ease of use in various settings.
- Large Screen 3-Line Display: The large LCD screen can simultaneously display up to three test results, such as voltage, frequency, and an analog bar graph, for comprehensive readings.
- Automatic Identification Design: Automatically detects and measures AC/DC voltage, frequency (Hz), continuity, and resistance without requiring manual mode switching.
- Flashlight Design: Integrated flashlight for improved visibility in dimly lit work areas.
- Hang Hole Design: Allows for convenient storage and portability.
- Unibody Design: Eliminates the need to plug and unplug probes, saving time and preventing incorrect connections that could damage the multimeter.
4. Components and Package Contents
The package typically includes:
- BSIDE ADMS7 Smart Digital Multimeter
- AVD06 Voltage Detector
- Test Leads (Red and Black)
- User Manual (this document)
- Carrying Pouch (may vary by package)
5. Setup
5.1 Battery Installation (ADMS7 Multimeter)
The ADMS7 Multimeter is powered by internal batteries. If the low battery indicator appears on the display, replace the batteries. Refer to the maintenance section for battery replacement instructions.
5.2 Connecting Test Leads (ADMS7 Multimeter)
- Ensure the multimeter is powered off before connecting or disconnecting test leads.
- The ADMS7 features a unibody design with integrated test leads. Ensure they are securely attached to the meter.
- For most measurements, the red lead is for the positive (+) connection and the black lead is for the negative (-) or common connection.
5.3 Battery Installation (AVD06 Voltage Detector)
The AVD06 Voltage Detector requires batteries for operation. Open the battery compartment (usually at the rear or base) and insert the specified battery type, observing polarity. Close the compartment securely.
6. Operating Instructions (BSIDE ADMS7 Multimeter)
6.1 Power On/Off
Press the power button (⏻) to turn the multimeter on or off. The device features an auto-power-off function to conserve battery life.
6.2 Automatic Identification Mode
The ADMS7 automatically identifies the measurement type (AC/DC voltage, resistance, continuity, frequency) when the test leads are connected to a circuit. No manual range or function selection is typically required for these basic measurements.
6.3 AC Voltage and Frequency Measurement

This image shows the BSIDE ADMS7 Multimeter displaying an AC voltage reading of "228.8 V" and a frequency reading of "50.0 Hz". The multimeter is held by a gloved hand, with its test leads connected to electrical wiring, demonstrating its capability to automatically identify and display both voltage and frequency simultaneously in AC mode.
- Ensure the test leads are properly connected.
- Touch the red test lead to the live terminal and the black test lead to the neutral terminal of the AC circuit.
- The multimeter will automatically display the AC voltage and frequency on the screen.
6.4 DC Voltage Measurement
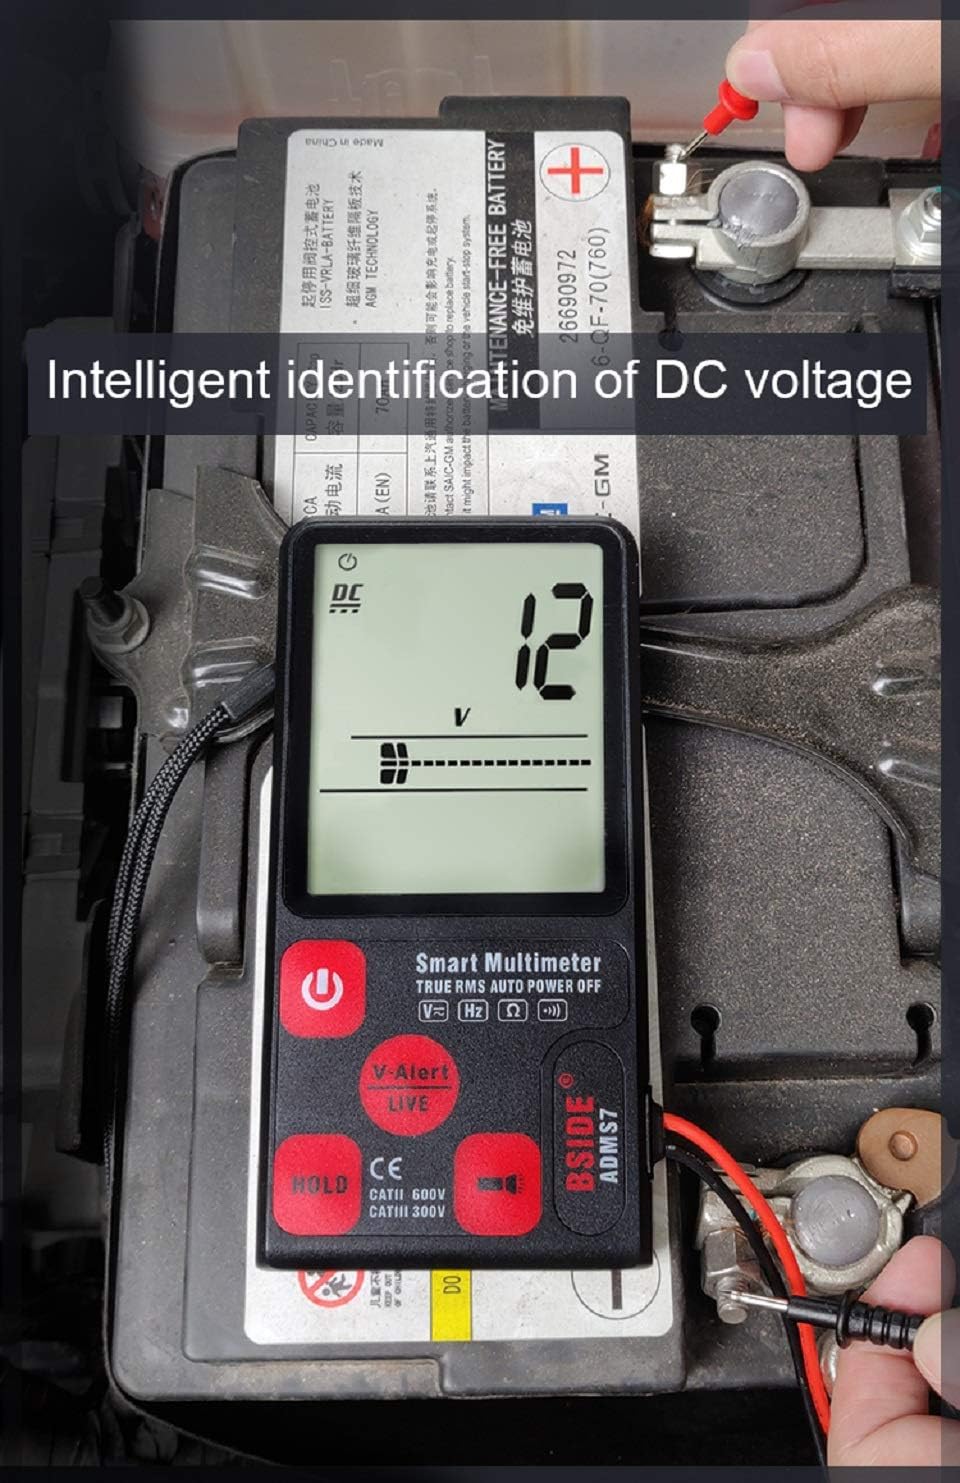
This image illustrates the BSIDE ADMS7 Multimeter measuring DC voltage. The display shows "12 V", indicating a 12-volt DC reading. The multimeter's test leads are connected to the terminals of a car battery, demonstrating its automatic identification and measurement of DC voltage.
- Connect the red test lead to the positive (+) terminal and the black test lead to the negative (-) terminal of the DC source.
- The multimeter will automatically display the DC voltage.
6.5 Resistance Measurement

This image shows the BSIDE ADMS7 Multimeter performing a resistance test. The display reads "88 Ω", indicating a resistance value of 88 ohms. The multimeter's test leads are placed on components of a circuit board, demonstrating its ability to automatically measure resistance.
- Ensure the circuit or component is de-energized before measuring resistance.
- Connect the test leads across the component or circuit where resistance is to be measured.
- The multimeter will automatically display the resistance value in Ohms (Ω).
6.6 V-Alert (Non-Contact Voltage Detection)

This image highlights the V-Alert function of the BSIDE ADMS7 Multimeter. The multimeter's screen displays "V-Alert Live", indicating the detection of live voltage without direct contact. A table is included, explaining the different alert ranges: "Low range" (L area, slow alarm), "Mid-range" (M area, quick alarm), and "High-range" (H area, very loud alarm), corresponding to the intensity of the detected voltage field.
The V-Alert function allows for non-contact detection of AC voltage. This is useful for quickly identifying live wires without direct contact.
- Activate the V-Alert mode (if not automatically engaged).
- Bring the top end of the multimeter close to the wire or outlet you wish to test.
- The display will show "V-Alert" and an analog bar graph will indicate the strength of the detected voltage. An audible alarm will also sound, with intensity varying based on voltage strength (as per the table in the image).
6.7 HOLD Function
Press the "HOLD" button to freeze the current reading on the display. Press it again to release the hold and resume live readings.
7. Operating Instructions (AVD06 Voltage Detector)

This image displays the AVD06 Voltage Detector, showcasing its ergonomic design, sensitivity adjustment dial, and LED indicator lights. The device is designed for non-contact voltage detection, providing a safe way to identify live electrical circuits.

This image demonstrates the AVD06 Voltage Detector's capability to distinguish between live and neutral wires within complex electrical wiring. Two panels show the detector's LED indicators: on the left, it indicates a "Neutral Wire" with fewer lit LEDs, and on the right, it indicates a "Live Wire" with more lit LEDs and a stronger alert, providing clear visual feedback for wire identification.
The AVD06 is a non-contact voltage detector used to quickly check for the presence of AC voltage in wires, cables, circuit breakers, lighting fixtures, switches, outlets, and more.
- Power On: Turn the rotary switch to the "ON" position. The indicator lights will briefly flash, and a beep may sound, indicating it's ready.
- Sensitivity Adjustment: Use the sensitivity dial to adjust the detection range. Higher sensitivity allows detection from a greater distance, while lower sensitivity requires closer proximity.
- Detection: Bring the tip of the detector close to the object to be tested.
- Indication: If AC voltage is detected, the LED indicators will light up, and an audible alarm will sound. The number of lit LEDs and the frequency of the beep typically increase with the strength of the detected voltage.
- Distinguishing Live/Neutral: When testing a live wire, more LEDs will illuminate, and the alarm will be more frequent/louder. For a neutral wire, fewer LEDs may light up, or the alarm may be less intense, or no detection may occur depending on the circuit.
- Power Off: Turn the rotary switch to the "OFF" position when finished.
8. Maintenance
8.1 Cleaning
Wipe the case with a damp cloth and mild detergent. Do not use abrasives or solvents. Keep the test leads clean and free of debris.
8.2 Battery Replacement (ADMS7 Multimeter)
When the low battery indicator appears on the display, replace the batteries. Open the battery compartment cover on the back of the multimeter, remove the old batteries, and insert new ones of the specified type, observing polarity. Securely close the compartment.
8.3 Storage
If the device is not used for a long period, remove the batteries to prevent leakage. Store the multimeter and detector in a cool, dry place, away from direct sunlight and extreme temperatures.
9. Troubleshooting
- No Display/Power On: Check battery installation and ensure batteries are not depleted. Replace if necessary.
- Inaccurate Readings: Ensure test leads are properly connected. Check battery level. Ensure you are using the correct measurement technique for the circuit.
- No V-Alert Detection: Ensure the V-Alert function is active. Adjust sensitivity if applicable. Ensure the device is close enough to the voltage source.
- Multimeter Does Not Respond: Try turning the device off and on again. If issues persist, contact customer support.
10. Specifications
| Attribute | Value |
|---|---|
| Brand | Unknown |
| Model Number | BSIDE ADMS7 Smart Digital Multimeter |
| Power Source | Battery Powered |
| Style | Digital |
| Measurement Type | Multimeter, Voltmeter |
| UPC | 630282713765 |
| Manufacturer | China |
| First Available | November 26, 2019 |
11. Warranty and Support
For warranty information or technical support, please refer to the product packaging or contact the retailer from whom the product was purchased. Keep your purchase receipt as proof of purchase.


