1. Introduction
This manual provides comprehensive instructions for the safe and efficient operation, installation, and maintenance of your Hotpoint-Ariston NT M11 91WK EU heat pump clothes dryer. Please read this manual thoroughly before using the appliance and retain it for future reference.
2. Safety Information
Always follow basic safety precautions when using electrical appliances to reduce the risk of fire, electric shock, and injury to persons. This appliance is intended for household use only.
- Ensure the appliance is properly grounded.
- Do not dry unwashed items in the tumble dryer.
- Items that have been soiled with substances such as cooking oil, acetone, alcohol, petrol, kerosene, spot removers, turpentine, waxes and wax removers should be washed in hot water with an extra amount of detergent before being dried in the tumble dryer.
- Remove all objects from pockets such as lighters and matches.
- Do not allow children to play with the appliance.
- Unplug the appliance before cleaning or performing any maintenance.
3. Product Overview
The Hotpoint-Ariston NT M11 91WK EU is a heat pump clothes dryer designed for efficient and gentle drying of various fabric types.

Figure 1: Front view of the Hotpoint-Ariston NT M11 91WK EU clothes dryer. This image shows the control panel, loading door, and lower filter access panel.
Key Features:
- Capacity: 9 kg
- Technology: Heat Pump
- Drum Volume: 120 liters
- Interface: BIG DIGIT display
- Energy Efficiency Class: A+
- Noise Level: 67 dB
- Filter: Removable Easy-Cleaning Filter
- Door: Reversible door for flexible installation
- Condensate Drainage: Direct drain compatibility
4. Installation and Setup
Proper installation is crucial for the safe and efficient operation of your dryer. Refer to the separate installation guide for detailed instructions on plumbing and electrical connections.
Placement:
- Place the dryer on a firm, level floor.
- Ensure adequate ventilation around the appliance.
- Do not install the dryer behind a lockable door, a sliding door, or a door with a hinge on the opposite side to that of the tumble dryer, in such a way that a full opening of the tumble dryer door is restricted.

Figure 2: The dryer positioned in a typical laundry room environment, demonstrating appropriate spacing.
Electrical Connection:
Connect the appliance to a properly grounded electrical outlet. The power supply requirements are 220/240 V, 50 Hz, with a 10 A fuse. The electrical cable length is 150 cm.
Condensate Drainage:
The dryer is equipped with a condensate collection tank. For continuous drainage, the appliance supports direct drain compatibility. Refer to the installation guide for instructions on connecting the drain hose.
5. Operating Instructions
This section details how to operate your clothes dryer, including program selection and option usage.
Loading the Dryer:
- Open the loading door.
- Load laundry into the drum, ensuring not to overload. The maximum capacity is 9 kg.
- Close the door firmly.

Figure 3: Interior view of the dryer drum, showing the perforated surface and lifters designed to tumble clothes.

Figure 4: Another perspective of the dryer drum interior, highlighting the design of the lifters for optimal drying performance.
Program Selection:
Turn the program selector dial to choose the desired drying program. The BIG DIGIT display will show relevant information.
Available Programs:
- Fibers:
- Unisex
- Cotton Eco
- Synthetics
- Wool
- Silk
- Extra:
- Anti-Allergy
- Daily
- Plush Toys
- Easy Iron
- Refresh
- Special:
- Duvet
- Home Clothes
- Baby
- Jeans
- Shirts
Options and Keys:
Customize your drying cycle using the available options:
- On/Off: Powers the appliance on or off.
- Start/Pause: Starts or pauses the selected program.
- Anti-Crease: Reduces creasing by periodically tumbling the load after the drying cycle.
- Gentle Temperature: Uses a lower drying temperature for delicate items.
- End Cycle Tone: Activates or deactivates the audible signal at the end of the cycle.
- Drying Time: Allows manual adjustment of drying time for certain programs.
- Delayed Start: Delays the start of the drying cycle.
- Drying Level: Adjusts the desired dryness level (e.g., iron dry, cupboard dry).
- Child Lock: Locks the control panel to prevent accidental changes.
- Quick: Reduces the drying time for smaller loads or less damp items.
- Silence: Operates the dryer at a reduced noise level.
Indicators:
- Drying Level Indicator: Shows the current dryness level.
- Remaining Time Indicator: Displays the estimated time left for the cycle.
- Inner Filter Cleaning Indicator: Illuminates when the lint filter needs cleaning.
- Condenser Filter Cleaning Indicator: Illuminates when the condenser filter needs cleaning.
- Full Tank Indicator: Illuminates when the condensate collection tank is full and needs emptying.
6. Maintenance
Regular maintenance ensures optimal performance and extends the lifespan of your dryer. Always unplug the appliance before performing any maintenance.
Cleaning the Lint Filter:
The lint filter should be cleaned after every drying cycle to maintain efficiency and prevent fire hazards. The "Inner Filter Cleaning Indicator" will illuminate when cleaning is required.
- Open the dryer door.
- Remove the lint filter, usually located inside the door opening.
- Remove any accumulated lint by hand or with a soft brush.
- Rinse the filter under running water if necessary, and ensure it is completely dry before reinserting.
- Reinsert the filter firmly into its position.
Cleaning the Condenser Filter:
The condenser filter requires periodic cleaning, typically every few cycles or when the "Condenser Filter Cleaning Indicator" illuminates.
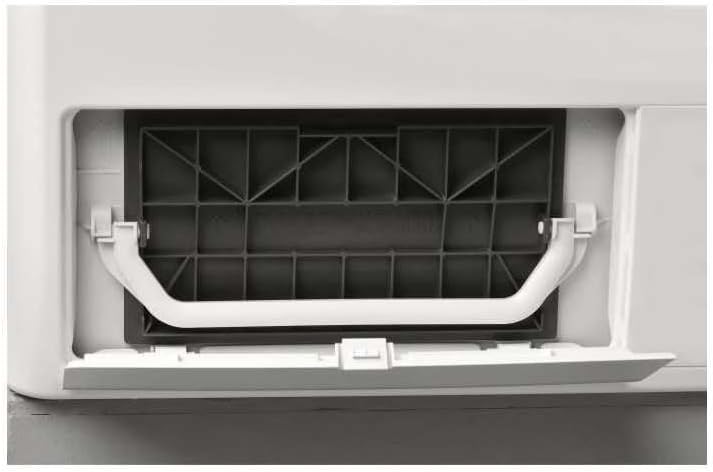
Figure 5: The lower access panel for the condenser filter, shown partially open.
- Open the lower access panel at the front of the dryer.
- Release the latches and carefully pull out the condenser filter unit.
- Remove any lint or debris from the filter using a soft brush or vacuum cleaner.
- Rinse the filter under running water if heavily soiled, and allow it to dry completely.
- Reinsert the condenser filter unit and close the access panel securely.

Figure 6: The condenser filter unit, detached from the dryer, illustrating its design for trapping lint and debris.
Emptying the Condensate Tank:
The condensate tank collects water extracted from the laundry. Empty it when the "Full Tank Indicator" illuminates. If using direct drainage, this step is not necessary.
- Carefully pull out the condensate tank, usually located at the top left of the control panel.
- Pour the collected water into a sink.
- Reinsert the tank firmly until it clicks into place.
7. Troubleshooting
This section provides solutions to common issues you might encounter with your dryer. For more complex problems, contact customer support.
| Problem | Possible Cause | Solution |
|---|---|---|
| Dryer does not start. | No power supply; Door not closed; Program not selected; Child lock active. | Check power plug and fuse; Ensure door is firmly closed; Select a program and press Start/Pause; Deactivate child lock. |
| Clothes are not drying properly. | Lint filter clogged; Condenser filter clogged; Overloaded dryer; Incorrect program selected. | Clean lint filter; Clean condenser filter; Reduce load size; Select appropriate program. |
| "Full Tank" indicator is on. | Condensate tank is full. | Empty the condensate tank. |
| Excessive noise during operation. | Dryer not level; Foreign objects in drum. | Adjust leveling feet; Check drum for loose items. |
8. Technical Specifications
Detailed technical specifications for the Hotpoint-Ariston NT M11 91WK EU clothes dryer.
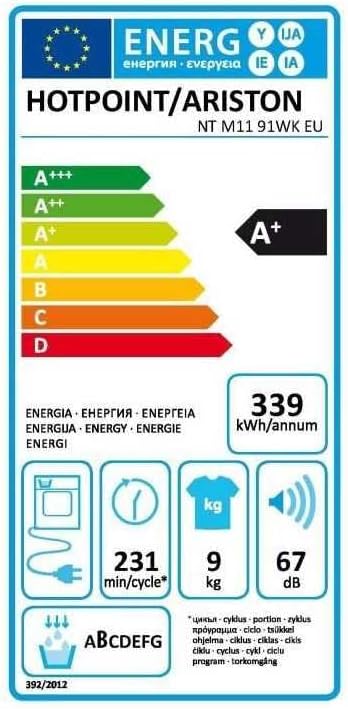
Figure 7: The energy label for the Hotpoint-Ariston NT M11 91WK EU, indicating an A+ energy efficiency rating, 339 kWh/annum consumption, 9 kg capacity, and 67 dB noise level.
| Specification | Value |
|---|---|
| Model Number | NT M11 91WK EU (NTM1191WKEU) |
| Brand | Hotpoint-Ariston |
| Type | Heat Pump Clothes Dryer |
| Capacity | 9 kg |
| Drum Volume | 120 liters |
| Energy Efficiency Class | A+ |
| Annual Energy Consumption | 339 kWh/year |
| Standard Cotton Program Duration | 231 min/cycle |
| Noise Level | 67 dB |
| Condensation Efficiency Class | B |
| Dimensions (HxWxD) | 84.9 x 59.5 x 65.5 cm |
| Net Weight | 44 kg |
| Heating Power | 850 W |
| Power Supply | 220-240 V / 50 Hz |
| Fuse | 10 A |
| Electrical Cable Length | 150 cm |
9. Warranty and Support
For warranty information, please refer to the warranty card included with your product or visit the official Hotpoint website. For technical support, spare parts, or service requests, please contact Hotpoint customer service.
You can find more information and support on the Hotpoint Brand Store.


