1. Introduction
This manual provides detailed instructions for the installation, operation, and maintenance of your Hysoon HY-C129A-WIFI Biometric Time and Attendance System. This device is designed for efficient presence control using fingerprint identification, RFID cards, and password authentication. It features a 2.4-inch TFT color screen and supports TCP/IP, WiFi, and USB Flash communication for data management.
2. Product Features
- Multiple Identification Modes: Fingerprint, RFID Card (125KHz), Password, and combinations thereof.
- High Capacity: Supports up to 2,000 users and stores up to 160,000 attendance records.
- Display: 2.4-inch TFT color screen (320x240 pixels) for clear interface.
- Connectivity: TCP/IP, WiFi, and USB Flash for flexible data transfer.
- Integrated Keyboard: Mechanical button keyboard for input and navigation.
- Fast Recognition: Fingerprint recognition time less than 0.5 seconds.
- Management Software: Includes free ETime Management Software for comprehensive control of schedules, shifts, and cycles.
3. Package Contents
Please verify that all items are present in the package:
- Hysoon HY-C129A-WIFI Biometric Time and Attendance System Unit
- Power Adapter (DC 5V/1.0A)
- Mounting Plate and Screws
- User Manual (this document)
- ETime Management Software CD/Download Link
4. Physical Description
Familiarize yourself with the components of the device:
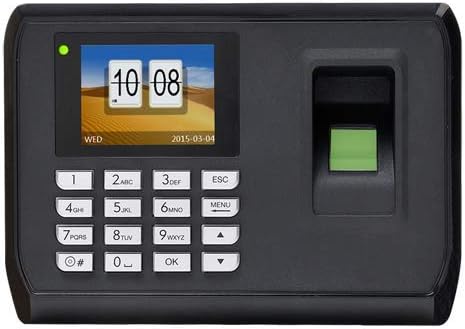
Figure 4.1: Front View (Screen On)
This image shows the front of the Hysoon HY-C129A-WIFI device. It features a 2.4-inch color TFT screen displaying the current time and date, a numeric keypad for input, and a fingerprint scanner on the right side with a green indicator light.
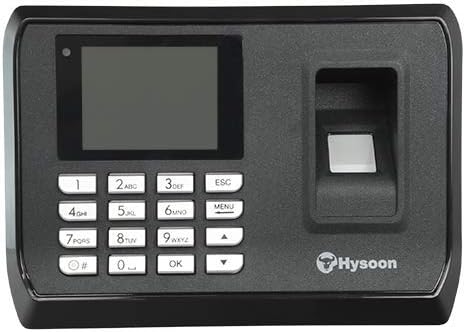
Figure 4.2: Front View (Screen Off)
This image presents the front of the device with the screen powered off. The numeric keypad and fingerprint scanner are visible, along with the Hysoon brand logo located below the scanner.

Figure 4.3: Side View
This image displays the side profile of the Hysoon HY-C129A-WIFI device, illustrating its depth and overall form factor.

Figure 4.4: Bottom/Rear Ports View
This image shows the bottom edge of the device, where the connectivity ports are located. From left to right, these include the DC 5V power input, a USB-DISK port for data transfer, and an Ethernet (RJ45) port for TCP/IP network connection.
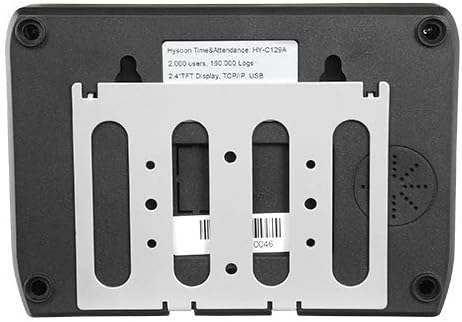
Figure 4.5: Back View with Mounting Bracket
This image shows the rear of the device, featuring the integrated mounting bracket for wall installation. A product label with model information and specifications is also visible.
5. Setup
5.1. Mounting the Device
- Select a suitable location for installation, ensuring it is easily accessible for users and protected from direct sunlight or moisture.
- Use the provided mounting plate (refer to Figure 4.5) as a template to mark the drilling points on the wall.
- Drill holes and insert wall plugs if necessary.
- Secure the mounting plate to the wall using the supplied screws.
- Carefully attach the HY-C129A-WIFI unit to the mounting plate, ensuring it is securely fastened.
5.2. Power Connection
Connect the supplied DC 5V/1.0A power adapter to the power input port on the bottom of the device (refer to Figure 4.4). Plug the adapter into a standard electrical outlet. The device will power on automatically.
5.3. Network Connection
The device supports both wired (TCP/IP) and wireless (WiFi) network connections.
5.3.1. Wired (TCP/IP) Connection
- Connect an Ethernet cable from your network router or switch to the RJ45 port on the bottom of the device (refer to Figure 4.4).
- Configure the IP address settings via the device's menu (Menu > Comm. Settings > TCP/IP).
5.3.2. Wireless (WiFi) Connection
- Navigate to the device's menu (Menu > Comm. Settings > WiFi).
- Enable WiFi and scan for available networks.
- Select your desired network and enter the password using the keypad.
- Confirm the connection.
5.4. Software Installation (ETime Management Software)
Install the ETime Management Software on your PC using the provided CD or download link. Follow the on-screen instructions to complete the installation. This software is essential for advanced user management, data reporting, and system configuration.
6. Operating Instructions
6.1. Initial Administrator Setup
Upon first power-on, it is recommended to set up an administrator account. This account will have full access to the device's menu and settings.
- Press the MENU button.
- If prompted, register the first fingerprint or enter a password to become the initial administrator.
- Navigate to "User Management" to add more administrators or regular users.
6.2. User Registration
Users can be registered using fingerprints, RFID cards, or passwords.
6.2.1. Registering a Fingerprint
- Access the menu (requires administrator privileges).
- Go to "User Management" > "New User".
- Enter a User ID.
- Select "Fingerprint" and follow the on-screen prompts to scan the user's finger multiple times for accurate registration.
- Save the user profile.
6.2.2. Registering an RFID Card
- Access the menu (requires administrator privileges).
- Go to "User Management" > "New User".
- Enter a User ID.
- Select "Card" and present the RFID card to the device's card reader.
- Save the user profile.
6.2.3. Registering a Password
- Access the menu (requires administrator privileges).
- Go to "User Management" > "New User".
- Enter a User ID.
- Select "Password" and enter a numeric password using the keypad. Confirm the password.
- Save the user profile.
6.3. Recording Attendance
To record attendance, users simply present their registered fingerprint, RFID card, or enter their password on the device. A confirmation message will appear on the screen, and a voice prompt will confirm the successful record.
6.4. Data Management
Attendance records can be managed and exported using the following methods:
- USB Flash Drive: Insert a USB flash drive into the USB-DISK port (refer to Figure 4.4). Navigate to the menu option for data export (e.g., "Data Management" > "Download Records") to transfer attendance logs.
- ETime Management Software: Connect the device to your PC via TCP/IP or WiFi. Use the ETime software to download, manage, and generate reports from the attendance data.
7. Maintenance
7.1. Cleaning
Regularly clean the fingerprint sensor and screen with a soft, dry, lint-free cloth. Avoid using abrasive cleaners, solvents, or spraying liquids directly onto the device.
7.2. Data Backup
It is recommended to regularly back up attendance data and user information to prevent data loss. Use the ETime Management Software or a USB flash drive for this purpose.
8. Troubleshooting
- Device does not power on:
Ensure the power adapter is correctly connected to the device and a working power outlet. Verify the power adapter is the correct voltage (DC 5V/1.0A).
- Fingerprint recognition failure:
Ensure the finger is clean and dry. Place the entire pad of the finger flat on the sensor. If issues persist, re-register the fingerprint. Check if the sensor is clean.
- Cannot connect to network (TCP/IP or WiFi):
For TCP/IP, check the Ethernet cable connection and IP settings. For WiFi, ensure the correct network is selected and the password is entered accurately. Verify network availability and signal strength.
- Data transfer issues:
For USB, ensure the USB flash drive is formatted correctly (FAT32) and functioning. For software, verify network connectivity between the device and the PC running ETime software.
- Screen is blank or unresponsive:
Try restarting the device by disconnecting and reconnecting the power. If the issue persists, contact technical support.
9. Specifications
| Feature | Specification |
|---|---|
| Brand | Hysoon |
| Model | HY-C129A-WIFI |
| CPU | 320 MHz |
| Identification Modes | Fingerprint, EM RFID Card (125KHz), Password |
| User Capacity | Up to 2,000 users |
| Record Capacity | Up to 160,000 logs |
| Recognition Speed | <0.5 sec |
| FAR (False Acceptance Rate) | <0.0001% |
| FRR (False Rejection Rate) | <1% |
| Screen | 2.4" TFT color (320x240 pixels) |
| Communication | USB PC, TCP/IP, WiFi |
| Software | Free ETime Management Software |
| Power Supply | DC 5V/1.0A |
| Operating Temperature | 0°C ~ 45°C |
| Dimensions (Fo x W x H) | 43 x 195 x 135 mm |
| Weight | 500 grams |
10. Warranty and Support
For warranty information and technical support, please refer to the documentation provided with your purchase or contact your local Hysoon distributor. Keep your proof of purchase for warranty claims.


