
1. Product Overview
The LABOREDUCER LED Under Cabinet Lighting Kit provides efficient and adjustable illumination for various indoor spaces. This kit includes six 11-inch LED light bars designed for installation under cabinets, shelves, or in closets. It offers cold white 6000K light, is dimmable, and can be linked in series or parallel to suit different layout requirements. The system supports both plug-in and hardwired installation methods.
- High Quality Materials: Features aluminum frames and PCBs with heat-sinks for durability and effective heat dissipation.
- Flexible Installation: Can be connected via plug-in to an outlet or hardwired directly to an electrical source.
- Dimmable Functionality: Includes a rotary dimmer switch for brightness adjustment from 0% to 100%.
- Easy Installation: Designed for quick setup with included mounting hardware and extension cords.
- Energy Efficient: Each 3W LED light bar contributes to a total of 18W for the 6-pack, providing significant energy savings.
2. Safety Information
- Ensure power is disconnected before installation or maintenance to prevent electrical shock.
- This product is designed for indoor use only. Do not expose to moisture or wet conditions.
- Do not attempt to modify or disassemble the light bars or power adapter.
- Keep away from flammable materials.
- If any damage is observed, discontinue use immediately and contact customer support.
3. Package Contents
Verify that all components listed below are present in your package:

Figure 3.1: Included Components
- 6 x 24V LED Strip Lights (11-inch each)
- 18 x Strong Adhesive Stickers
- 1 x Rotary Switch Dimmer
- 4 x 5ft Extension Cords
- 12 x Metal Clips
- 12 x Screws
- 20 x Cable Clips
- 1 x 6-Way Splitter
- 1 x 24V 1A Power Adapter
- 1 x US Plug
4. Setup and Installation
4.1 Planning Your Layout
Before installation, plan the placement of each LED light bar and the routing of cables to ensure optimal lighting coverage and a neat appearance. Consider the length of extension cords and the location of the power source.

Figure 4.1: Product Dimensions
4.2 Mounting the Light Bars
There are two primary methods for mounting the LED light bars:
- Adhesive Mounting: Clean the surface where the light bar will be mounted. Peel the backing from the strong adhesive stickers and firmly press them onto the back of the light bar. Then, press the light bar onto the desired surface.
- Screw Mounting with Metal Clips: Position the metal clips at the desired locations for the light bar. Mark the screw holes, drill pilot holes if necessary, and secure the clips with the provided screws. Snap the LED light bars into the secured metal clips.
4.3 Connecting the Lights
The LED light bars can be linked in parallel or series using the provided extension cords and 6-way splitter.
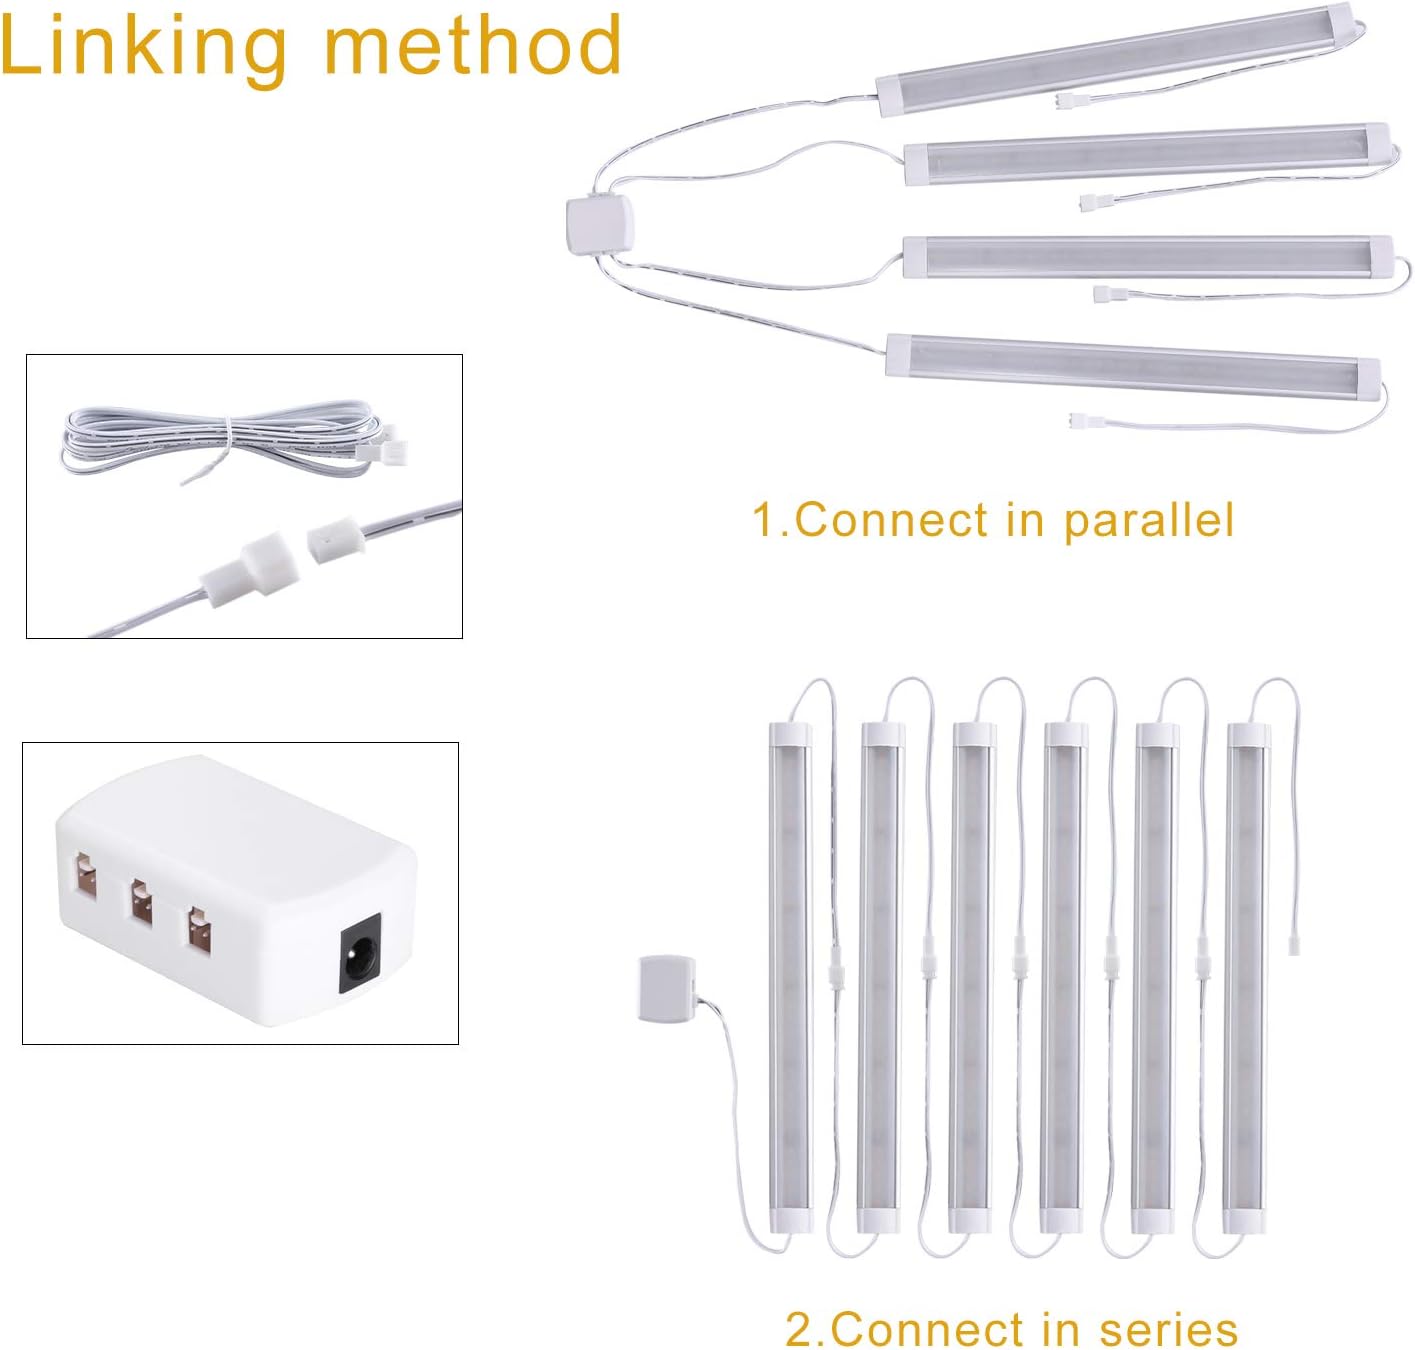
Figure 4.2: Linking Methods
- Parallel Connection: Connect multiple light bars to the 6-way splitter. The splitter then connects to the power adapter. This method ensures consistent brightness across all connected lights.
- Series Connection: Connect light bars directly to each other using the short connectors or extension cords. The last light bar in the chain connects to the power adapter. Note that while the 24V system minimizes voltage drop, very long series connections might show slight brightness variations.
4.4 Power Connection
Choose between plug-in or hardwired installation:
- Plug-in Installation: Connect the rotary dimmer switch to the power adapter, then connect the power adapter to the main light assembly (either directly or via the 6-way splitter). Plug the US plug into a standard 100-240V AC wall outlet.
- Hardwired Installation: For a permanent installation, the AC plug can be removed from the power adapter cable, and the wires can be directly connected to an electrical outlet or junction box by a qualified electrician. Ensure all local electrical codes are followed.
Use the provided cable clips to neatly route and secure all wires.
5. Operating Instructions
The LABOREDUCER LED Under Cabinet Lighting Kit is operated using the included rotary dimmer switch.
- Turning On/Off: The rotary dimmer switch also functions as an on/off switch. Rotate the knob clockwise until you hear a click to turn the lights on. Rotate counter-clockwise until you hear a click to turn them off.
- Adjusting Brightness: Once the lights are on, rotate the knob clockwise to increase brightness and counter-clockwise to decrease brightness. The dimmer allows for adjustment from 0% to 100% illumination.
- Memory Function: The dimmer switch retains the last brightness setting when the lights are turned off and on again using the switch.
6. Maintenance
To ensure the longevity and optimal performance of your LABOREDUCER LED Under Cabinet Lighting Kit, follow these simple maintenance guidelines:
- Cleaning: Disconnect power before cleaning. Use a soft, dry cloth to gently wipe the light bars and other components. Avoid using abrasive cleaners, solvents, or excessive moisture, as these can damage the product.
- Inspection: Periodically check all connections and mounting points to ensure they are secure. Inspect cables for any signs of wear or damage.
- LED Lifespan: The LED lights are designed for long-term use and do not require bulb replacement.
7. Troubleshooting
If you encounter issues with your lighting kit, refer to the following troubleshooting steps:
- Lights do not turn on:
- Ensure the power adapter is securely plugged into a working electrical outlet.
- Verify all connections between the light bars, splitter, dimmer, and power adapter are firm.
- Check if the rotary dimmer switch is turned to the 'on' position (clockwise click).
- Lights flicker or are dim:
- Adjust the rotary dimmer switch to increase brightness.
- Ensure the power adapter is receiving adequate power.
- Check for loose connections.
- Some lights are not working:
- Inspect the connections to the non-working light bar.
- If connected in series, a faulty connection or light bar in the chain can affect subsequent lights. Test individual light bars if possible.
- Lights take 1-2 seconds to turn on:
- This is a known characteristic for some LED drivers and is generally not indicative of a fault.
If the problem persists after attempting these steps, please contact LABOREDUCER customer support.
8. Specifications
| Feature | Detail |
|---|---|
| Brand | LABOREDUCER |
| Model Number | 619960891223 |
| Light Color | Cold White 6000K |
| Material | Aluminum, Plastic |
| Product Dimensions | 11"L x 4"W x 1"H (per light bar) |
| Number of Light Sources | 6 |
| Wattage | 3 watts (per light bar), 18W total |
| Voltage | 110 Volts (input), 24V (output) |
| Brightness | 1800 Lumen (total) |
| Efficiency | 100 lumens per watt |
| Installation Type | Plug In / Hardwired |
| Special Features | Dimmable, Energy Efficient, Low Voltage, Wired, Linkable |
| Control Method | Rotary Dimmer Switch |
| Indoor/Outdoor Usage | Indoor |
| Item Weight | 1.83 pounds (total package) |
9. Warranty and Support
This LABOREDUCER product comes with a 2-year limited warranty. This warranty covers defects in materials and workmanship under normal use.
For warranty claims, technical assistance, or any questions regarding your product, please contact LABOREDUCER customer support through the retailer's platform or the official brand website.
Please have your model number (619960891223) and purchase date available when contacting support.
