
Ralbay 1089
Ralbay 40-inch Modern LED Black Vanity Light
Model: 1089
1. Introduction
Thank you for choosing the Ralbay 40-inch Modern LED Black Vanity Light. This manual provides essential information for the safe installation, operation, and maintenance of your new lighting fixture. Please read it thoroughly before beginning installation and retain it for future reference.

Image 1.1: Ralbay 40-inch Modern LED Black Vanity Light.
2. Safety Information
Always follow basic safety precautions when installing and operating electrical products. This fixture is designed for indoor use only. Ensure the power is turned off at the circuit breaker before installation or maintenance. If you are unsure about electrical wiring, consult a qualified electrician.
- Do not connect to a dimmer switch unless explicitly stated as dimmable. (Note: This model is not listed as dimmable in specifications, but customer reviews mention dimming. For safety, assume non-dimmable unless confirmed by manufacturer.)
- Do not modify the fixture in any way.
- Keep away from water and moisture.
- Handle with care to avoid damage to the LED components.
3. Package Contents
Verify that all components are present before beginning installation:
- Vanity Lamp (1 unit)
- Set Screw (quantity as needed for installation)
- Installation Instruction (this manual)
4. Product Features and Dimensions
The Ralbay LED Vanity Light features a modern, minimalist design with high-quality aluminum construction and a frosted acrylic lampshade for soft, uniform light. It is waterproof and anti-fog, designed to resist rust.

Image 4.1: Key features of the Ralbay Vanity Light, including its aluminum construction and frosted acrylic diffuser.
Dimensions:
- Length: 39.4 inches (100 cm)
- Width: 4.3 inches (11 cm)
- Extension from wall: 3.4 inches (8.6 cm)
- Height: 4.33 inches (11 cm)

Image 4.2: Detailed dimensions of the light fixture.
5. Setup and Installation
This fixture is hardwired and designed for wall mount installation. It does not have a switch or plug on the fixture itself. Installation should be done according to local electrical codes.
Installation Steps:
- Prepare the Mounting Area: Drill two holes and mount the drop-in anchor, fixing the mounting bracket with M4 screws. Ensure the mounting surface is secure and can support the fixture's weight.
- Electrical Connection: Connect the fixture to 110V AC power. Pay attention to the side of Neutral (N), Live (L), and Earth (ground) wires; they should be connected correctly.
- Secure the Lamp: Fix the lamp to the bracket using the supplied screws.
- Final Check: Ensure all connections are secure and the fixture is firmly mounted before restoring power.
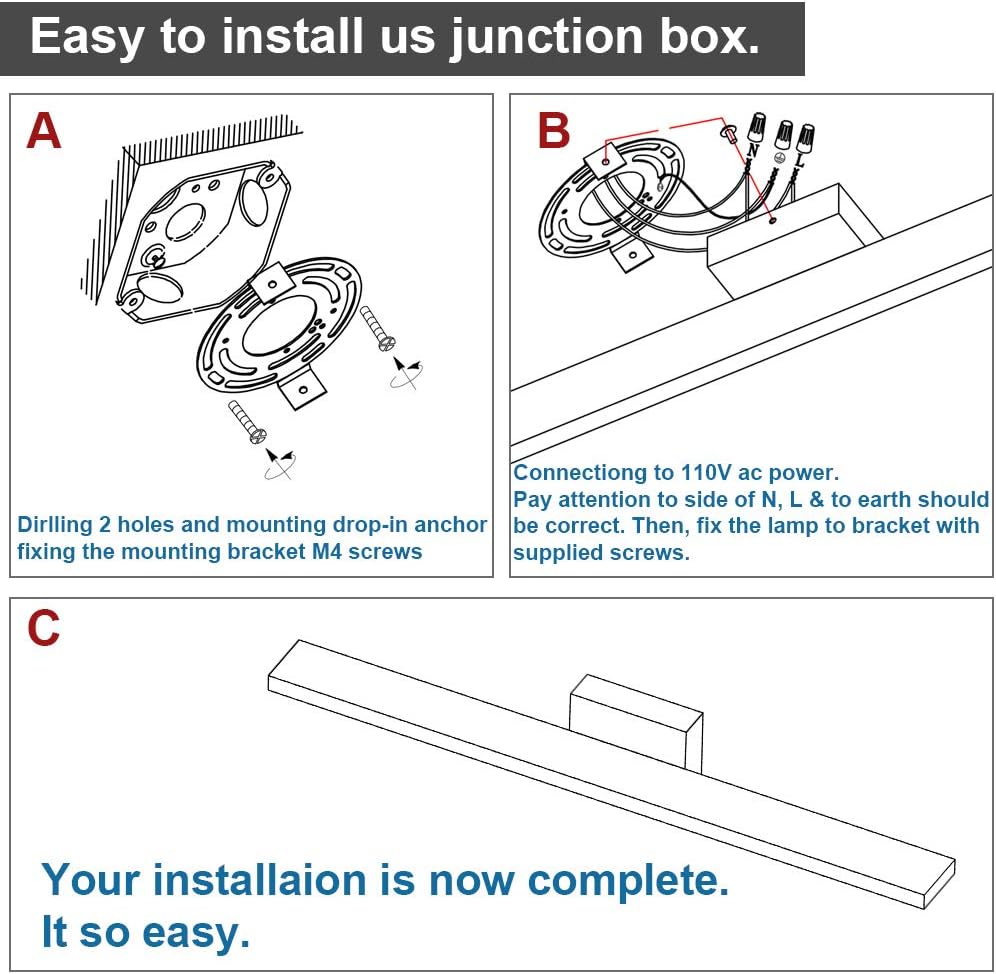
Image 5.1: Installation guide for the Ralbay Vanity Light.
6. Operating Instructions
Once properly installed and wired, the Ralbay LED Vanity Light operates by a standard wall switch connected to your electrical circuit. It provides a cool white light at 6000K with a brightness of 3600 Lumens.

Image 6.1: Illustration of the light distribution when the fixture is on.
The fixture is designed to provide instant illumination without flickering. Its integrated LED source ensures energy efficiency and a long lifespan.
7. Maintenance
To ensure the longevity and optimal performance of your Ralbay LED Vanity Light, follow these simple maintenance guidelines:
- Cleaning: Before cleaning, ensure the power is turned off at the circuit breaker. Use a soft, dry cloth to wipe the surface of the fixture. For stubborn spots, a slightly damp cloth with mild soap can be used, followed by drying immediately. Avoid abrasive cleaners, solvents, or harsh chemicals as they may damage the finish or acrylic.
- No User-Serviceable Parts: The LED components are integrated and not user-replaceable. Do not attempt to disassemble the fixture.
- Regular Inspection: Periodically check the fixture for any signs of damage or loose connections. If any issues are found, turn off the power and consult a qualified electrician.
8. Troubleshooting
If you encounter any issues with your Ralbay LED Vanity Light, refer to the following common troubleshooting steps:
| Problem | Possible Cause | Solution |
|---|---|---|
| Light does not turn on. | No power to the fixture; loose wiring; faulty wall switch. | Check circuit breaker. Ensure all wiring connections are secure. Test the wall switch. |
| Light flickers. | Loose wiring connection; incompatible dimmer switch (if used). | Check all wiring connections. If using a dimmer, ensure it is LED-compatible and rated for the fixture's wattage. |
| Light is dim or inconsistent. | Voltage drop; faulty LED driver (internal). | Verify proper voltage supply. If problem persists, contact customer support. |
If these steps do not resolve the issue, please contact Ralbay customer support for assistance.
9. Specifications
| Attribute | Value |
|---|---|
| Brand | Ralbay |
| Model Number | 1089 |
| Color | Black |
| Material | Acrylic, Aluminum |
| Style | Modern |
| Product Dimensions | 39.37"L x 3.39"W x 4.33"H |
| Power Source | Corded Electric |
| Installation Type | Wall Mount |
| Light Source Type | LED |
| Voltage | 110 Volts |
| Light Color | Cool White (6000K) |
| Wattage | 36 watts |
| Brightness | 3600 Lumen |
| Lifespan | Up to 50,000 hours |
| Indoor/Outdoor Usage | Indoor |
10. Warranty and Support
Ralbay Team 100% guarantees to always provide the best quality product. If you have any problems when using it, our customer service will solve your problem within 24 hours. Please contact us through the retailer's platform or visit the official Ralbay website for support.
For more information, visit the Ralbay Store.
Ask a question about this manual
Ask about setup, troubleshooting, compatibility, parts, safety, or missing instructions. Manuals+ will review the question and use this page’s manual context to help answer it.