
1. Introduction
Thank you for choosing the FOTGA A70T 7-inch FHD IPS On-Camera Field Monitor. This manual provides essential information for the safe and correct operation of your device. Please read this manual thoroughly before use and retain it for future reference. The A70T monitor is designed to enhance your video production workflow with its high-resolution display, versatile connectivity, and user-friendly interface.
2. Product Overview
2.1 Key Features
- 7-inch FHD IPS Display: 1920x1080 resolution with a wide 178-degree viewing angle and 450cd/m2 brightness.
- Touch Screen Control: Intuitive touch interface complemented by physical buttons for quick operation.
- 4K HDMI Input/Output: Supports 4K video signals for broad compatibility with cameras and camcorders.
- Dual NP-F Battery Plate: Extends operating time with two NP-F series batteries. Also supports AC power.
- Audio Output: Includes 3.5mm headphone jack and a built-in loudspeaker.
- Firmware Upgrade: USB port for convenient firmware updates.
- Multiple Mounting Points: 1/4", 3/8", M6 threads, and a cold shoe connector for flexible mounting.
2.2 Monitor Components
Familiarize yourself with the various parts of your FOTGA A70T monitor.

Figure 2.2.1: Front view of the FOTGA A70T monitor, showing the 7-inch IPS display and the FOTGA branding on the right side. HDMI IN and HDMI OUT ports are labeled on the left side, and SDI IN and SDI OUT on the right.

Figure 2.2.2: Angled front view of the FOTGA A70T monitor, highlighting the top control buttons (F-buttons, power) and the side ports for HDMI and SDI connections.
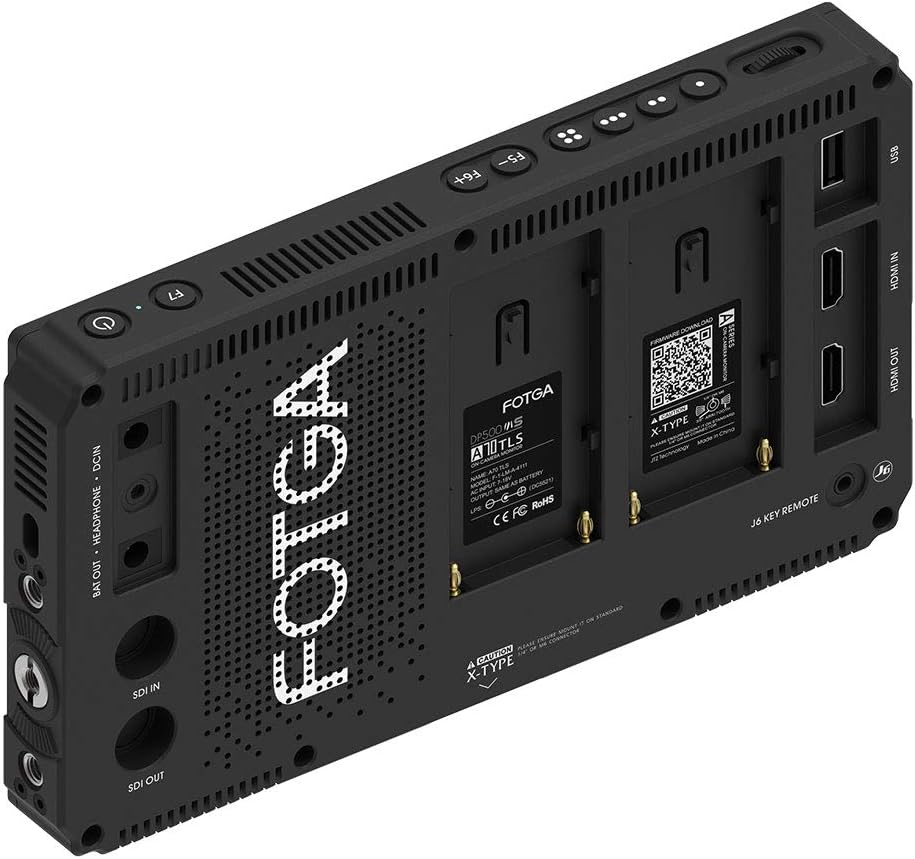
Figure 2.2.3: Rear view of the FOTGA A70T monitor, displaying the dual NP-F battery plates, USB port, HDMI IN/OUT, SDI IN/OUT, DC IN, and headphone jack. A QR code for firmware download is visible on the battery plate area.
3. Setup
3.1 Powering the Monitor
The FOTGA A70T monitor can be powered by two methods:
- NP-F Series Batteries: Insert two compatible NP-F series batteries (e.g., NP-F970, F550, F570, F770, F750) into the dual battery plates on the rear of the monitor. Ensure they are securely latched.
- AC Power Adapter: Connect a compatible DC power adapter (not included) to the DC IN port on the side of the monitor.
The monitor also supports powering your camera via a compatible adapter plate (sold separately) using the BAT OUT port.

Figure 3.1.1: Detailed rear view showing the dual NP-F battery plates and various input/output ports including DC IN, BAT OUT, HDMI IN/OUT, SDI IN/OUT, and USB.
3.2 Connecting to a Camera
Connect your camera or video source to the monitor using an HDMI cable. The A70T supports 4K HDMI input.
- Connect one end of an HDMI cable to the HDMI output port of your camera.
- Connect the other end of an HDMI cable to the HDMI IN port on the FOTGA A70T monitor.
- If you need to loop out the signal to another monitor, connect an HDMI cable from the HDMI OUT port of the A70T to your secondary display.
- For SDI connections, use the SDI IN and SDI OUT ports as required.
3.3 Mounting the Monitor
The monitor offers multiple mounting options:
- 1/4" and 3/8" Screw Threads: Located on the bottom and sides for attaching to camera cages, magic arms, or tripods.
- Cold Shoe Connector: For direct attachment to a camera's hot shoe or cold shoe mount.
- M6 Thread: Additional mounting point for specific accessories.
Ensure the monitor is securely mounted to prevent accidental drops.

Figure 3.3.1: The FOTGA A70T monitor shown with an attached sun hood, demonstrating its use in bright conditions. The sun hood helps improve screen visibility outdoors.
4. Operating Instructions
4.1 Power On/Off
Press and hold the power button (usually located on the top right) for a few seconds to turn the monitor on or off.
4.2 Touch Screen and Button Control
The A70T monitor supports both touch screen and physical button operation.
- Touch Screen: Navigate menus, adjust settings, and activate functions by tapping or swiping on the screen.
- Physical Buttons: Use the F-buttons (F1-F7) on the top panel for quick access to custom functions. The menu button allows entry into the main settings menu.
Refer to the on-screen interface for specific touch gestures and button assignments.
4.3 Menu Navigation and Settings
Access the main menu by pressing the dedicated menu button or by a specific touch gesture (e.g., swiping from the edge of the screen). Within the menu, you can adjust various parameters:
- Display Settings: Brightness, contrast, saturation, backlight.
- Input Source: Select between HDMI and SDI inputs.
- Assist Functions: Peaking, false color, zebra, histogram, aspect ratio, center marker, safe frames, etc.
- Audio Settings: Volume control for headphone and loudspeaker output.
- System Settings: Language, firmware version, factory reset.
4.4 Firmware Upgrade
To ensure optimal performance and access to new features, it is recommended to keep your monitor's firmware updated. Firmware updates are typically performed via the USB port.
- Visit the official FOTGA website for the latest firmware: http://fotga.com/download/firmware/monitor
- Download the appropriate firmware file for your A70T monitor.
- Follow the specific instructions provided with the firmware download for the upgrade process. This usually involves placing the firmware file on a USB drive and connecting it to the monitor's USB port.
Always ensure the monitor has sufficient power during a firmware upgrade to prevent interruption.

Figure 4.4.1: The FOTGA A70T monitor configured with an external control box and sun hood, illustrating advanced setup possibilities and the monitor's versatility.
5. Maintenance
5.1 Cleaning
- Screen: Use a soft, lint-free cloth specifically designed for electronics screens. For stubborn smudges, lightly dampen the cloth with water or a screen-cleaning solution. Avoid harsh chemicals.
- Body: Wipe the monitor body with a soft, dry cloth. Do not use abrasive cleaners or solvents.
Always power off and disconnect the monitor from power sources before cleaning.
5.2 Storage
When not in use, store the monitor in a cool, dry place, away from direct sunlight and extreme temperatures. If storing for extended periods, remove batteries to prevent leakage.
6. Troubleshooting
| Problem | Possible Cause | Solution |
|---|---|---|
| Monitor does not power on. | Low or depleted batteries; AC adapter not connected or faulty; power button not pressed correctly. | Charge or replace batteries. Ensure AC adapter is securely connected and functional. Press and hold the power button firmly. |
| No video signal. | Incorrect input source selected; HDMI/SDI cable faulty or loose; camera output not active; incompatible signal format. | Check input source settings on the monitor. Verify cable connections. Ensure camera is outputting video. Check camera's video output settings for compatibility. |
| Screen flickering or distorted image. | Faulty cable; signal interference; monitor settings. | Try a different HDMI/SDI cable. Move away from strong electromagnetic sources. Reset monitor display settings. |
| Touch screen unresponsive. | Temporary software glitch; screen dirty. | Restart the monitor. Clean the screen thoroughly. If problem persists, consider a firmware update or factory reset. |
| No audio output. | Volume too low; headphone not fully inserted; camera not sending audio. | Increase volume in monitor settings. Ensure headphones are fully plugged in. Verify camera is sending audio signal via HDMI/SDI. |
7. Specifications
| Feature | Detail |
|---|---|
| Model Number | A70 |
| Screen Size | 7 inch |
| Screen Type | Wide Color Gamut IPS Display |
| Resolution | 1920x1080 |
| Brightness | 450cd/m2 |
| Contrast Ratio | 1200:1 |
| Viewing Angle | 178 degrees |
| Input/Output | HDMI 4K Input/Output, SDI Input/Output, USB (for firmware) |
| Audio Output | 3.5mm Headphone Jack, Loudspeaker |
| Power Source | Dual NP-F Battery Plate, AC Power Supply |
| Dimensions | 30.9 x 23.4 x 8.8 cm (Package) |
| Weight | 1.05 kg (Package) |
8. Warranty and Support
For warranty information, technical support, or service inquiries, please refer to the warranty card included with your product or visit the official FOTGA website. Keep your purchase receipt as proof of purchase for warranty claims.
Official FOTGA Website: www.fotga.com